Let me tell you, the moment the sweet, nutty aroma of peanut butter and whipped cream mingled in my kitchen, I knew I was onto something dangerously good. The first time I made this creamy no-bake peanut butter pie with crunchy topping, it was during a lazy Sunday afternoon when all I wanted was a dessert that felt indulgent but didn’t require firing up the oven. I was instantly hooked—the kind of moment where you pause, take a deep breath, and just smile because you know you’re onto something truly special.
Years ago, when I was knee-high to a grasshopper, my grandma used to whip up peanut butter treats that everyone in the family adored. This pie somehow reminded me of those nostalgic, cozy afternoons spent around her kitchen table. Honestly, I wish I’d discovered this recipe years ago—it’s a quick, no-fuss way to get that classic peanut butter flavor with a silky texture and a satisfying crunch on top.
My family couldn’t stop sneaking slices off the cooling rack (and I can’t really blame them). Between the smooth filling and that irresistibly crunchy topping, this pie has become a staple for family gatherings and gifting. Whether you’re looking for a sweet treat to brighten up your Pinterest cookie board or a luscious dessert for potlucks, this creamy no-bake peanut butter pie with crunchy topping fits the bill perfectly. Trust me, once you try it, you’re going to want to bookmark this one for all your next dessert emergencies.
Why You’ll Love This Recipe
After testing this creamy no-bake peanut butter pie with crunchy topping more times than I can count (in the name of research, of course), I’ve gathered a few reasons why it stands out from the crowd:
- Quick & Easy: Comes together in under 30 minutes—perfect for busy weeknights or last-minute cravings.
- Simple Ingredients: No fancy grocery trips needed; you likely already have everything in your pantry.
- Perfect for Any Occasion: Whether it’s a cozy dinner, potluck, or holiday morning, this pie fits right in.
- Crowd-Pleaser: Always gets rave reviews from kids and adults alike—seriously, it disappears fast.
- Unbelievably Delicious: The creamy filling combined with the crunchy topping offers a texture and flavor combo that’s pure comfort food.
This isn’t just another peanut butter pie. What makes it special is the perfectly balanced sweetness, the airy but rich texture of the filling, and that crunchy topping that adds a delightful contrast. I like to blend the peanut butter until it’s ultra-smooth, which gives the pie a velvety feel that just melts in your mouth. It’s comfort food reimagined—fast, fuss-free, but still packed with soul-soothing satisfaction. Honestly, it’s the kind of dessert that makes you close your eyes after the first bite and smile.
What Ingredients You Will Need
This recipe uses simple, wholesome ingredients to deliver bold flavor and a satisfying texture without the fuss. Most of these are pantry staples, and you can swap a few out depending on your preferences or what you have on hand.
- For the crust:
- 1 ½ cups graham cracker crumbs (I prefer Honey Maid for a nice sweet crunch)
- 6 tablespoons unsalted butter, melted (adds richness and helps bind the crust)
- 2 tablespoons granulated sugar
- For the peanut butter filling:
- 1 cup creamy peanut butter (smooth, no-stir varieties work best for texture)
- 8 oz cream cheese, softened (room temperature for smooth blending)
- 1 cup powdered sugar (sifts easily for a lump-free filling)
- 1 ½ cups heavy whipping cream (cold, to whip into stiff peaks)
- 1 teaspoon vanilla extract
- For the crunchy topping:
- ½ cup chopped roasted peanuts (unsalted or lightly salted for balance)
- ¼ cup mini chocolate chips (optional, but adds a nice touch)
- 2 tablespoons crushed pretzels (for an extra salty crunch)
If you’re feeling a bit adventurous, you can swap the graham cracker crust for a gluten-free cookie crust or use almond flour for a low-carb option. For dairy-free versions, coconut whipped cream and vegan cream cheese work wonders. The ingredients are flexible, but the peanut butter flavor is the real star here!
Equipment Needed
- 9-inch (23 cm) pie dish (glass or ceramic works best for even chilling)
- Mixing bowls (preferably one large for the filling, one medium for crust)
- Electric mixer or stand mixer (for whipping the cream and blending the filling smoothly)
- Spatula (for folding the whipped cream gently)
- Measuring cups and spoons (accuracy matters for sweetness and texture)
- Food processor or rolling pin (to crush graham crackers if not pre-crumbled)
If you don’t have a stand mixer, a handheld electric mixer works just fine. For crushing the graham crackers, a zip-top bag and rolling pin is a budget-friendly alternative. Just be sure to melt the butter properly and let the crust chill for a solid base.
Preparation Method
- Prepare the crust: In a medium bowl, combine 1 ½ cups graham cracker crumbs, 6 tablespoons melted unsalted butter, and 2 tablespoons granulated sugar. Mix until the crumbs are evenly coated and hold together when pressed. (This should take about 3-5 minutes.)
- Press the crust: Firmly press the crumb mixture into the bottom and slightly up the sides of your 9-inch pie dish. Use the bottom of a measuring cup to get an even, compact layer. Chill the crust in the fridge for at least 15 minutes to set while you prepare the filling.
- Make the peanut butter filling: In a large bowl, beat 8 oz softened cream cheese until creamy and smooth (about 2-3 minutes). Add 1 cup creamy peanut butter and 1 cup powdered sugar, mixing until fully combined and silky. (Don’t rush this part—lumps are no fun!)
- Whip the cream: In a separate chilled bowl, whip 1 ½ cups heavy cream with 1 teaspoon vanilla extract until stiff peaks form. This usually takes about 5-7 minutes with an electric mixer on medium-high speed. You want it fluffy but not grainy.
- Fold the whipped cream into peanut butter mixture: Gently fold the whipped cream into the peanut butter mixture using a spatula, preserving as much air as possible for a light, creamy texture. This step is key—don’t overmix or you’ll lose that lovely fluffiness.
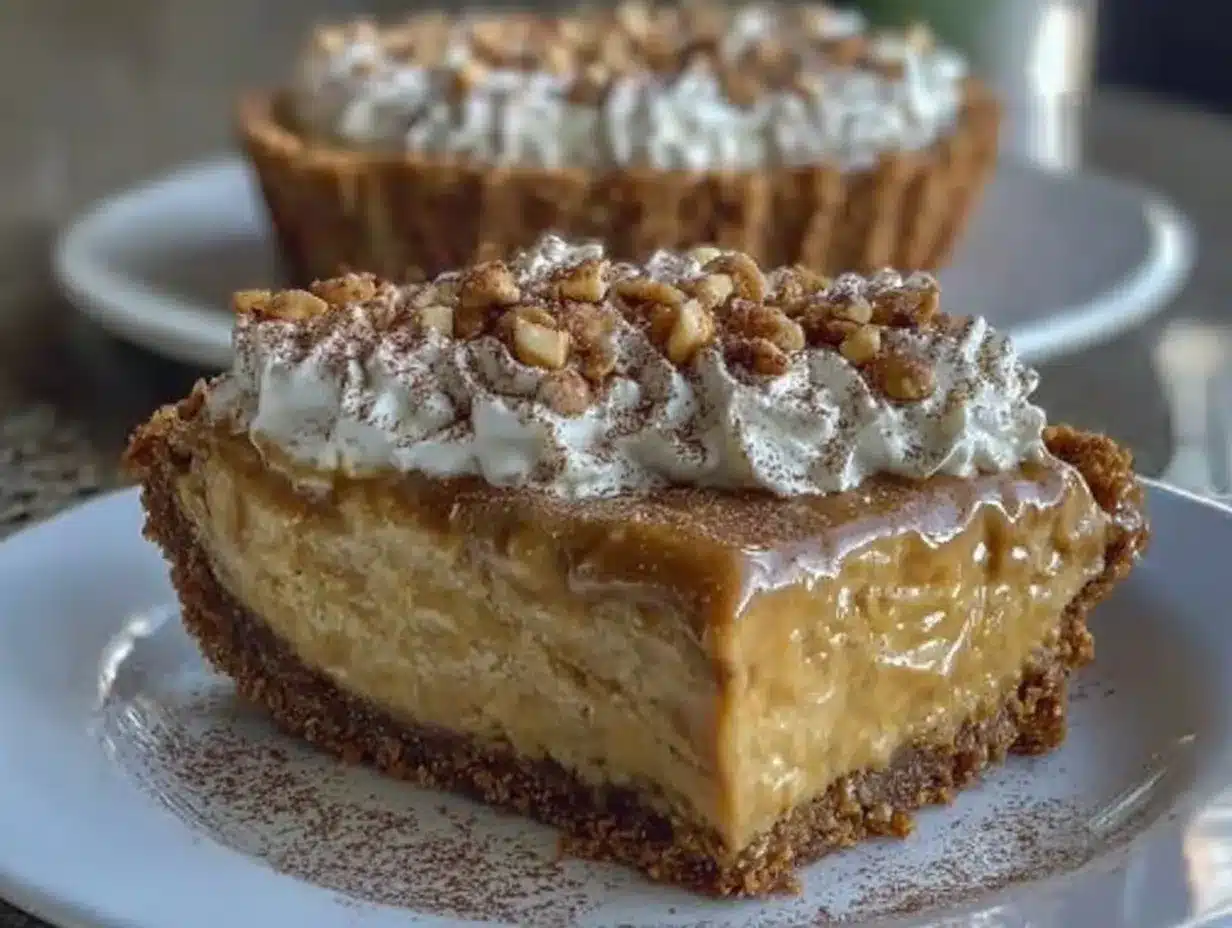
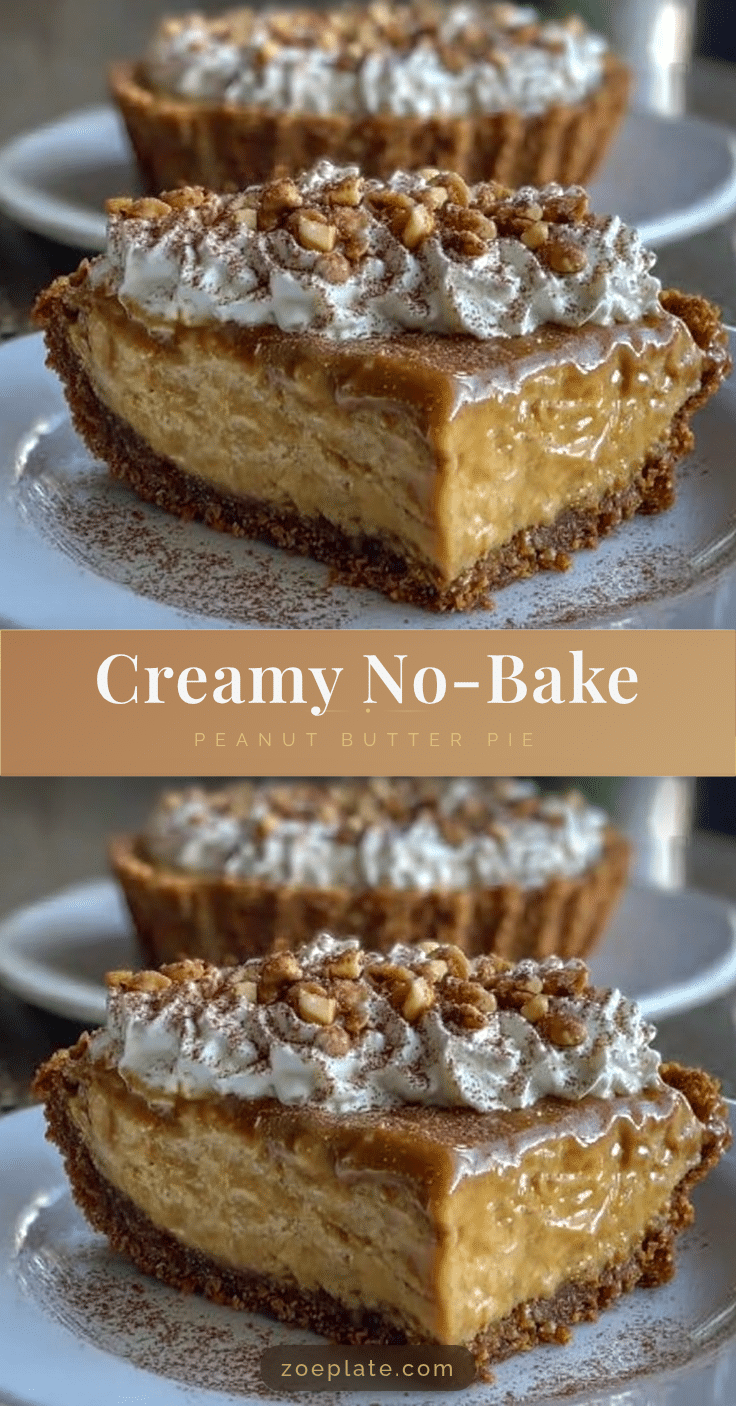
- Assemble the pie: Spoon the creamy peanut butter filling into the chilled graham cracker crust. Smooth the top evenly with a spatula.
- Add the crunchy topping: Sprinkle ½ cup chopped roasted peanuts, ¼ cup mini chocolate chips, and 2 tablespoons crushed pretzels evenly over the top. This gives the pie that perfect crunchy contrast.
- Chill the pie: Cover the pie loosely with plastic wrap and refrigerate for at least 4 hours, preferably overnight. This lets the flavors meld and the filling firm up to slice easily.
You’ll know it’s ready when the edges pull slightly away from the dish, and the filling feels set but still creamy. If your filling is too soft, a little extra chill time usually does the trick.
Cooking Tips & Techniques
Getting this creamy no-bake peanut butter pie just right takes a few tricks I’ve learned through trial and error. For example, always use softened cream cheese at room temperature. Otherwise, you’ll get lumps that are tricky to smooth out. Also, whipping the cream to stiff peaks is crucial—it gives the filling that airy texture instead of a dense, heavy feel.
One common mistake is folding too vigorously. You want to gently fold to keep the whipped cream light and fluffy. Honestly, I’ve done this wrong more times than I care to admit (and ended up with a dense pie). Patience here really pays off.
Timing-wise, prepping the crust first and letting it chill while you make the filling saves precious minutes. Multitasking is your friend! If you’re short on time, you can chill the pie for just 2 hours, but overnight refrigeration yields the best results.
Lastly, for a cleaner cut, dip your knife in hot water before slicing each piece—this prevents sticking and keeps your slices picture-perfect for serving.
Variations & Adaptations
This creamy no-bake peanut butter pie is super versatile, so you can tweak it to suit your preferences or dietary needs. Here are some ideas I’ve tried and loved:
- Chocolate Lover’s Dream: Mix ¼ cup cocoa powder into the peanut butter filling for a rich, chocolate twist.
- Gluten-Free Option: Swap the graham cracker crust for a gluten-free cookie crust or made-from-scratch almond flour crust.
- Vegan Adaptation: Use coconut cream whipped to stiff peaks and vegan cream cheese; substitute the crust with vegan cookie crumbs.
- Seasonal Twist: Top with crushed freeze-dried strawberries or raspberries instead of pretzels for a fruity pop.
- Extra Crunch: Add toasted coconut flakes or chopped toffee bits to the topping mix for an added crunch factor.
I personally love the chocolate version when I’m craving something extra indulgent. Just a heads up—adding cocoa powder makes the filling a bit firmer, so you might want to whip the cream a tad longer to keep it airy.
Serving & Storage Suggestions
This pie is best served chilled straight from the fridge. The creamy filling and crunchy topping create a perfect balance that’s refreshing and satisfying. I like to slice it into generous wedges and serve it with a dollop of whipped cream or a drizzle of chocolate sauce for a little extra flair.
It pairs wonderfully with a cup of strong coffee or cold milk—perfect for a cozy afternoon treat or a casual dinner party dessert. You can also add fresh berries on the side for a burst of color and freshness.
Store leftovers covered in the refrigerator for up to 4 days. The flavors actually deepen after a day or two, so it’s great for prepping ahead. If you want to freeze it, wrap tightly in plastic wrap and foil, then thaw overnight in the fridge before serving. Avoid freezing the crunchy topping separately as it can get soggy.
Reheating isn’t really ideal here, but letting the pie sit at room temperature for 10-15 minutes before serving softens the filling just enough for that perfect creamy bite.
Nutritional Information & Benefits
This creamy no-bake peanut butter pie is a treat, but it also sneaks in some nutritional perks. Peanut butter provides a good dose of protein and healthy fats, which help keep you fuller longer. The cream cheese and heavy cream add richness but also bring calcium and vitamin A to the table.
Per serving (based on 8 slices), you’re looking at approximately 350 calories, 8g protein, 25g fat, and 25g carbohydrates. It’s definitely a dessert to enjoy in moderation, but the wholesome ingredients mean you’re getting quality nutrition alongside indulgence.
If you’re watching allergens, note that this recipe contains dairy, peanuts, and gluten (unless you swap the crust). For dairy-free or gluten-free options, the substitutions mentioned earlier work well.
Conclusion
This creamy no-bake peanut butter pie with crunchy topping is a total winner in my book. It’s simple enough to whip up on a whim, yet fancy enough to impress guests or satisfy your own sweet tooth like a pro. The balance of creamy, nutty filling with a crunchy finish makes every bite a little celebration.
Feel free to customize it to your liking—whether that’s making it chocolatey, gluten-free, or adding your favorite crunch mix-ins. Honestly, I love this pie because it brings back sweet memories and creates new ones every time I serve it.
If you try it out, I’d love to hear how it goes! Leave a comment, share your favorite twists, or snap a pic and tag me. You’re going to want to make this one again and again, so bookmark it and enjoy every luscious bite.
FAQs About Creamy No-Bake Peanut Butter Pie with Crunchy Topping
Can I use crunchy peanut butter instead of creamy?
Yes, you can! Using crunchy peanut butter will add extra texture to the filling, which some people love. Just be sure to blend it well to avoid any large chunks.
How long does the pie need to chill before serving?
For best results, chill the pie for at least 4 hours, but overnight is ideal. This helps the filling set and the flavors meld perfectly.
Can I make this pie ahead of time?
Absolutely! This pie actually tastes better after sitting overnight. Just keep it covered and refrigerated until you’re ready to serve.
What can I substitute for graham cracker crust?
You can use gluten-free cookie crumbs, crushed digestive biscuits, or even a nut-based crust like almond flour mixed with butter for a low-carb alternative.
How do I store leftover pie?
Store leftovers covered in the refrigerator for up to 4 days. If freezing, wrap tightly and thaw overnight in the fridge before serving.
Pin This Recipe!
Creamy No-Bake Peanut Butter Pie Recipe with Crunchy Topping
A quick and easy no-bake peanut butter pie featuring a silky smooth filling and a crunchy topping, perfect for any occasion and crowd-pleasing dessert.
- Prep Time: 20 minutes
- Cook Time: 0 minutes
- Total Time: 4 hours 20 minutes
- Yield: 8 servings 1x
- Category: Dessert
- Cuisine: American
Ingredients
- 1 ½ cups graham cracker crumbs
- 6 tablespoons unsalted butter, melted
- 2 tablespoons granulated sugar
- 1 cup creamy peanut butter
- 8 oz cream cheese, softened
- 1 cup powdered sugar
- 1 ½ cups heavy whipping cream
- 1 teaspoon vanilla extract
- ½ cup chopped roasted peanuts
- ¼ cup mini chocolate chips (optional)
- 2 tablespoons crushed pretzels
Instructions
- Prepare the crust: In a medium bowl, combine graham cracker crumbs, melted butter, and granulated sugar. Mix until crumbs are evenly coated and hold together when pressed (3-5 minutes).
- Press the crust: Firmly press the crumb mixture into the bottom and slightly up the sides of a 9-inch pie dish. Chill in the fridge for at least 15 minutes.
- Make the peanut butter filling: Beat softened cream cheese until smooth (2-3 minutes). Add peanut butter and powdered sugar, mixing until silky and lump-free.
- Whip the cream: In a separate chilled bowl, whip heavy cream with vanilla extract until stiff peaks form (5-7 minutes).
- Fold whipped cream into peanut butter mixture gently using a spatula to preserve airiness.
- Assemble the pie: Spoon the filling into the chilled crust and smooth the top.
- Add the crunchy topping: Sprinkle chopped peanuts, mini chocolate chips, and crushed pretzels evenly over the top.
- Chill the pie: Cover loosely with plastic wrap and refrigerate for at least 4 hours or overnight before serving.
Notes
Use softened cream cheese at room temperature to avoid lumps. Whip cream to stiff peaks for airy texture. Gently fold whipped cream into filling to keep it light. Chill pie overnight for best results. Dip knife in hot water before slicing for clean cuts. For dairy-free or gluten-free options, substitute ingredients as suggested.
Nutrition
- Serving Size: 1 slice (1/8 of pie)
- Calories: 350
- Fat: 25
- Carbohydrates: 25
- Protein: 8
Keywords: no-bake, peanut butter pie, creamy pie, crunchy topping, easy dessert, quick dessert, no oven dessert