Introduction
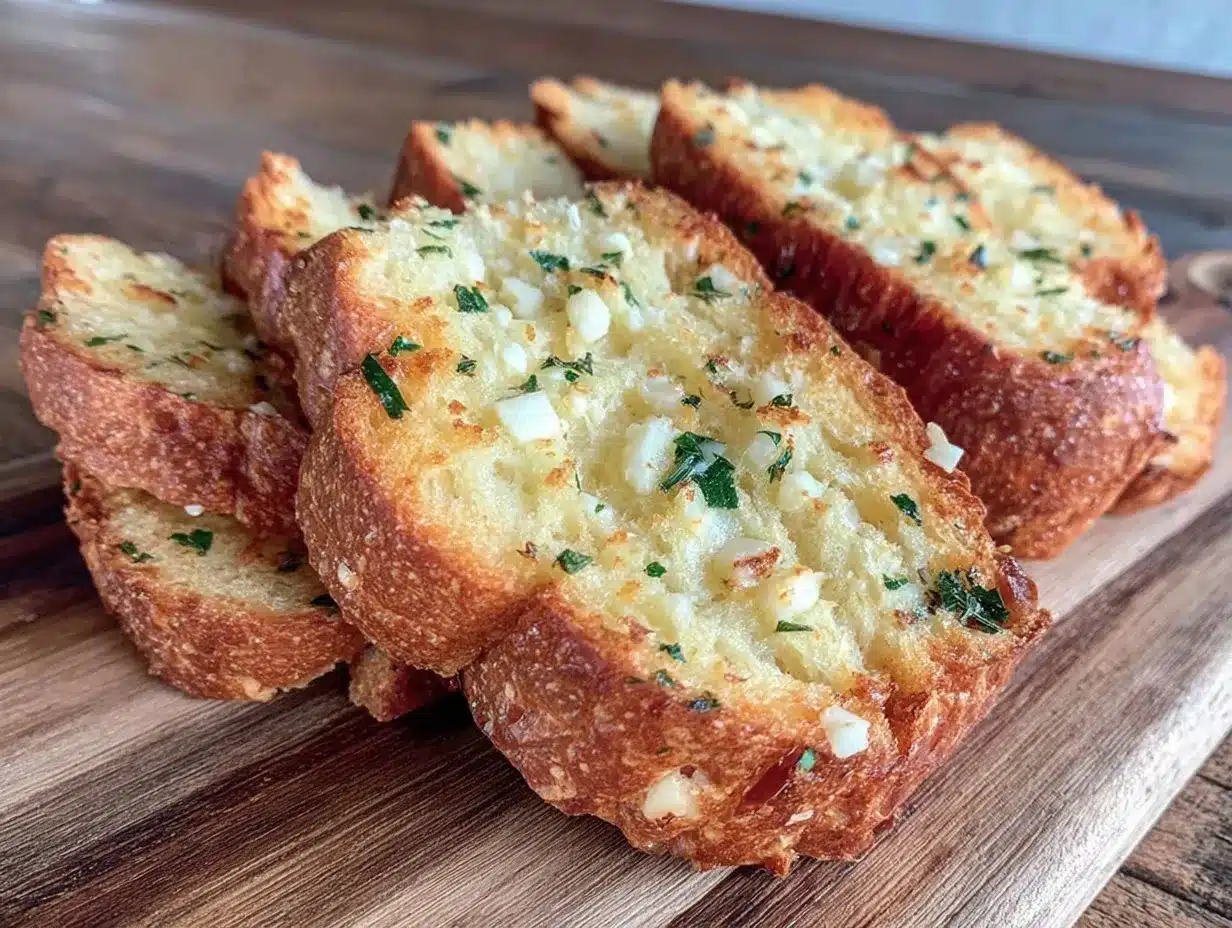
Let me tell you, the scent of golden garlic mingling with fresh herbs wafting from my oven is enough to make anyone’s mouth water. The first time I baked this crispy homemade garlic bread with herb butter, I was instantly hooked—the kind of moment where you pause, take a deep breath, and just smile because you know you’re onto something truly special. Years ago, when I was knee-high to a grasshopper, family dinners were all about the simple joys, and nothing brought us together quite like the smell of garlic bread bubbling away on a chilly evening.
I stumbled upon this recipe on a rainy weekend when I wanted something easy yet comforting. Honestly, it’s dangerously easy and provides pure, nostalgic comfort every time. My family couldn’t stop sneaking slices off the cooling rack (and I can’t really blame them). Whether it’s a quick snack, a side for pasta night, or the star of your next potluck, this crispy homemade garlic bread with herb butter brightens up any table and is sure to make your Pinterest cookie board jealous.
After testing this recipe multiple times, in the name of research, of course, it’s become a staple for family gatherings and gifting to friends. It feels like a warm hug in bread form—you’re definitely going to want to bookmark this one.
Why You’ll Love This Recipe
This crispy homemade garlic bread with herb butter isn’t just your run-of-the-mill side dish. Having cooked it dozens of times, I can confidently say it hits every mark for a quick, easy, and crowd-pleasing snack. Here’s why you’ll be smitten:
- Quick & Easy: Comes together in under 30 minutes, perfect for busy weeknights or last-minute cravings.
- Simple Ingredients: No fancy grocery trips needed; you likely already have everything in your kitchen pantry.
- Perfect for Any Occasion: Fantastic for cozy dinners, game nights, or holiday gatherings.
- Crowd-Pleaser: Always gets rave reviews from kids and adults alike—honestly, it disappears fast.
- Unbelievably Delicious: The crispy crust paired with buttery garlic herb goodness is next-level comfort food.
This recipe stands out because of its perfectly balanced herb butter, made with fresh parsley and thyme, which is gently whipped into softened butter for an ultra-flavorful spread. Plus, the technique of toasting the bread just right ensures a crisp exterior without drying it out—a balance I’ve fussed over to get just right. This isn’t just garlic bread; it’s your best version, the one that makes you close your eyes after the first bite and say, “Yep, this is the one.”
What Ingredients You Will Need
This recipe uses simple, wholesome ingredients to deliver bold flavor and satisfying texture without the fuss. Most of these are pantry staples, and you can easily swap or adjust based on what you have on hand.
- For the Bread:
- 1 loaf of crusty French bread or baguette (about 12 inches/30 cm) – I recommend a day-old loaf for the best texture
- For the Herb Butter:
- 1/2 cup (115 g) unsalted butter, softened (room temperature) – Kerrygold or Plugrá work wonders here
- 4 cloves garlic, finely minced or pressed (fresh is key for punchy flavor)
- 2 tablespoons fresh parsley, finely chopped (adds vibrant color and freshness)
- 1 teaspoon fresh thyme leaves, chopped (optional, but it adds lovely earthiness)
- 1/4 teaspoon salt (adjust to taste)
- 1/8 teaspoon freshly ground black pepper
- 1 tablespoon grated Parmesan cheese (optional, for a cheesy twist)
- Optional Toppings:
- Red pepper flakes (for a little heat)
- Chopped chives or basil (for extra herbaceous notes)
Ingredient tips: Look for a sturdy baguette with a crisp crust but soft interior. If you want a gluten-free option, try a gluten-free baguette or ciabatta. For dairy-free, swap unsalted butter with a vegan butter alternative or olive oil (though the flavor will differ slightly).
Equipment Needed
- Baking sheet or tray – a rimmed one helps catch any drips and makes cleanup easier
- Parchment paper or aluminum foil – to line your baking sheet for easy cleanup
- Mixing bowl – for combining the herb butter
- Spreading knife or small spatula – to evenly apply the butter mixture
- Garlic press or fine grater – makes mincing garlic a breeze (I prefer a garlic press for less mess)
- Sharp serrated knife – for slicing the bread cleanly without squashing it
- Optional: small whisk or fork – to blend the butter and herbs smoothly
If you don’t have a garlic press, finely chopping the garlic with a knife works just as well (though takes a few more minutes). A budget-friendly baking sheet will do just fine—no need for fancy pans here. Just make sure your oven rack is in the middle position for even toasting.
Preparation Method
- Preheat your oven to 375°F (190°C). Line a baking sheet with parchment paper or foil for easy cleanup. (About 5 minutes prep here.)
- Prepare the herb butter: In a mixing bowl, combine 1/2 cup softened unsalted butter with 4 minced garlic cloves, 2 tablespoons chopped fresh parsley, 1 teaspoon chopped fresh thyme, 1/4 teaspoon salt, and 1/8 teaspoon black pepper. Add 1 tablespoon grated Parmesan if using. Use a fork or small whisk to blend until smooth and creamy. (This step takes about 5 minutes.)
- Slice the bread: Using a serrated knife, cut the baguette into 1-inch (2.5 cm) thick slices. For extra crispiness, slice all the way through. If you prefer pull-apart style, slice partially through the loaf lengthwise, then crosswise into thick pieces. (Take your time here; it’s worth it!)
- Spread the butter: Generously spread the herb butter on each slice or into the cuts of the loaf if using the pull-apart method. Make sure each piece is well coated for that perfect garlic hit. (About 5-7 minutes.)
- Arrange on the baking sheet: Place the bread slices or the whole loaf on the prepared baking sheet, buttered side up. Space them slightly apart to allow even heat circulation.
- Bake the bread: Pop the tray into the preheated oven and bake for 12-15 minutes. Keep an eye out—once the edges turn golden brown and the butter is bubbling, you’re good to go. (Ovens vary; mine runs hot, so I check at 12 minutes.)
- Optional broil for extra crispiness: If you want that extra crunch, switch the oven to broil for the last 1-2 minutes. Watch closely to avoid burning!
- Remove and serve: Carefully take the garlic bread out of the oven (it’s hot!). If desired, sprinkle with a pinch of red pepper flakes, fresh chives, or basil. Serve warm for the best experience. (Total cook time: roughly 15 minutes.)
Pro tip: If your butter isn’t soft enough to spread easily, pop it in the microwave for 10 seconds. Also, don’t skip the fresh herbs—they make all the difference in flavor!
Cooking Tips & Techniques
There’s a bit of art to making garlic bread that’s crispy on the outside yet perfectly tender inside. Here’s what I’ve learned over the years:
- Use room temperature butter: It spreads more easily and blends better with garlic and herbs, resulting in more even flavor.
- Don’t overload the butter: Too much butter can make the bread soggy rather than crispy. A generous but balanced spread is key.
- Watch your oven: Baking time can vary. Keep an eye on the bread from the 12-minute mark to avoid burning.
- For that perfect crunch: Broil for the last 1-2 minutes, but stand by the oven because it browns fast.
- Fresh garlic vs. garlic powder: Fresh always wins for flavor, but if you’re in a pinch, a sprinkle of garlic powder mixed into the butter can work.
- Try to use day-old bread: It absorbs the butter without getting mushy, leading to better texture.
- Make it ahead: You can prepare the butter spread and slice the bread a few hours ahead and refrigerate both separately until ready to bake.
Honestly, the first time I tried melting the butter directly on the bread instead of mixing it with garlic and herbs, it was a total flop—bland and greasy. Lesson learned! Mixing everything together before spreading is the way to go.
Variations & Adaptations
This crispy homemade garlic bread with herb butter is a great canvas for creativity. Here are a few ways I’ve played around with it:
- Cheesy Garlic Bread: Add shredded mozzarella or cheddar cheese on top before baking for a melty, gooey twist.
- Vegan Version: Use vegan butter and skip the Parmesan or swap it with a nutritional yeast sprinkle for cheesy flavor.
- Spicy Kick: Mix in finely chopped jalapeños or sprinkle red pepper flakes into the herb butter for some heat.
- Herb Variations: Swap thyme for rosemary or add a pinch of oregano to vary the flavor profile.
- Whole Wheat or Gluten-Free Bread: Try this with whole wheat baguette or your favorite gluten-free loaf to suit dietary needs.
My personal favorite is adding a little smoked paprika to the herb butter—it gives the bread a subtle smoky warmth that’s downright addictive.
Serving & Storage Suggestions
This crispy homemade garlic bread with herb butter is best served warm, right out of the oven, when the butter is melty and the crust crackles under your fingers. It pairs beautifully with pasta, soups, or a fresh salad. For drinks, a chilled glass of white wine or sparkling water complements the garlic and herbs nicely.
If you have leftovers (though good luck!), store them in an airtight container at room temperature for up to 2 days. For longer storage, wrap tightly and freeze for up to 1 month. To reheat, pop the bread in a 350°F (175°C) oven for 5-7 minutes, or toast individual slices in a skillet for a minute or two until crispy again.
Fun fact: the flavors actually deepen if you let the bread sit wrapped for a few hours—the garlic and herbs soak in even better. Just give it a quick warm-up before serving to recapture that crunch.
Nutritional Information & Benefits
One slice of this crispy homemade garlic bread with herb butter (about 1 inch thick) contains roughly:
| Nutrient | Amount |
|---|---|
| Calories | 150-180 kcal |
| Fat | 9-11 g (mostly from butter) |
| Carbohydrates | 15-18 g |
| Protein | 3-4 g |
The fresh garlic offers immune-boosting compounds, while parsley packs vitamins A and C, making this snack a little more than just tasty. For those watching carbs, swapping the bread for a low-carb alternative or eating in moderation works well. This recipe contains gluten and dairy, so substitutions are advised for allergies.
From a wellness perspective, making garlic bread at home lets you control the quality of ingredients—no mysterious additives or preservatives here, just honest, flavorful comfort food.
Conclusion
There’s just something about this crispy homemade garlic bread with herb butter that feels like a little celebration in your mouth. It’s easy to make, uses simple ingredients, and delivers big on flavor every single time. I love how customizable it is—you can tweak the herbs, add cheese, or spice it up to suit your mood, which makes it a winner in my book.
Give this recipe a try, and don’t be shy about making it your own! I’d love to hear how you customize your garlic bread, so drop a comment below or share your tasty adaptations. Remember, the best recipes are the ones that bring joy and a bit of magic to your kitchen.
Go ahead, treat yourself and your loved ones to this crispy, buttery delight—it’s sure to become a favorite.
FAQs
Can I use frozen bread for this garlic bread recipe?
Yes, you can use frozen bread, but it’s best to thaw it completely and let it dry out slightly before spreading the herb butter to avoid sogginess.
How do I make this garlic bread dairy-free?
Simply swap the unsalted butter for a plant-based vegan butter or olive oil. Skip the Parmesan or use nutritional yeast for a cheesy flavor.
Can I prepare the herb butter in advance?
Absolutely! The herb butter can be made and refrigerated for up to 3 days before using. Just bring it to room temperature before spreading.
What’s the best bread to use for crispy garlic bread?
A crusty French baguette or Italian bread works best for that perfect balance of crunchy outside and soft inside.
Can I add cheese to this recipe?
Yes! Adding shredded mozzarella or Parmesan cheese on top before baking gives a delicious cheesy twist to your garlic bread.
Pin This Recipe!
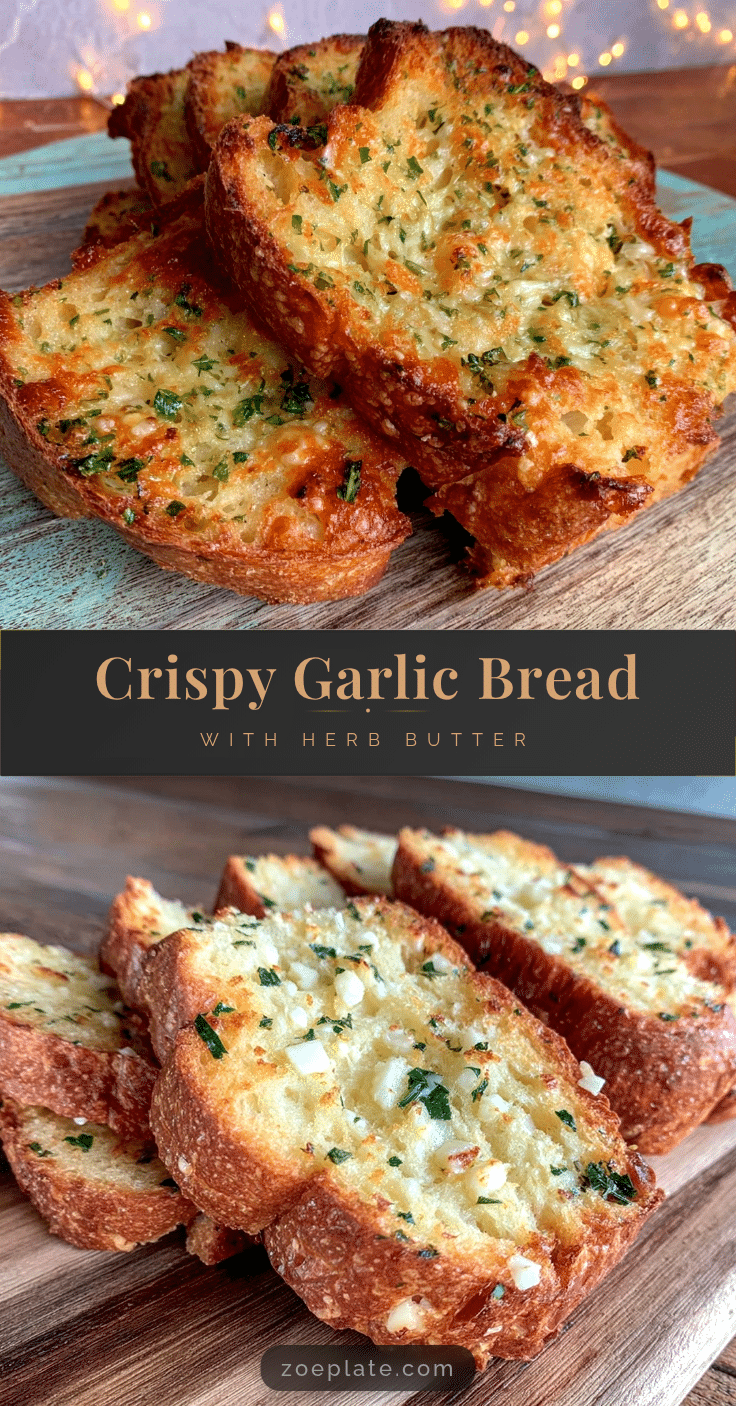
Crispy Homemade Garlic Bread with Herb Butter

A quick and easy recipe for crispy garlic bread with a flavorful herb butter spread, perfect as a snack or side dish.
- Prep Time: 15 minutes
- Cook Time: 15 minutes
- Total Time: 30 minutes
- Yield: 8 servings 1x
- Category: Snack
- Cuisine: Italian
Ingredients
- 1 loaf crusty French bread or baguette (about 12 inches/30 cm), day-old recommended
- 1/2 cup (115 g) unsalted butter, softened (room temperature)
- 4 cloves garlic, finely minced or pressed
- 2 tablespoons fresh parsley, finely chopped
- 1 teaspoon fresh thyme leaves, chopped (optional)
- 1/4 teaspoon salt
- 1/8 teaspoon freshly ground black pepper
- 1 tablespoon grated Parmesan cheese (optional)
- Optional toppings: red pepper flakes, chopped chives or basil
Instructions
- Preheat your oven to 375°F (190°C). Line a baking sheet with parchment paper or foil for easy cleanup.
- In a mixing bowl, combine 1/2 cup softened unsalted butter with 4 minced garlic cloves, 2 tablespoons chopped fresh parsley, 1 teaspoon chopped fresh thyme, 1/4 teaspoon salt, and 1/8 teaspoon black pepper. Add 1 tablespoon grated Parmesan if using. Blend until smooth and creamy.
- Using a serrated knife, cut the baguette into 1-inch (2.5 cm) thick slices. For extra crispiness, slice all the way through. Alternatively, slice partially through the loaf lengthwise, then crosswise into thick pieces for pull-apart style.
- Generously spread the herb butter on each slice or into the cuts of the loaf if using the pull-apart method.
- Place the bread slices or whole loaf on the prepared baking sheet, buttered side up, spaced slightly apart.
- Bake in the preheated oven for 12-15 minutes until edges turn golden brown and butter bubbles.
- Optional: Broil for the last 1-2 minutes for extra crispiness, watching closely to avoid burning.
- Remove from oven carefully and, if desired, sprinkle with red pepper flakes, fresh chives, or basil. Serve warm.
Notes
Use room temperature butter for easier spreading. Avoid overloading butter to keep bread crispy. Watch oven closely from 12 minutes to prevent burning. Fresh garlic is preferred over garlic powder. Day-old bread absorbs butter better without becoming soggy. Herb butter and bread can be prepared ahead and refrigerated separately. For extra crispiness, broil for 1-2 minutes at the end.
Nutrition
- Serving Size: 1 slice (about 1 inc
- Calories: 165
- Sugar: 1
- Sodium: 150
- Fat: 10
- Saturated Fat: 6
- Carbohydrates: 16
- Fiber: 1
- Protein: 3.5
Keywords: garlic bread, herb butter, crispy garlic bread, easy snack, homemade garlic bread, side dish, quick recipe