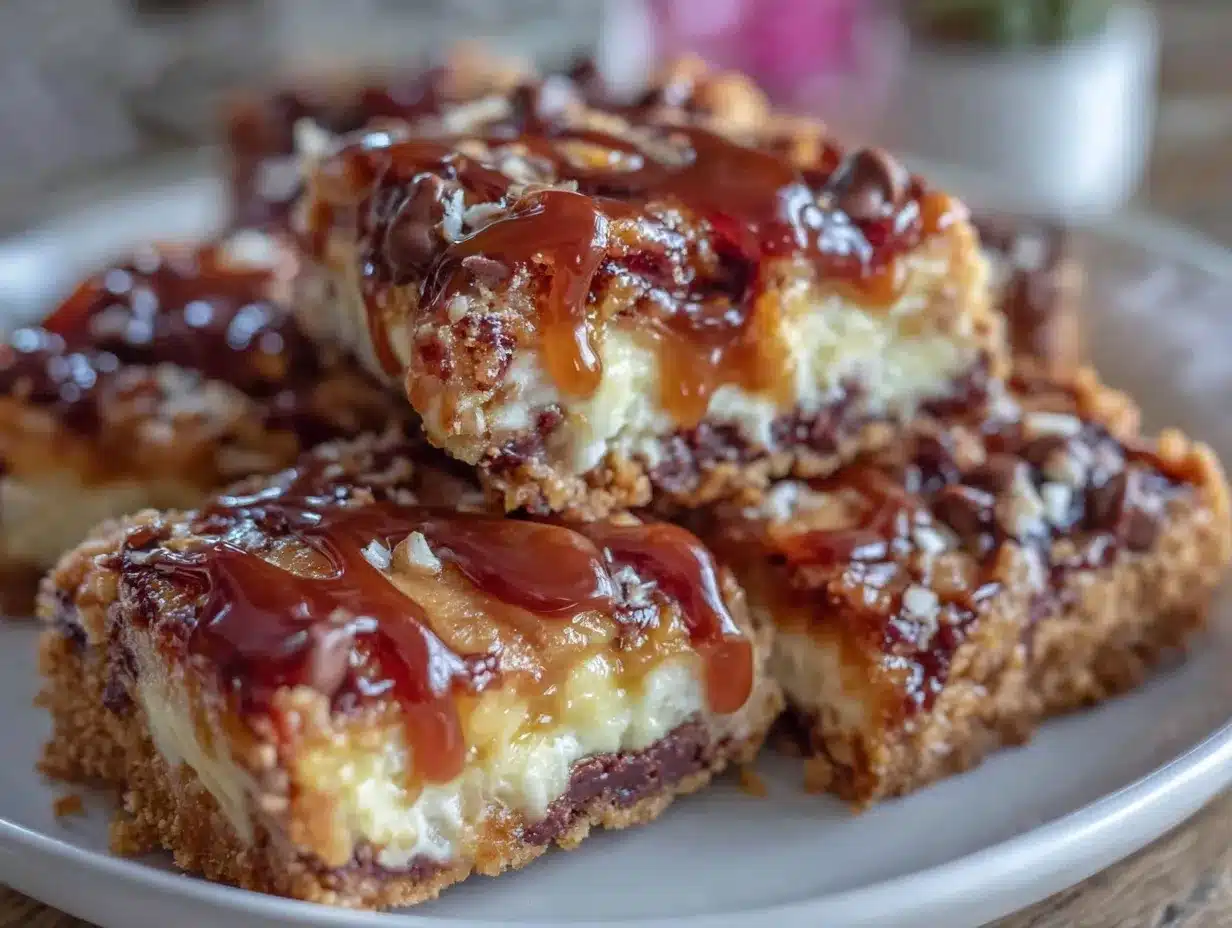
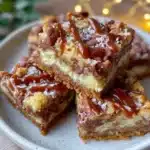
“You brought the 7-layer bars? Oh man, you’re the real MVP today,” my friend exclaimed as I showed up at the neighborhood potluck with a pan of these iconic bars in hand. Honestly, I wasn’t expecting much when I pulled this recipe out of an old, slightly stained cookbook I found at a thrift store last summer. The name alone—Classic Chewy 7-Layer Bars—felt like a time capsule from the 80s, a decade of big hair, neon lights, and, apparently, stacked dessert bars.
That first batch was a bit of an experiment. I remember standing in my kitchen, mixing layers of graham cracker crumbs, melted butter, shredded coconut, chocolate chips, and toasted nuts, wondering if this old-school combo could really hit the mark in today’s world of fancy desserts. The aroma alone—sweet toasted coconut mingled with buttery richness—had me hooked before even tasting. When the first bite delivered that perfect chewy texture coupled with a rich chocolatey snap, I was sold.
What surprised me most was how much this recipe reminded me of simpler times, the kind of comfort food that doesn’t try too hard but gets everything just right. It’s funny how a humble dessert can bring back flashes of family gatherings, casual chats over coffee, and even a few moments of late-night baking therapy after a long day. This 7-layer bars recipe stuck with me because it’s reliable, approachable, and undeniably delicious—a sweet little throwback that feels like a warm hug.
There’s something quietly satisfying about layering flavors and textures in a single bar, each bite telling its own story. It’s not flashy, but it’s got heart. And if you’re like me, you’ll find yourself reaching for this recipe again and again, even as new fads come and go.
Why You’ll Love This Classic Chewy 7-Layer Bars Recipe
After making these bars countless times, I’ve gathered a few reasons why they’ve earned a permanent spot in my dessert rotation:
- Quick & Easy: This recipe comes together in under 30 minutes (plus baking time), which is perfect when you need a fast homemade treat without fuss.
- Simple Ingredients: No need to hunt down fancy or obscure items. Most of these are pantry staples, so you probably already have what’s needed.
- Perfect for Gatherings: Whether it’s a potluck, holiday party, or casual brunch, these bars are a crowd favorite that never disappoints.
- Crowd-Pleaser: Kids and adults alike rave about these chewy, chocolatey layers—you might want to double the batch!
- Unbelievably Delicious: The combo of toasted coconut, crunchy nuts, and melty chocolate chips on a buttery graham crust creates a texture and flavor that’s comfort food at its finest.
What really sets this recipe apart is the perfectly balanced layering technique. Each ingredient gets its own moment, creating a rich tapestry of flavors without overwhelming your palate. I’ve tried versions with extra nuts or swapped in semi-sweet chocolate chips, but the magic really lies in the classic mix. Plus, if you’re curious, the melted butter in the base binds everything in such a way that these bars hold together beautifully while staying satisfyingly chewy.
This recipe isn’t just another dessert; it’s more like a nostalgic bite that makes your kitchen smell like a cozy 80s diner, brings a smile to your face, and invites you to slow down for just a moment. Honestly, I think that’s why it keeps popping up in my baking schedule, even decades after the original craze.
What Ingredients You Will Need
This recipe relies on straightforward, wholesome ingredients to create those distinct layers and textures. Nothing fancy, just the good stuff that works together to deliver that classic chewy 7-layer bars experience.
- For the Base Layer:
- 1 1/2 cups (150g) graham cracker crumbs – forms the crunchy, buttery foundation
- 1/2 cup (115g) unsalted butter, melted – binds the crumbs and adds richness
- 1/4 cup (50g) granulated sugar – balances the butter with a touch of sweetness
- For the Layers:
- 1 cup (90g) sweetened shredded coconut – lends a toasty, chewy texture
- 1 cup (170g) semi-sweet chocolate chips – classic melty chocolate goodness
- 1 cup (120g) chopped walnuts or pecans, toasted – adds crunch and nuttiness (I prefer walnuts for their buttery flavor)
- 1 (14 oz / 396g) can sweetened condensed milk – the glue that holds the layers together with creamy sweetness
Pro tip: When selecting your shredded coconut, go for unsweetened if you want to control sugar levels, but sweetened gives that authentic 80s vibe. For nuts, toasting them lightly in a dry pan brings out their flavor—don’t skip this step if you want that extra depth!
If you want to make this gluten-free, almond flour or gluten-free graham cracker crumbs work well in place of traditional graham crumbs. For a dairy-free version, swap the butter with coconut oil and the sweetened condensed milk with a coconut milk-based condensed milk alternative.
Equipment Needed
- 9×13 inch (23×33 cm) baking pan – standard size for perfect thickness
- Mixing bowls – one large for the base, plus smaller ones for toasting nuts and melting butter
- Measuring cups and spoons – accuracy helps keep that chewy texture consistent
- Rubber spatula or wooden spoon – for mixing layers evenly
- Microwave-safe bowl or small saucepan – to melt butter
- Aluminum foil or parchment paper – to line the baking pan for easy removal
If you don’t have a 9×13 pan, a slightly smaller or larger pan works too, but baking time may vary. I’ve also used a glass baking dish before, which gives even heat distribution and a nicely browned crust. Wrapping the pan with foil before baking helps prevent over-browning on the edges if you’re worried about that.
Preparation Method
- Preheat your oven to 350°F (175°C). Line your 9×13 inch pan with parchment paper, leaving an overhang on the sides for easy lifting later.
- Make the crust: In a large bowl, combine 1 1/2 cups graham cracker crumbs, 1/2 cup melted unsalted butter, and 1/4 cup sugar. Stir until the crumbs are evenly coated and resemble wet sand.
- Press the crust mixture firmly into the bottom of your prepared pan. Use the back of a spoon or your fingers to create an even, compact layer. This helps the base hold up when layered.
- Bake the crust for 8-10 minutes. You want it lightly golden and fragrant but not browned. This pre-baking prevents sogginess once the layers go on.
- Toast your nuts and shredded coconut. While the crust bakes, heat a dry skillet over medium heat. Add 1 cup nuts and 1 cup shredded coconut (separately or together, stirring frequently) for about 3-5 minutes until fragrant and lightly browned. Watch closely to avoid burning.
- Remove the crust from the oven and immediately sprinkle the toasted coconut evenly over it. Follow with an even layer of the toasted nuts.
- Sprinkle the chocolate chips evenly on top of the nuts. Don’t skip this order; it helps the layers meld beautifully.
- Pour the entire can of sweetened condensed milk evenly over the top. The milk will seep through the layers, binding everything together and creating that chewy texture.
- Bake the assembled bars for 25-30 minutes at 350°F (175°C). The edges should be golden brown, and the center set but still slightly soft.
- Cool completely in the pan on a wire rack. This is crucial—trying to cut warm bars will cause them to fall apart. Once cooled, use the parchment overhang to lift the bars out and cut into squares or rectangles.
If you notice the bars are too soft to cut cleanly after cooling, pop them in the fridge for 30 minutes to firm up—trust me, it helps!
Cooking Tips & Techniques
From many batches and occasional mishaps, here are my go-to tips for the best chewy 7-layer bars:
- Don’t skimp on melting the butter fully—some lumps can create uneven texture in the crust.
- Even layering is key. Spread each layer gently but thoroughly to avoid gaps or clumps.
- Toast nuts and coconut carefully. Too dark, and the bitterness sneaks in; too light, and you miss the flavor boost.
- Use parchment paper lining. Bars stick terribly otherwise, and you’ll lose precious crumbs.
- Cooling is non-negotiable. Warm bars crumble and don’t slice well, so patience pays off.
- For cleaner cuts, warm your knife under hot water and wipe it before slicing. This little trick prevents sticking and messy edges.
- Feel free to experiment with nut varieties. Pecans, almonds, or even hazelnuts add unique twists, but walnuts remain my personal favorite for that classic taste.
When I first made these bars, I underestimated the importance of toasting the coconut. The first batch was a little bland and lacked that toasty depth. After I fixed that, I was hooked. Funny how the smallest details can make such a difference, right?
Variations & Adaptations
Here are a few ways to put your own spin on these classic bars:
- Nut-Free Version: Skip the nuts and add more shredded coconut or substitute with sunflower seeds for crunch. This makes it safe for nut allergies.
- Dark Chocolate Twist: Swap semi-sweet chips for dark chocolate chunks or bittersweet chips to cut sweetness and add richness.
- Salted Caramel Drizzle: After baking and cooling, drizzle a bit of salted caramel sauce on top for a decadent finish that balances the sweetness perfectly.
- Seasonal Fruit Addition: Toss in chopped dried cranberries or cherries between the nut and chocolate layers for a tart contrast that brightens the flavor.
- Gluten-Free Version: Use gluten-free graham cracker crumbs or crushed gluten-free cookies in the base for those avoiding gluten.
Personally, I once tried substituting the shredded coconut with hemp hearts for a nutty, protein-packed twist. It was definitely different but surprisingly good! If you want to see another wholesome, easy snack idea with hemp hearts, be sure to check out my Easy No-Bake Hemp Heart Protein Balls Recipe.
Serving & Storage Suggestions
These bars are best served at room temperature, letting the chewy texture shine through. I like to plate them with a simple cup of coffee or, on chillier days, a cozy mug of creamy collagen hot chocolate—because, honestly, what’s better than chocolate alongside chocolate?
To store, keep the bars tightly covered at room temperature for up to 3 days. For longer storage, refrigerate them in an airtight container for up to a week or freeze for up to 3 months. When freezing, separate layers with parchment paper to prevent sticking.
Reheat refrigerated bars for about 10 seconds in the microwave to soften if they’ve become too firm. Over time, the flavors meld and the bars become even more delightful, so leftovers aren’t a problem here.
Nutritional Information & Benefits
One classic chewy 7-layer bar (about 2×2 inches) contains roughly:
| Calories | Fat | Carbohydrates | Protein | Sugar |
|---|---|---|---|---|
| 230 kcal | 13g | 28g | 3g | 20g |
While these bars are certainly a treat, the nuts add heart-healthy fats and protein, and the coconut provides fiber and minerals like manganese. Using real butter and chocolate chips means you’re getting a classic flavor profile without artificial additives. For those mindful of sugar, you can experiment with reduced-sugar chocolate chips or coconut sugar in the crust.
These bars are not gluten-free by default but can be adapted easily, making them accessible to many dietary preferences. Just watch out for nut allergies if serving to a crowd.
Conclusion
Honestly, the classic chewy 7-layer bars are exactly the kind of nostalgic homemade dessert that feels like a small celebration in every bite. They’re easy to make, use simple ingredients, and carry that unmistakable texture and flavor that make you smile. Plus, they’re wonderfully adaptable if you want to tweak them for your taste or dietary needs.
I’ve found that these bars bring a little bit of joy and comfort no matter the occasion. Whether you’re baking for a potluck, a busy weeknight, or just because, this recipe delivers every time. Give it a try, put your own spin on it, and let me know what variations you discover along the way!
For more nostalgic and easy treats, you might enjoy my Delicious Date Syrup Brownies Recipe, which also uses simple ingredients in a fun twist on a classic.
Frequently Asked Questions About Classic Chewy 7-Layer Bars
Can I make these bars ahead of time?
Yes! They actually taste better after resting for a day as the layers meld. Store them covered at room temperature or in the fridge.
What if I don’t have graham crackers?
You can substitute with digestive biscuits, vanilla wafer cookies, or gluten-free cookie crumbs for a similar base.
Can I use dark chocolate instead of semi-sweet chips?
Absolutely! Dark chocolate adds a richer, less sweet flavor that pairs nicely with the coconut and nuts.
How do I prevent the bars from being too crumbly?
Make sure to press the crust firmly into the pan and don’t skip the sweetened condensed milk—it’s the key binder that keeps the bars chewy.
Are these bars freezer-friendly?
Yes, wrap them well or store in an airtight container with parchment paper between layers, and they’ll keep for up to 3 months.
Pin This Recipe!
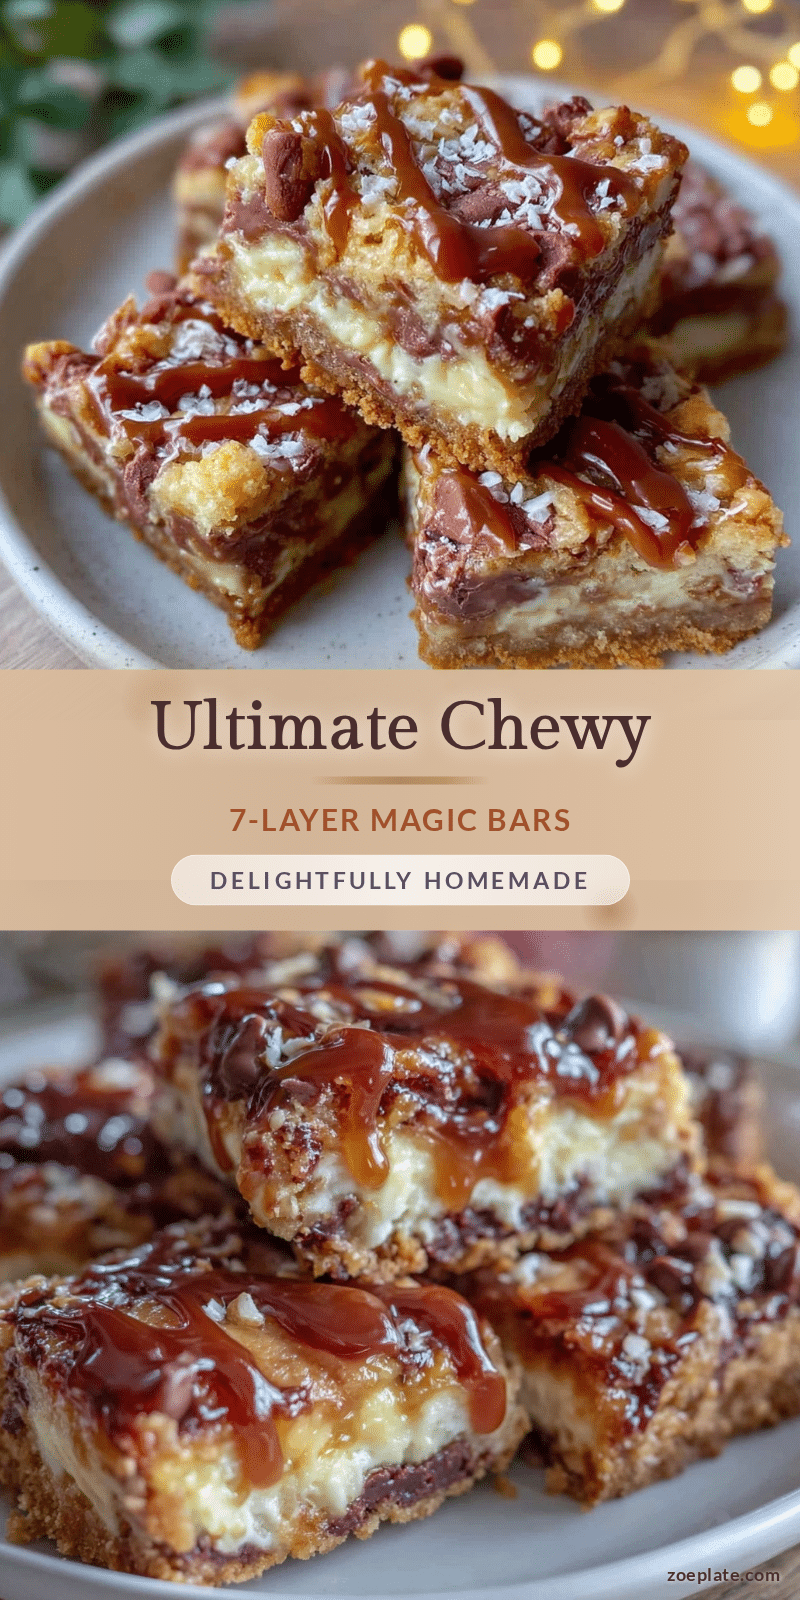
Classic Chewy 7-Layer Bars
A nostalgic 80s dessert featuring layers of graham cracker crust, toasted coconut, nuts, chocolate chips, and sweetened condensed milk for a chewy, rich treat.
- Prep Time: 15 minutes
- Cook Time: 35 minutes
- Total Time: 50 minutes
- Yield: 24 bars 1x
- Category: Dessert
- Cuisine: American
Ingredients
- 1 1/2 cups (150g) graham cracker crumbs
- 1/2 cup (115g) unsalted butter, melted
- 1/4 cup (50g) granulated sugar
- 1 cup (90g) sweetened shredded coconut
- 1 cup (170g) semi-sweet chocolate chips
- 1 cup (120g) chopped walnuts or pecans, toasted
- 1 (14 oz / 396g) can sweetened condensed milk
Instructions
- Preheat your oven to 350°F (175°C). Line a 9×13 inch pan with parchment paper, leaving an overhang on the sides for easy lifting.
- In a large bowl, combine graham cracker crumbs, melted unsalted butter, and granulated sugar. Stir until crumbs are evenly coated and resemble wet sand.
- Press the crust mixture firmly into the bottom of the prepared pan to create an even, compact layer.
- Bake the crust for 8-10 minutes until lightly golden and fragrant but not browned.
- While the crust bakes, toast the nuts and shredded coconut in a dry skillet over medium heat for 3-5 minutes until fragrant and lightly browned, stirring frequently.
- Remove the crust from the oven and immediately sprinkle the toasted coconut evenly over it.
- Add an even layer of toasted nuts on top of the coconut.
- Sprinkle the chocolate chips evenly over the nuts.
- Pour the entire can of sweetened condensed milk evenly over the top to bind the layers.
- Bake the assembled bars for 25-30 minutes at 350°F (175°C) until edges are golden brown and center is set but slightly soft.
- Cool completely in the pan on a wire rack. Use the parchment overhang to lift the bars out and cut into squares or rectangles.
- If bars are too soft to cut after cooling, refrigerate for 30 minutes to firm up.
Notes
Toast nuts and coconut carefully to avoid bitterness. Use parchment paper to prevent sticking. Cool bars completely before cutting to avoid crumbling. For cleaner cuts, warm and wipe knife before slicing. Variations include nut-free, dark chocolate, salted caramel drizzle, seasonal fruit additions, and gluten-free substitutions.
Nutrition
- Serving Size: 1 bar (about 2x2 inc
- Calories: 230
- Sugar: 20
- Fat: 13
- Carbohydrates: 28
- Protein: 3
Keywords: 7-layer bars, classic dessert, chewy bars, 80s dessert, graham cracker crust, toasted coconut, chocolate chips, nuts, sweetened condensed milk