“You’ve got to try these waffles,” my friend texted me on a sleepy Sunday morning, “they’re a game changer.” Honestly, I was skeptical. Scratch-made waffles? I’d always thought they were a bit of a production, and with weekend mornings usually feeling like a whirlwind, I wasn’t sure I had the patience. But curiosity got the best of me, and a quick glance at the recipe promised something simple—not fancy, just real, fluffy waffles made from scratch. So, I rolled up my sleeves, dug out my old waffle iron, and figured, why not? What happened next was a quiet, comforting surprise. The kitchen filled with this warm, buttery aroma that made the morning instantly better—like a soft, cozy blanket you didn’t know you needed. The waffles emerged golden and airy, just begging for a dollop of cream and a drizzle of syrup. That first bite? It was like a little moment of calm in a hectic day.
Since that morning, these fluffy scratch-made waffles with cream have made their way into my brunch rotation more times than I can count. It’s not just the taste but the whole ritual—the mixing, the smell, the sizzle on the iron—that turns a simple weekend into something a bit more special. And honestly, there’s a kind of quiet pride in knowing you whipped them up yourself, no box mixes or shortcuts. The recipe stuck because it’s forgiving, approachable, and genuinely satisfying. Plus, it pairs beautifully with homemade whipped cream or even something unexpected like a spoonful of the creamy cottage cheese chocolate mousse I love from that recipe. Cozy brunches don’t get easier or tastier than this.
Why You’ll Love This Recipe
After trying out a handful of waffle recipes, this one quickly became my go-to. Here’s why it’s such a winner:
- Quick & Easy: You can have these waffles ready in about 25 minutes, which is great when you want a no-fuss brunch that still feels special.
- Simple Ingredients: No need for fancy or hard-to-find items. Just basic pantry staples like flour, eggs, and milk.
- Perfect for Cozy Brunch: Whether it’s a slow weekend morning or a small gathering, these waffles feel like a warm hug on a plate.
- Crowd-Pleaser: They consistently get thumbs up from kids and adults alike—light, fluffy, and just a touch crispy.
- Unbelievably Delicious: The secret to that amazing texture? A little buttermilk tang and whipped egg whites folded in, giving these waffles an airy lift that’s hard to beat.
This recipe isn’t your typical waffle mix in a hurry. It’s a bit of a throwback to the kind of scratch cooking that’s all about comfort and care. The use of buttermilk adds a subtle tang that balances perfectly with the rich cream topping, while the whipped egg whites make them lighter than you’d expect. And if you’re into pairing brunch with a drink, I love how these waffles go alongside a creamy collagen hot chocolate from this recipe—both soothing and indulgent.
Honestly, it’s the kind of recipe that makes you close your eyes after the first bite and just savor the moment.
What Ingredients You Will Need
This recipe uses simple, wholesome ingredients that come together to create waffles with bold flavor and a melt-in-your-mouth texture, all without fuss. Most of these are pantry staples, so you probably have everything on hand already.
- All-purpose flour – 2 cups (240g). I like to use a trusted brand like King Arthur for consistent results.
- Baking powder – 2 teaspoons (8g), to give the waffles their lift.
- Baking soda – ½ teaspoon (2g), works with the buttermilk for extra fluffiness.
- Salt – ½ teaspoon (3g), balances the sweetness.
- Granulated sugar – 2 tablespoons (25g), adds just a hint of sweetness.
- Buttermilk – 1 ¾ cups (420ml), the tangy backbone that makes these waffles stand out. If you don’t have buttermilk, mix 1 ¾ cups milk with 1 tablespoon lemon juice and let it sit for 5 minutes.
- Large eggs – 3, separated. The whites get whipped to create that airy texture.
- Unsalted butter – ½ cup (115g), melted and slightly cooled (adds richness and helps with crisp edges).
- Pure vanilla extract – 1 teaspoon (5ml), for warmth and depth.
- Heavy cream – 1 cup (240ml), whipped lightly for topping (feel free to sweeten with a teaspoon of powdered sugar).
If you’re interested in a dairy-free version, swapping out the buttermilk for almond or oat milk mixed with a bit of apple cider vinegar works well, and coconut cream can replace heavy cream for topping.
Equipment Needed
- Waffle iron: A classic non-stick waffle maker is ideal. I have a basic model that’s been a kitchen workhorse for years. If you don’t have one, you can find affordable options online or at your local store.
- Mixing bowls: At least two – one for dry ingredients and one for wet.
- Electric mixer or whisk: To whip the egg whites until stiff peaks form. A hand mixer speeds things up, but a balloon whisk works fine if you’re patient.
- Measuring cups and spoons: Precise measurements make a difference, especially with baking powder and baking soda.
- Rubber spatula: For folding ingredients gently without deflating the batter.
- Cooling rack: To keep waffles crisp if you’re making multiple batches.
Pro tip: Make sure your waffle iron is well-oiled or use a non-stick spray before each batch to avoid sticking. If your waffle maker is older, a quick wipe with a paper towel dipped in oil before heating can prevent sticky messes. This little maintenance step saved me more than once!
Preparation Method
- Prepare your ingredients: Separate the eggs carefully. Place the egg whites in a clean, dry bowl, and the yolks in another. Melt the butter and let it cool slightly to avoid cooking the eggs later. Preheat your waffle iron according to its instructions.
- Mix the dry ingredients: In a large bowl, whisk together 2 cups (240g) all-purpose flour, 2 teaspoons (8g) baking powder, ½ teaspoon (2g) baking soda, ½ teaspoon (3g) salt, and 2 tablespoons (25g) sugar. This ensures even distribution and a balanced rise.
- Combine wet ingredients: In a separate bowl, whisk the 3 egg yolks with 1 ¾ cups (420ml) buttermilk, ½ cup (115g) melted butter, and 1 teaspoon (5ml) vanilla extract until smooth and slightly frothy.
- Whip the egg whites: Using an electric mixer or balloon whisk, beat the egg whites until stiff peaks form. This step is key for those fluffy waffles—if you underwhip, the texture will be dense; if you overwhip, they might collapse.
- Combine batter: Pour the wet mixture into the dry ingredients and stir gently with a rubber spatula until just combined. It’s okay if there are a few lumps—over-mixing can make waffles tough.
- Fold in egg whites: Carefully fold the whipped egg whites into the batter in three additions. Use a light hand to keep the air bubbles intact for maximum fluffiness.
- Cook waffles: Lightly grease your waffle iron with butter or oil. Pour about ½ cup (120ml) of batter onto the hot iron (adjust amount depending on your iron size). Close the lid and cook for 4 to 6 minutes until golden brown and crisp.
- Keep warm: Place cooked waffles on a cooling rack in a warm oven (about 200°F or 90°C) if making multiple batches. This prevents sogginess and keeps them crisp.
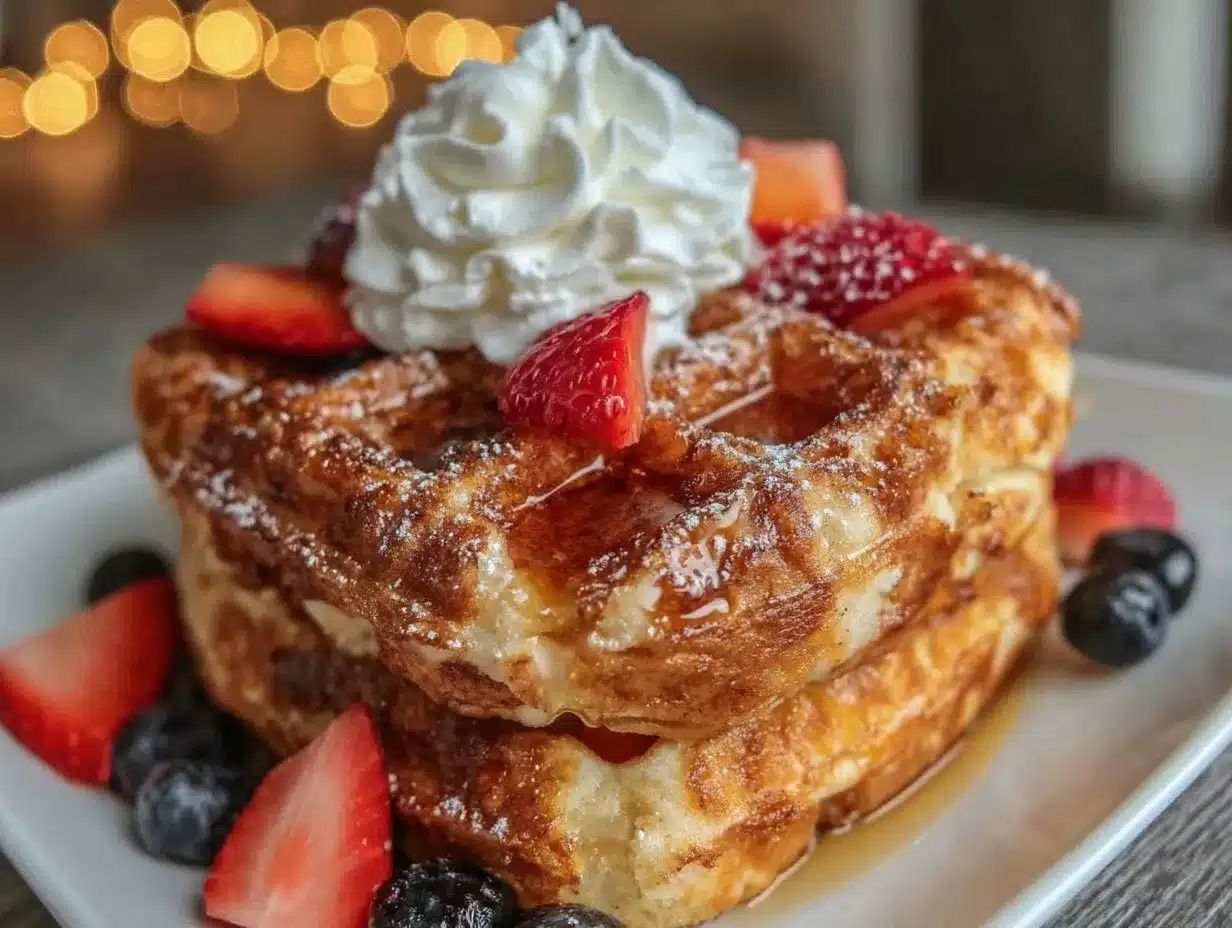
- Serve: Top with a generous dollop of whipped heavy cream and your favorite syrup, fresh fruit, or a spoonful of the creamy cottage cheese chocolate mousse from this recipe for a truly indulgent treat.
Cooking Tips & Techniques
Getting waffles just right requires a few little tricks I’ve learned the hard way. First, don’t skip whipping the egg whites—that’s the secret behind the light, cloud-like texture. A quick test: the whites should hold stiff peaks and not slide off your whisk.
Also, be patient with your waffle iron. Rushing the cooking time leads to pale, soggy waffles. Let the iron do its job without opening it too soon—trust me, I’ve been guilty of that impatient flip more times than I’d admit.
If you want crispier waffles, try adding a tablespoon of cornstarch to the dry ingredients. It helps create that golden, crunchy exterior without drying out the inside.
Multitasking tip: While the waffles cook, whip the cream or prep fruit toppings. This keeps the workflow smooth and gets everything to the table warm and fresh.
And here’s a personal nugget: once, I forgot to separate the eggs and ended up with dense waffles. Lesson learned—separating and folding in the whites properly makes all the difference.
Variations & Adaptations
This recipe is a solid base for all kinds of tasty twists. Here are a few ways to make it your own:
- Gluten-Free: Swap all-purpose flour with a gluten-free blend like Bob’s Red Mill 1-to-1 flour. The texture will be slightly different but still delicious.
- Vegan-Friendly: Use flax eggs (1 tablespoon ground flaxseed + 3 tablespoons water per egg) and swap buttermilk for almond or oat milk mixed with vinegar. Use coconut cream whipped for topping.
- Seasonal Flavors: Fold in fresh blueberries, diced apples with cinnamon, or even pumpkin puree and warming spices for autumn vibes.
- Extra Protein: Add a scoop of unflavored collagen powder to the batter or pair your brunch with a creamy collagen hot chocolate like this one for a nourishing boost.
- Sweet & Savory: Top with crispy bacon and a drizzle of maple syrup or try a savory twist with herbs and a dollop of creamy cottage cheese from this recipe.
I once tried adding a little nutritional yeast to the batter for a subtle cheesy note—it was surprisingly good and paired nicely with a savory topping. You might find inspiration in some of the creative twists shared in this creamy nutritional yeast Caesar dressing recipe.
Serving & Storage Suggestions
Serve these waffles fresh and warm, topped generously with whipped cream and your favorite syrup or fresh berries. They’re perfect with a side of crispy bacon or sautéed mushrooms for a balanced brunch plate.
If you have leftovers (lucky you!), store them in an airtight container in the refrigerator for up to 2 days. To reheat, pop them in a toaster or oven at 350°F (175°C) for about 5 minutes to restore crispness—microwaving tends to make waffles soggy.
For longer storage, freeze the waffles in a single layer on a baking sheet, then transfer them to a freezer bag. Reheat straight from frozen in the toaster for a quick, convenient breakfast or snack that still tastes homemade.
Flavors tend to deepen if you let the batter rest for 10-15 minutes before cooking, so if you’re prepping ahead, that’s a handy trick to try. Also, pairing these waffles with a creamy beverage like the creamy vanilla protein cold brew makes the brunch feel both indulgent and balanced.
Nutritional Information & Benefits
One serving (about 2 waffles with cream topping) roughly contains:
| Nutrient | Amount |
|---|---|
| Calories | 350-400 kcal |
| Protein | 10-12g |
| Carbohydrates | 40-45g |
| Fat | 18-20g |
| Fiber | 1-2g |
Using buttermilk adds calcium and probiotics, which are great for digestion. Eggs provide high-quality protein and essential nutrients like choline. If you opt for the whipped cream topping, it adds richness but also fat—so feel free to lighten it with Greek yogurt or a dollop of whipped coconut cream. This recipe is not gluten-free unless you swap the flour, and it contains dairy and eggs, so be mindful of allergies.
Conclusion
Making these fluffy scratch-made waffles with cream has been one of those little joys that turn a regular morning into a cozy celebration. They strike just the right balance between effort and reward—simple ingredients, straightforward steps, and that unbeatable homemade taste. I love how adaptable the recipe is, whether you’re aiming for a classic brunch or a fun twist on a weekend treat.
Feel free to tweak the toppings, mix in your favorite seasonal fruits, or pair with a comforting drink like the creamy collagen hot chocolate to make it your own. It’s a recipe that invites you to slow down, enjoy the process, and savor every bite.
If you give these waffles a try, I’d love to hear how you customize them or what your favorite topping combo is—sharing those little kitchen stories always makes cooking feel more like a community.
FAQs About Fluffy Scratch-Made Waffles
How do I make my waffles extra crispy?
Try adding a tablespoon of cornstarch to the dry mix and cook the waffles a bit longer on a lower heat setting. Also, let them cool on a wire rack instead of stacking to keep them from steaming.
Can I prepare the batter ahead of time?
Yes, you can mix the batter and refrigerate it for up to 24 hours. Just fold in the whipped egg whites right before cooking for best results.
What if I don’t have buttermilk?
No worries! Mix regular milk with a tablespoon of lemon juice or vinegar and let it sit for 5 minutes to mimic the tanginess of buttermilk.
Can I freeze leftover waffles?
Absolutely. Freeze them in a single layer, then store in a freezer bag. Reheat in a toaster or oven directly from frozen for a quick snack or breakfast.
How do I know when waffles are done cooking?
Most waffle irons have an indicator light, but generally, waffles should be golden brown and crisp to the touch. Avoid opening the iron too early to prevent sticking or tearing.
Pin This Recipe!
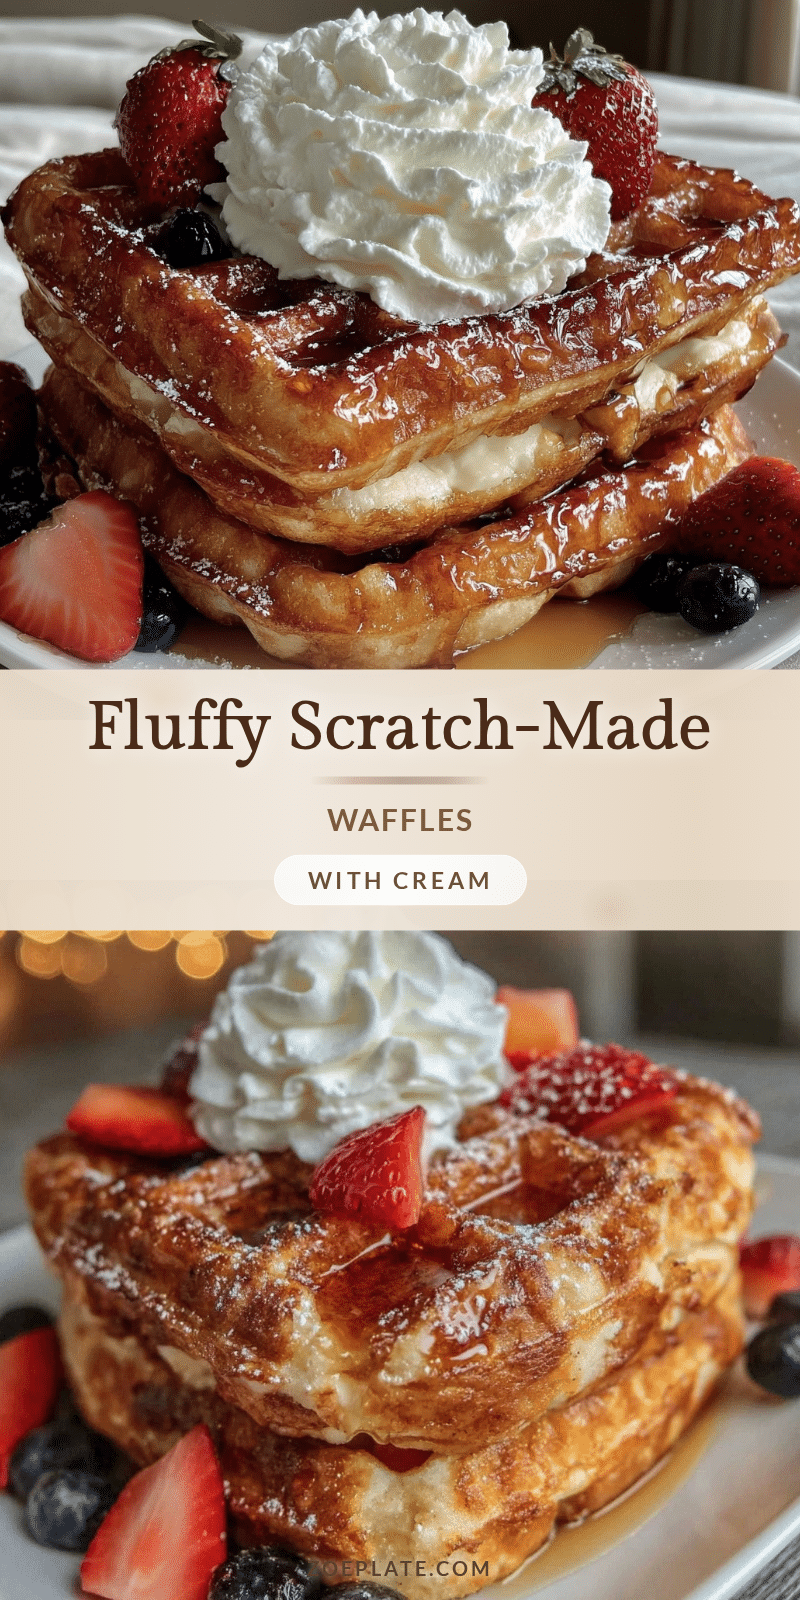
Fluffy Scratch-Made Waffles Recipe Perfect for Cozy Brunch at Home

A simple, forgiving recipe for light and airy scratch-made waffles with a tangy buttermilk base and whipped egg whites, perfect for a cozy weekend brunch.
- Prep Time: 15 minutes
- Cook Time: 10 minutes
- Total Time: 25 minutes
- Yield: 4 servings 1x
- Category: Breakfast, Brunch
- Cuisine: American
Ingredients
- 2 cups (240g) all-purpose flour
- 2 teaspoons (8g) baking powder
- ½ teaspoon (2g) baking soda
- ½ teaspoon (3g) salt
- 2 tablespoons (25g) granulated sugar
- 1 ¾ cups (420ml) buttermilk (or 1 ¾ cups milk + 1 tablespoon lemon juice, let sit 5 minutes)
- 3 large eggs, separated
- ½ cup (115g) unsalted butter, melted and slightly cooled
- 1 teaspoon (5ml) pure vanilla extract
- 1 cup (240ml) heavy cream, whipped lightly for topping (optional, sweeten with powdered sugar if desired)
Instructions
- Separate the eggs carefully. Place the egg whites in a clean, dry bowl, and the yolks in another.
- Melt the butter and let it cool slightly.
- Preheat your waffle iron according to its instructions.
- In a large bowl, whisk together the flour, baking powder, baking soda, salt, and sugar.
- In a separate bowl, whisk the egg yolks with buttermilk, melted butter, and vanilla extract until smooth and slightly frothy.
- Using an electric mixer or balloon whisk, beat the egg whites until stiff peaks form.
- Pour the wet mixture into the dry ingredients and stir gently with a rubber spatula until just combined; some lumps are okay.
- Carefully fold the whipped egg whites into the batter in three additions, using a light hand to keep air bubbles intact.
- Lightly grease your waffle iron with butter or oil.
- Pour about ½ cup (120ml) of batter onto the hot iron, close the lid, and cook for 4 to 6 minutes until golden brown and crisp.
- Place cooked waffles on a cooling rack in a warm oven (about 200°F or 90°C) if making multiple batches to keep them crisp.
- Serve topped with whipped heavy cream and your favorite syrup, fresh fruit, or other toppings.
Notes
Do not skip whipping the egg whites to stiff peaks for the light, airy texture. Avoid over-mixing the batter to keep waffles tender. For crispier waffles, add 1 tablespoon cornstarch to dry ingredients. Let batter rest 10-15 minutes before cooking for deeper flavor. Keep waffles warm on a cooling rack in a low oven to prevent sogginess. Batter can be refrigerated up to 24 hours before folding in egg whites and cooking.
Nutrition
- Serving Size: About 2 waffles with
- Calories: 350400
- Sugar: 68
- Sodium: 400500
- Fat: 1820
- Saturated Fat: 1012
- Carbohydrates: 4045
- Fiber: 12
- Protein: 1012
Keywords: waffles, scratch-made waffles, buttermilk waffles, brunch recipe, fluffy waffles, homemade waffles