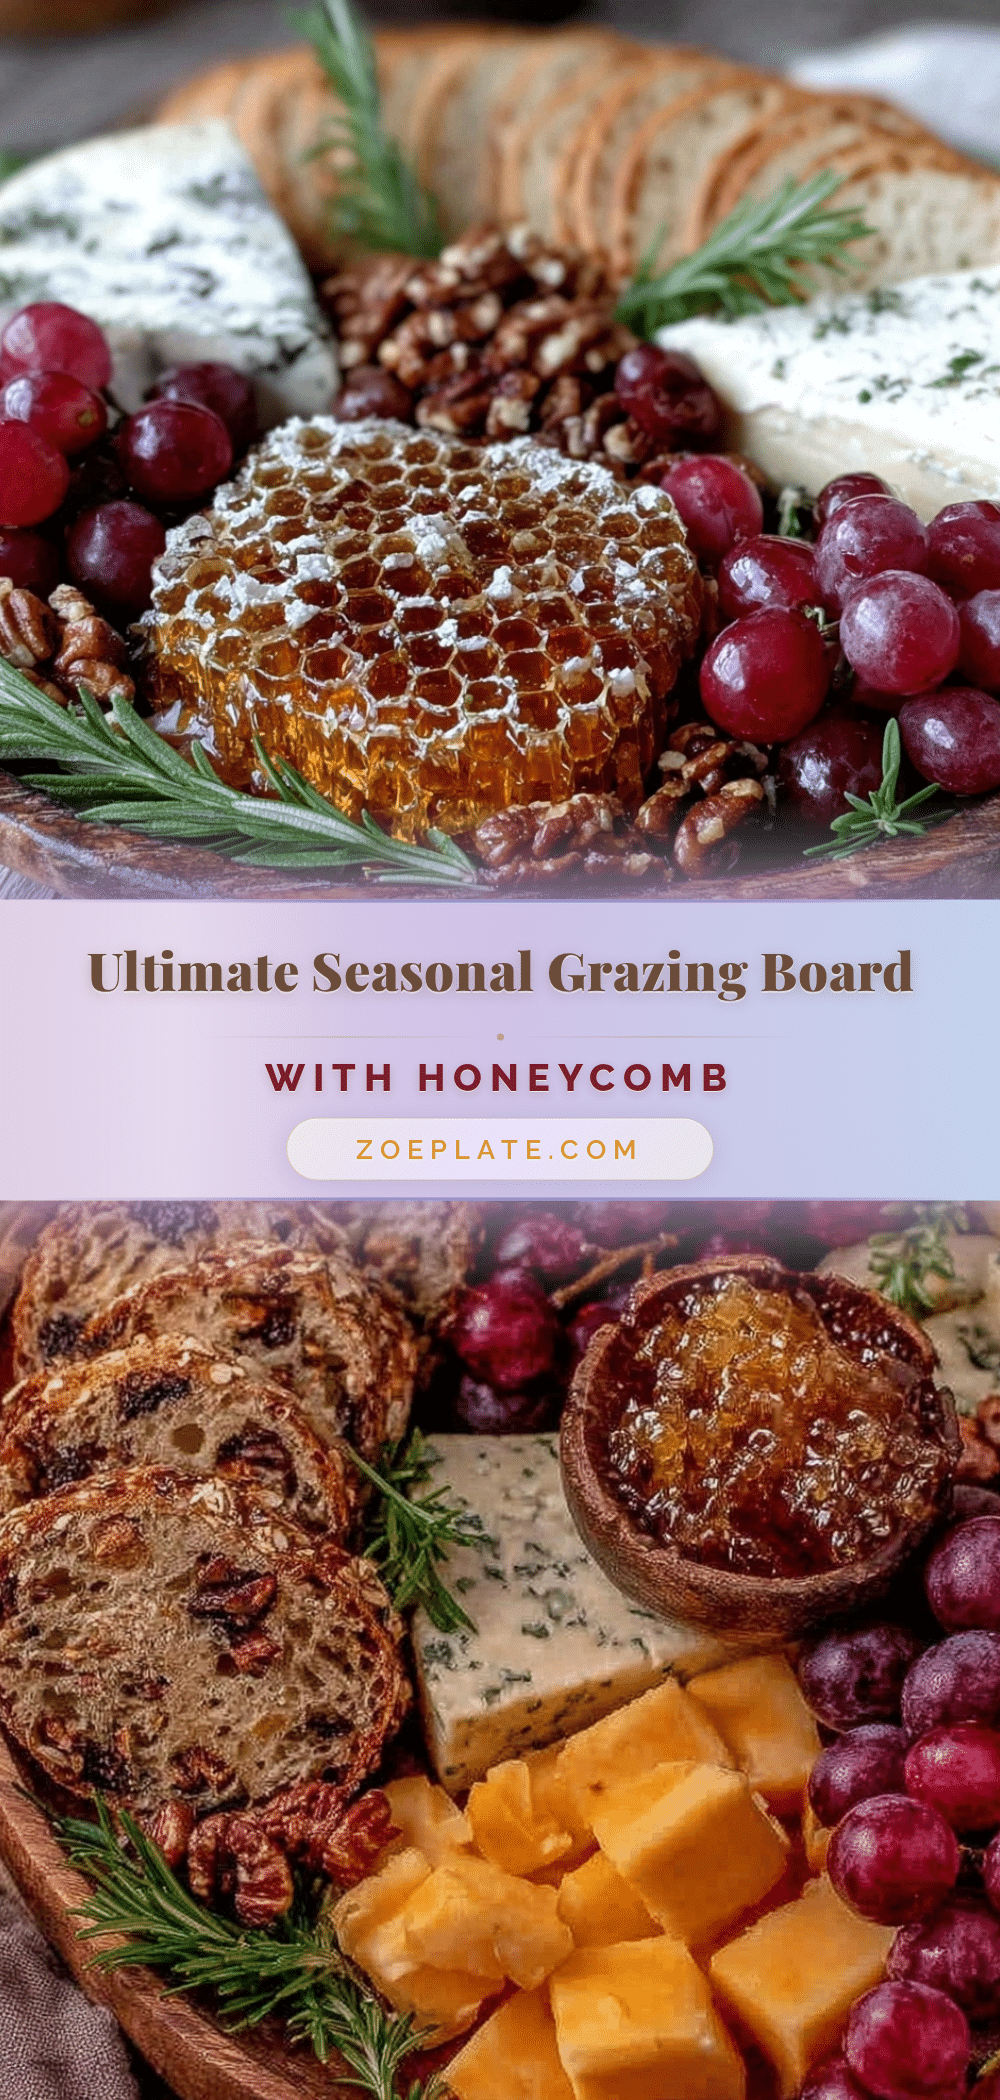
“You brought the board again? Honestly, you’re making this a thing,” my friend joked as I showed up at our weekend get-together with my latest attempt at a grazing board. The truth is, assembling this Perfect Seasonal Grazing Board with Artisan Cheeses and Honeycomb started as a bit of a last-minute scramble. I’d forgotten to plan a proper snack for a casual gathering, and the fridge was looking a little sparse. So, I grabbed a few artisan cheeses, some honeycomb I’d picked up at the farmer’s market, and whatever seasonal fruit and nuts I could find. The result? Something unexpectedly stunning and delicious that everyone kept circling back to.
It wasn’t planned out or fancy, just a collection of flavors and textures that somehow clicked. The crunch of the nuts, the sweet floral notes of honeycomb melding with creamy cheeses, and fresh seasonal touches made it feel effortless but special. Over the next few weeks, I found myself recreating and tweaking this board — sometimes adding a little homemade jam or swapping cheeses depending on the season. Each time, it felt just right, perfect for relaxing evenings or impromptu hosting.
Looking back, that accidental win stuck with me because it reminded me that entertaining doesn’t have to be complicated. A few quality ingredients, a bit of creativity, and a little honeycomb magic can make a simple gathering feel cozy and memorable. This recipe isn’t about perfection — it’s about savoring the moments and flavors that bring people together, no fuss required.
Why You’ll Love This Recipe
After making this Perfect Seasonal Grazing Board with Artisan Cheeses and Honeycomb several times, I can say it’s become my go-to for easy entertaining. Here’s why it works so well:
- Quick & Easy: You can pull this together in under 20 minutes, which is a lifesaver when you’re short on time but want to impress.
- Simple Ingredients: All the elements are straightforward, mostly pantry staples or items from local markets. No hunting for obscure products.
- Perfect for Any Occasion: Whether it’s a casual brunch, a cozy date night in, or a holiday gathering, this board fits right in.
- Crowd-Pleaser: Kids, adults, picky eaters — everyone finds something to love, especially with the sweet honeycomb balancing out savory cheeses.
- Unbelievably Delicious: The combination of creamy, nutty, sweet, and crunchy textures makes every bite feel indulgent yet approachable.
What makes this recipe stand out is the way it highlights seasonal produce alongside artisan cheeses, giving you a fresh, vibrant board that feels thoughtfully curated without hours of prep. The honeycomb is a game-changer — its natural sweetness and waxy texture add a rustic charm and a touch of unexpected elegance. I usually pick small-batch, raw honeycomb from trusted local producers to keep that authentic flavor.
Honestly, this isn’t just another grazing board — it’s the kind of dish that makes you pause and appreciate the simple joys of food shared with friends. It’s comfort food in a way that’s light but satisfying, perfect for turning a simple gathering into a memorable one.
What Ingredients You Will Need
This recipe uses simple, wholesome ingredients to deliver bold flavor and satisfying texture without the fuss. Most are pantry staples or easy to find at your local market, with the artisan cheeses and honeycomb as the stars of the show. Feel free to swap ingredients seasonally or based on what you have on hand.
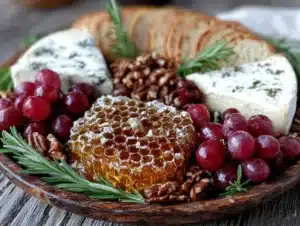
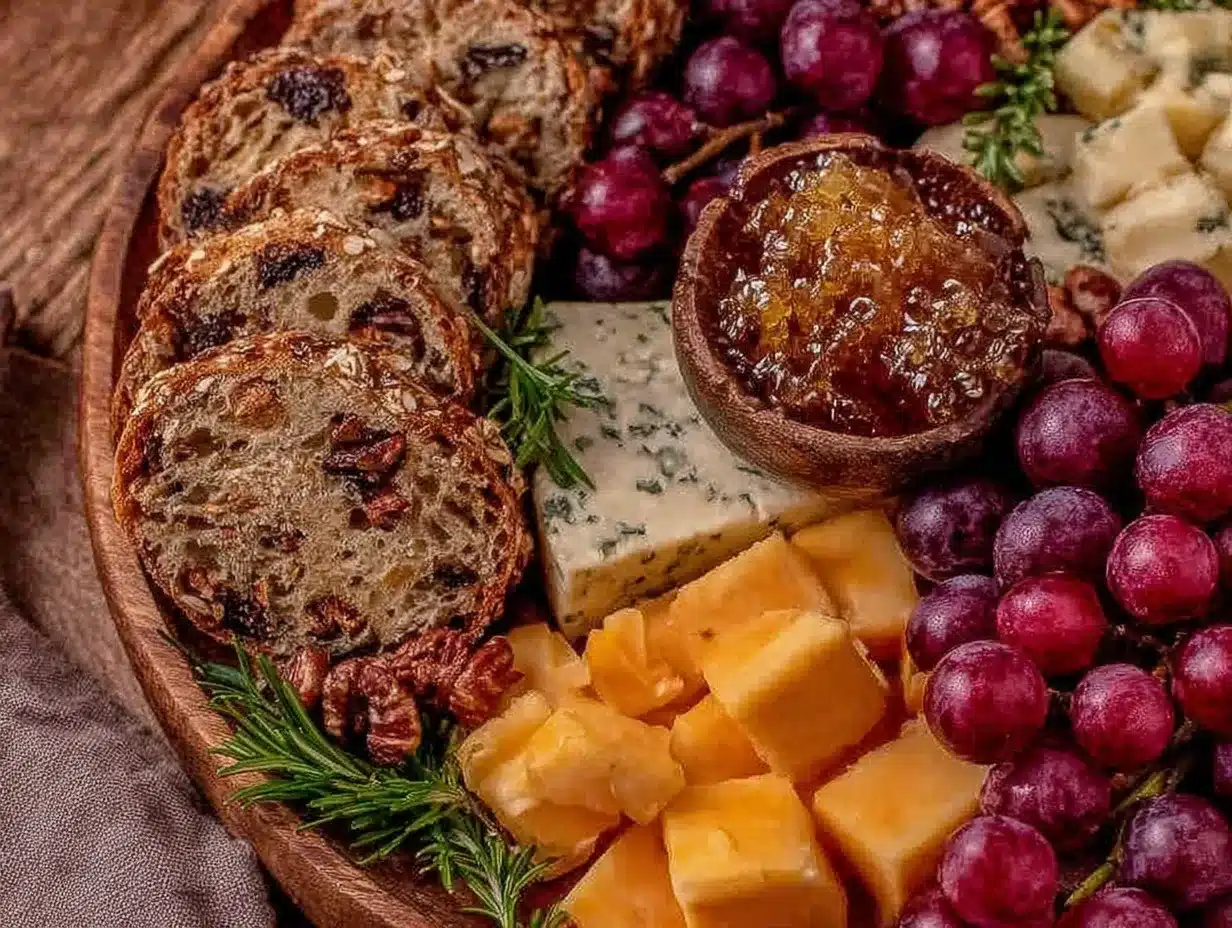
- Artisan Cheeses: Select 3-5 varieties for a balanced board. Examples include creamy Brie, sharp aged Cheddar, tangy goat cheese, nutty Gruyère, and blue cheese. I recommend brands like Beecher’s Handmade Cheese or Rogue Creamery for quality you can taste.
- Honeycomb: About 4-6 ounces (115-170 g), raw and fresh if possible. Local farmer’s markets are gold mines for this.
- Fresh Seasonal Fruit: Think grapes, figs, apple slices, pears, or berries — about 2 cups total. In summer, swap in fresh stone fruits like peaches or plums.
- Nuts: Toasted almonds, walnuts, or pecans (about ½ cup / 60 g) add crunch and richness.
- Crackers and Bread: Choose a mix of crisp crackers and sliced baguette or artisan bread — about 2 cups total. Multi-grain or seeded varieties work beautifully.
- Accents and Extras: Olives (½ cup / 75 g), cornichons or pickled vegetables (½ cup / 75 g), and fresh herbs like rosemary or thyme for garnish.
- Optional Sweet Touches: Small bowls of fig jam or grainy mustard add layers of flavor.
If you want to make this gluten-free, just swap the bread and crackers for gluten-free versions or rice crackers. For a vegan twist, try plant-based cheeses and a drizzle of agave syrup instead of honeycomb. I’ve also found swapping Greek yogurt for soft cheeses works well for a lighter feel.
Equipment Needed
Putting together this Perfect Seasonal Grazing Board doesn’t require anything fancy, but a few tools make the process smoother:
- Large Wooden or Slate Serving Board: A sturdy surface about 18×12 inches lets you arrange all your elements beautifully. I’ve used both and love the rustic feel of slate, though a wooden board warms up the presentation.
- Cheese Knives: A set with different blades for soft and hard cheeses helps guests serve themselves easily. If you don’t have specialty knives, a sharp paring knife works fine.
- Small Bowls: For olives, nuts, jams, and honeycomb pieces to keep things neat.
- Cutting Board and Sharp Knife: For slicing fruit, bread, and cheeses.
- Tongs or Small Spreaders: Handy for serving spreads or picking up delicate items.
For budget-friendly options, thrift stores often have great wooden boards, and you can improvise cheese knives with butter knives if needed. Just keep everything clean and dry, especially when working with honeycomb to avoid stickiness spreading.
Preparation Method
- Prep the Ingredients (10-15 minutes): Rinse and dry your fresh fruit, then slice or halve as needed. Toast the nuts lightly in a dry pan over medium heat for 3-5 minutes until fragrant, shaking frequently to avoid burning.
- Slice the Cheeses (5 minutes): Cut harder cheeses like aged Cheddar or Gruyère into bite-sized cubes or thin slices. Leave softer cheeses like Brie or goat cheese whole or in wedges for a rustic look.
- Arrange the Board (5-7 minutes): Place the largest cheese wedges spaced apart on the board first. Next, add small bowls for honeycomb, olives, and jams. Fill in gaps with fruit clusters, nuts, and crackers, layering colors and textures to keep it inviting.
- Add Final Touches (2-3 minutes): Garnish with fresh herbs like rosemary sprigs or thyme leaves to add a pop of green and fragrance. Drizzle a little honey around the honeycomb bowl for extra sweetness and shine.
- Serve and Enjoy: Leave knives and spreaders on the board for easy self-serving.
Tip: Keep the honeycomb chilled until just before serving to maintain its delicate texture. If you notice any stickiness spreading on the board, a quick wipe with a damp cloth works wonders.
When I make this board, I like to prep the nuts and fruit first to save time. Sometimes I even toast nuts ahead and keep them in an airtight jar, so the assembly feels more like a relaxing art project than a scramble.
Cooking Tips & Techniques
Putting together a grazing board seems straightforward, but a few tricks can elevate your presentation and flavor balance:
- Balance Flavors: Combine salty, sweet, creamy, and crunchy components. The honeycomb’s sweetness is perfect alongside tangy cheeses and salty olives.
- Mind the Textures: Offer a mix of soft cheeses, crisp crackers, juicy fruit, and crunchy nuts. This makes the board more interesting bite after bite.
- Don’t Overload: Leave some negative space on the board to keep it from looking chaotic. It also makes grabbing snacks easier.
- Room Temperature Cheeses: Remove cheeses from the fridge 30 minutes before serving for the best flavor and creaminess.
- Fresh is Best: Use seasonal fruits at their peak for vibrant color and taste. Overripe or soggy fruit can detract from the experience.
One mistake I’ve made is trying to cram too many extras on the board — it looks overwhelming and steals attention from the star ingredients. Also, I learned that honeycomb melts quickly at room temperature, so keeping it chilled until guests arrive helps preserve its shape.
Multitasking tip: While the nuts toast, slice cheeses and fruit. This helps keep your prep flowing smoothly without downtime.
Variations & Adaptations
This grazing board is wonderfully flexible, letting you tailor it for different tastes and dietary needs:
- Seasonal Swaps: Use fresh berries and stone fruits in summer, and roasted root vegetables or dried fruits like apricots in fall and winter.
- Dietary Adjustments: For gluten-free boards, swap crackers and bread for seed crackers or rice cakes. Vegan cheeses and agave syrup can replace traditional cheese and honeycomb.
- Flavor Twists: Add spiced nuts (think cinnamon or smoked paprika) or include marinated vegetables for a savory punch.
- Cooking Method Variations: Try warming some cheeses slightly under a broiler for a melty effect, or add a small skillet of baked brie to the board.
- Personal Variation I Love: I once added a small dish of creamy cacio e pepe pasta on the side for a richer, Italian-inspired spread. It was a hit for a cozy night in.
Serving & Storage Suggestions
Serve your Perfect Seasonal Grazing Board at room temperature to allow the cheeses to bloom and the honeycomb to shine. Arrange it on a large surface where guests can reach easily and enjoy the casual vibe.
Pair the board with a crisp white wine like Sauvignon Blanc or a light rosé for a refreshing balance. For non-alcoholic options, sparkling water with a twist of lemon or iced herbal tea works nicely.
Leftovers can be stored in airtight containers in the refrigerator for up to 3 days. Keep cheeses wrapped separately to preserve their texture. Honeycomb is best eaten fresh but can be refrigerated for a couple of days — just bring it back to room temperature before serving.
When reheating bread or crackers, a quick 5-minute toast in the oven revives their crunch. The flavors of the board actually deepen after a day as the honeycomb infuses into the cheeses and fruit, making for a delightful second serving.
Nutritional Information & Benefits
This grazing board offers a balanced mix of nutrients from wholesome ingredients:
- Rich in protein and calcium from artisan cheeses to support bone health.
- Natural sugars and antioxidants from fresh seasonal fruit promote vitality.
- Healthy fats from nuts and honeycomb provide sustained energy and satiety.
- Low in processed ingredients, making it a cleaner choice compared to many snack options.
For those watching carbs, choosing lower-carb crackers or more vegetables can keep the board lighter. If you have allergies, easily swap nuts or dairy for safe alternatives. Personally, I find this board a satisfying way to enjoy a variety of flavors and textures while keeping things nourishing and fun.
Conclusion
The Perfect Seasonal Grazing Board with Artisan Cheeses and Honeycomb has become a staple in my entertaining toolkit because it’s just so easy to make and endlessly adaptable. What started as a last-minute snack fix turned into a recipe I now rely on for casual hangouts and special moments alike.
Feel free to make it your own by switching up cheeses, fruits, or nuts based on what’s fresh or what you crave. I love how this board invites guests to nibble and savor at their own pace, turning simple ingredients into something that feels like a celebration.
If you enjoy putting together boards that mix textures and flavors, you might appreciate the crunchy, sweet fun in my simple ants on a log recipe or the cozy vibes of a one-pot freezer meal for those busier days.
Give this grazing board a try and share your tweaks or favorite cheese combos in the comments. There’s something truly satisfying about gathering around good food and even better company.
FAQs
What cheeses work best for a seasonal grazing board?
Choose a variety of textures and flavors like creamy Brie, sharp Cheddar, tangy goat cheese, and nutty Gruyère. Including a blue cheese adds a bold option for adventurous eaters.
How do I keep honeycomb from getting sticky on the board?
Keep the honeycomb chilled until serving, and place it in a small bowl or on wax paper to contain stickiness. Wipe any spills quickly with a damp cloth.
Can I prepare the grazing board ahead of time?
You can prep most ingredients a few hours ahead, but assemble the board just before serving to keep fresh textures and flavors.
What are good substitutes for nuts for those with allergies?
Try seeds like pumpkin or sunflower seeds, or crunchy roasted chickpeas as nut-free alternatives that still add texture.
How should I store leftovers from the grazing board?
Wrap cheeses separately and store in airtight containers in the fridge for up to 3 days. Keep honeycomb in a sealed container and bring to room temperature before serving again.
Pin This Recipe!
Perfect Seasonal Grazing Board Recipe with Artisan Cheeses and Honeycomb for Easy Entertaining

An easy-to-assemble grazing board featuring a variety of artisan cheeses, fresh seasonal fruits, nuts, honeycomb, and crackers, perfect for casual gatherings and entertaining.
- Prep Time: 15 minutes
- Cook Time: 5 minutes
- Total Time: 20 minutes
- Yield: 6-8 servings 1x
- Category: Appetizer
- Cuisine: American
Ingredients
- 3–5 varieties of artisan cheeses (e.g., Brie, aged Cheddar, goat cheese, Gruyère, blue cheese)
- 4–6 ounces raw honeycomb
- 2 cups fresh seasonal fruit (e.g., grapes, figs, apple slices, pears, berries, peaches, plums)
- ½ cup toasted nuts (almonds, walnuts, or pecans)
- 2 cups crackers and sliced baguette or artisan bread (multi-grain or seeded varieties)
- ½ cup olives
- ½ cup cornichons or pickled vegetables
- Fresh herbs like rosemary or thyme for garnish
- Optional: small bowls of fig jam or grainy mustard
Instructions
- Rinse and dry fresh fruit, then slice or halve as needed.
- Toast nuts lightly in a dry pan over medium heat for 3-5 minutes, shaking frequently to avoid burning.
- Cut harder cheeses into bite-sized cubes or thin slices; leave softer cheeses whole or in wedges.
- Place largest cheese wedges spaced apart on the serving board.
- Add small bowls for honeycomb, olives, and jams.
- Fill gaps with fruit clusters, nuts, and crackers, layering colors and textures.
- Garnish with fresh herbs and drizzle a little honey around the honeycomb bowl.
- Leave knives and spreaders on the board for easy self-serving.
Notes
Keep honeycomb chilled until just before serving to maintain texture and prevent stickiness. Remove cheeses from the fridge 30 minutes before serving for best flavor. Toast nuts ahead and store in airtight container to save time. Leave some negative space on the board for easy grabbing and visual appeal. Use gluten-free crackers and bread for gluten-free option; plant-based cheeses and agave syrup for vegan adaptation.
Nutrition
- Serving Size: Approximately 1/6 to
- Calories: 0.30035
- Sugar: 10
- Sodium: 350
- Fat: 22
- Saturated Fat: 10
- Carbohydrates: 18
- Fiber: 3
- Protein: 10
Keywords: grazing board, artisan cheeses, honeycomb, seasonal fruit, easy entertaining, snack board, cheese board, nuts, crackers