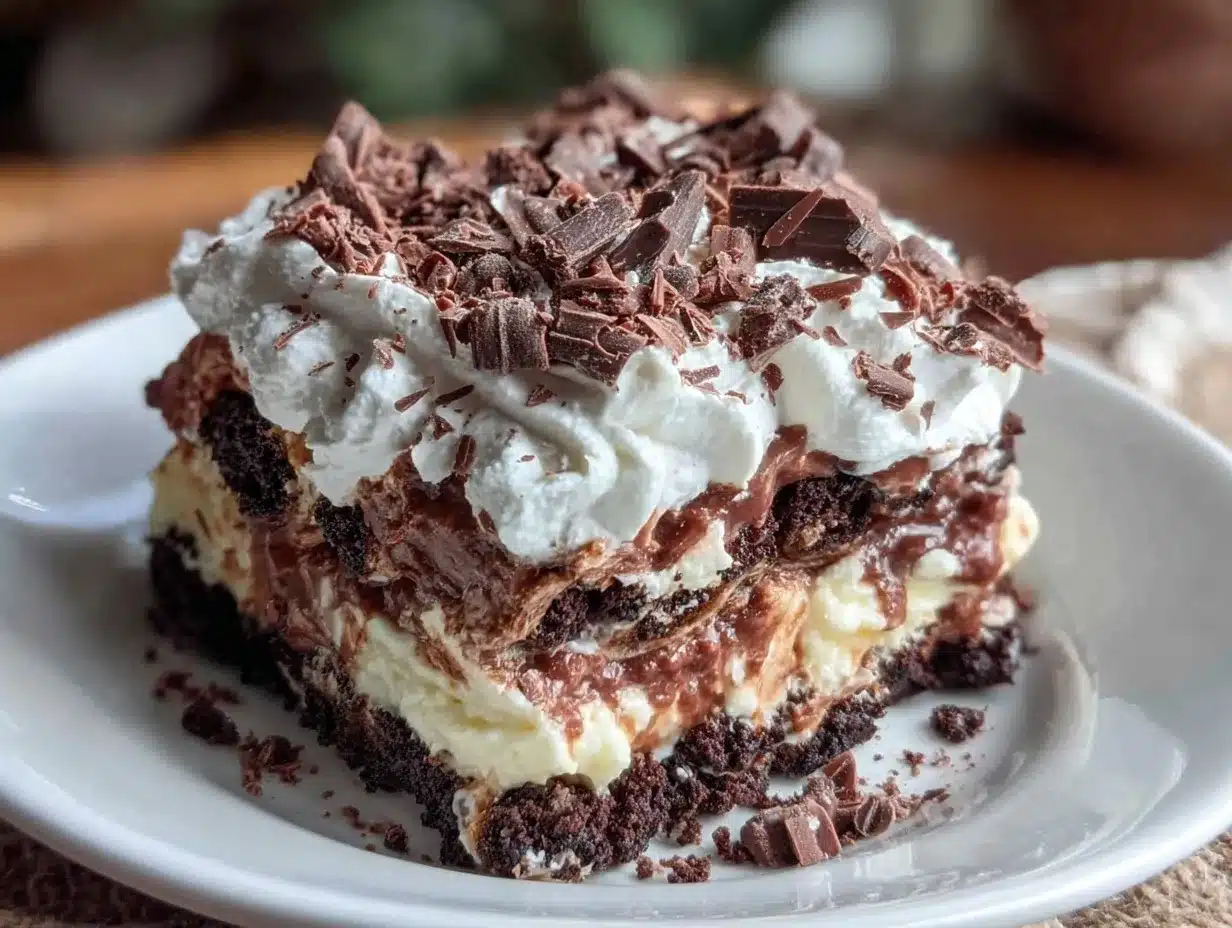
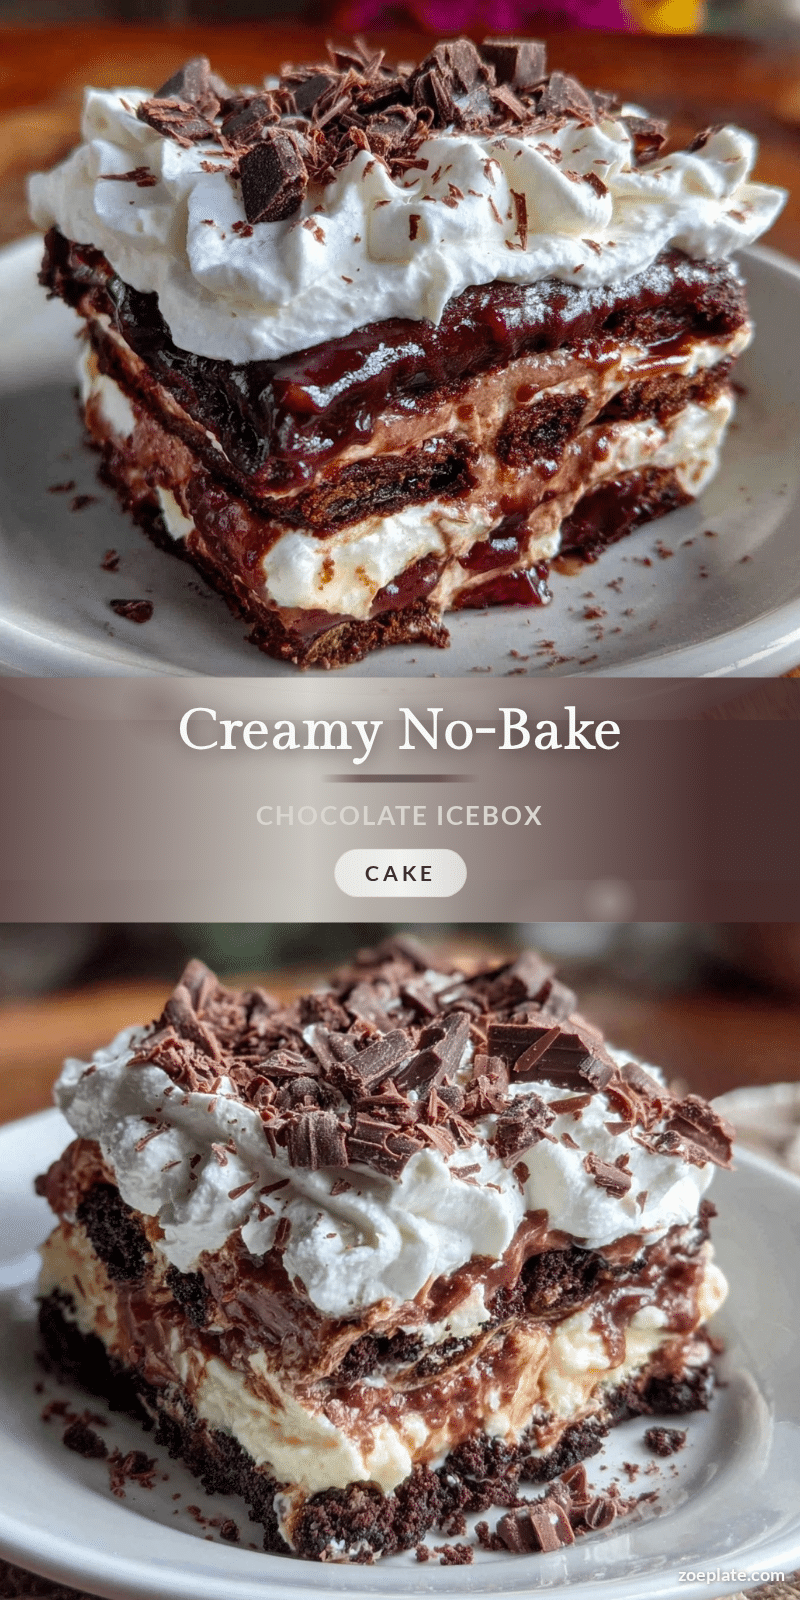
“You really have to try my mom’s chocolate icebox cake,” my friend said, sliding a slice across the table with a knowing grin. Honestly, I was skeptical—no-bake desserts always felt like a bit of a cheat to me, lacking the oomph of a good baked treat. But that afternoon, sun filtering through the kitchen window, I took a bite and something unexpected happened. The rich, velvety chocolate whipped cream melded with the crisp, yet tender cookie layers in a way that made me pause. It wasn’t just a quick fix for dessert; it felt like a quiet celebration in every forkful.
That moment stuck with me, especially on those days when I want something indulgent but don’t have the energy to stand by the oven. The creamy chocolate icebox cake with whipped cream became my go-to, the kind of dessert I’d make repeatedly in the week, even inviting friends over just to share it. It’s the perfect blend of simple ingredients yielding a dreamy texture that melts in your mouth—no complicated steps, no fuss, just pure chocolate bliss.
What’s funny is how this recipe slowly turned from a “maybe I’ll try it” to a “this is the one” kind of dessert. The cool, luscious layers are a refreshing treat, especially when you want something that feels homemade but doesn’t demand hours. And honestly, it’s a recipe that brings people together—a slice on a lazy weekend, or a sweet finish after a meal like the ultimate juicy French dip sandwiches I recently made. It’s the kind of comfort food that quietly promises a moment of calm and happiness.
Why You’ll Love This Creamy Chocolate Icebox Cake Recipe
This creamy chocolate icebox cake with whipped cream isn’t just another dessert; it has earned its place in my recipe rotation through countless tests and happy taste testers. Here’s the lowdown on why it’s so special:
- Quick & Easy: Ready in under 30 minutes, this no-bake dessert fits perfectly into busy weeknights or last-minute entertaining plans.
- Simple Ingredients: Using pantry staples like chocolate wafers, heavy cream, and cocoa powder means no extra trips to specialty stores.
- Perfect for Gatherings: Whether it’s a casual brunch or a cozy dinner party, this cake always disappears fast.
- Crowd-Pleaser: Kids and adults alike rave about the creamy texture combined with the chocolate crunch.
- Unbelievably Delicious: The layers soak up flavor overnight, creating a luscious, melt-in-your-mouth experience that feels indulgent but not heavy.
What sets this recipe apart is the whipped cream’s silky smoothness, whipped just right to balance the rich chocolate flavor without overwhelming it. I also love how the cake layers soften just enough without turning soggy, thanks to a careful chill time and layering method. This isn’t just a paste-and-chill dessert—it’s a thoughtfully crafted treat that feels special every time.
If you want a dessert that’s fuss-free but still has that “wow” factor, this recipe hits the spot. And if you’re a fan of creamy, dreamy desserts like the creamy chocolate pudding from scratch, you’ll find this icebox cake a perfect companion for your sweet tooth cravings.
What Ingredients You Will Need for Creamy Chocolate Icebox Cake
This recipe uses straightforward, wholesome ingredients to deliver rich chocolate flavor and a satisfyingly smooth texture without complicating things.
- Chocolate Wafers or Thin Chocolate Cookies: About 36 pieces (I prefer Nabisco Famous Chocolate Wafers for their perfect snap and classic flavor)
- Heavy Whipping Cream: 2 cups (480 ml), cold for best whipping results
- Powdered Sugar: 1/3 cup (40 g), sifted to avoid lumps
- Unsweetened Cocoa Powder: 1/4 cup (20 g), sifted (Dutch-processed cocoa works beautifully here)
- Vanilla Extract: 1 teaspoon for subtle warmth and depth
- Salt: A pinch to balance sweetness
Optional but delicious additions:
- Espresso Powder: 1/2 teaspoon, to enhance the chocolate notes
- Chocolate Shavings or Chips: Sprinkle between layers or on top for added texture
If you want to swap ingredients, almond flour cookies can replace wafers for a gluten-free twist, and coconut cream whipped with a bit of maple syrup makes a decent dairy-free version (though the texture shifts slightly). For summer vibes, try layering fresh raspberries between the chocolate wafers for a fruity contrast.
Equipment Needed
- Mixing Bowl: A large one for whipping cream comfortably
- Electric Hand Mixer or Stand Mixer: Essential for whipping cream to soft peaks without the arm ache
- Spatula: For folding in cocoa powder and spreading the whipped cream evenly
- 9×13 Inch (23×33 cm) Baking Dish or Similar Size Pan: Ideal for layering the cake
- Sifter or Fine Mesh Strainer: To evenly distribute cocoa powder and powdered sugar
- Plastic Wrap or Lid: To cover the cake while chilling
If you don’t own a mixer, a sturdy whisk and some elbow grease work fine, though it takes longer to reach ideal whipping consistency. For budget-friendly options, hand mixers like the Hamilton Beach are reliable without breaking the bank. Keeping your bowl and beaters chilled in the fridge before whipping helps a ton—trust me, that’s a game changer.
Preparation Method
- Chill Your Equipment: Place your mixing bowl and beaters in the fridge for at least 15 minutes before starting. Cold cream whips faster and holds better.
- Prepare the Whipped Cream: Pour 2 cups (480 ml) of cold heavy whipping cream into the chilled bowl. Using an electric mixer, beat on medium speed until it starts to thicken (about 2 minutes).
- Add Sweeteners and Flavor: Gradually add 1/3 cup (40 g) powdered sugar, 1/4 cup (20 g) sifted cocoa powder, 1 teaspoon vanilla extract, and a pinch of salt. Continue beating on medium-high until soft peaks form (about 1-2 more minutes). Be careful not to overbeat — the cream should be fluffy but not grainy.
- Layer the Cake: In your 9×13 inch (23×33 cm) baking dish, spread a thin layer of the chocolate whipped cream on the bottom. Arrange chocolate wafers in a single layer over the cream, breaking a few to fit as needed.
- Continue Layering: Spread another layer of the chocolate whipped cream over the wafers (about 1/3 of your total cream), smoothing gently with a spatula. Repeat wafer and cream layers two more times, finishing with a final cream layer on top.
- Chill: Cover the dish tightly with plastic wrap or a lid. Refrigerate for at least 6 hours, preferably overnight. This allows the wafers to soften and absorb moisture, creating that signature creamy texture.
- Serve: Before serving, optionally dust with extra cocoa powder or sprinkle chocolate shavings. Cut into squares with a sharp knife, wiping the blade between cuts for clean slices.
Watch out for overwhipping the cream — once it starts to stiffen, stop mixing immediately. If you’re short on time, a minimum of 4 hours chilling still works, but the texture benefits from that overnight rest. When layering, don’t press down too hard; you want the wafers to remain distinct while softening, not mushy.
Cooking Tips & Techniques for Perfect Icebox Cake
Mastering this creamy chocolate icebox cake comes down to a few key tips I learned the hard way:
- Keep Everything Cold: From the cream to your mixing tools, cold is your friend. It helps the cream whip better and hold its shape.
- Don’t Rush the Chill: The magic happens as the wafers soak up moisture overnight. Skipping this step leads to a crumbly, less cohesive cake.
- Use Fresh Whipping Cream: Older cream can be harder to whip and won’t hold peaks as well.
- Layer Thoughtfully: Spread cream evenly but gently to avoid breaking wafers too much. This preserves texture contrast.
- Experiment with Flavors: Try adding a teaspoon of espresso powder into the whipped cream for a mocha twist, or a splash of almond extract for a nutty note.
One time, I whipped the cream too much and ended up with butter instead of fluffy topping — lesson learned the messy way! Also, multitasking by prepping the whipped cream while pre-chilling the dish saves time. Patience is key; the cake looks simple but demands that chill for the best results.
Variations & Adaptations to Suit Your Taste
This recipe is wonderfully flexible, letting you tailor it to different occasions and diets:
- Fruit-Infused: Add fresh berries or sliced bananas between layers for a fruity surprise and a pop of color.
- Nutty Crunch: Sprinkle toasted chopped nuts like hazelnuts or pecans inside layers for texture and flavor.
- Dairy-Free Version: Use coconut cream whipped with a bit of powdered sugar and cocoa powder. Swap wafers for gluten-free cookies if needed.
- Mocha Delight: Stir 1/2 teaspoon espresso powder into the whipped cream for a coffee-chocolate blend.
For a richer cake, fold in mini chocolate chips or swirl in a bit of softened cream cheese with the whipped cream. I once tried layering crushed peppermint candies during the holidays, which gave a festive crunch and minty freshness. You can also adapt the recipe for individual servings using small jars or ramekins, making it perfect for single-night indulgence.
Serving & Storage Suggestions
Serve this creamy chocolate icebox cake chilled, straight from the fridge. A sharp knife warmed in hot water cuts through the layers cleanly, giving neat slices. It pairs beautifully with a cup of coffee or a glass of cold milk for a classic combo.
For a complete dessert spread, add a scoop of vanilla ice cream or a drizzle of raspberry sauce to contrast the rich chocolate. It also makes a lovely finale after a savory meal like the garlic butter baked cod I enjoy making when I want something light yet flavorful.
Store leftovers covered in the refrigerator for up to 3 days. The flavors deepen with time, but the texture is best within the first two days. If freezing, wrap tightly and thaw overnight in the fridge before serving; texture may soften a bit but remains delicious.
Nutritional Information & Benefits
Each slice (about 1/12th of the cake) provides approximately 250 calories, with 18 grams of fat, 15 grams of carbohydrates, and 3 grams of protein. Using heavy cream adds richness but also brings essential fats that help absorb fat-soluble vitamins.
Cocoa powder is rich in antioxidants and can boost mood thanks to compounds like flavonoids. Choosing powdered sugar over granulated helps the cream whip smoothly without graininess.
This dessert is gluten-friendly if you select gluten-free wafers and can be adapted for dairy-free diets. It’s a treat best enjoyed in moderation, pairing indulgence with simple, quality ingredients.
Conclusion
This creamy chocolate icebox cake with whipped cream has earned a permanent spot in my dessert lineup. It’s a no-fuss, no-bake recipe that feels indulgent without demanding a ton of time or fancy ingredients. Whether you’re winding down after a hectic day or hosting an impromptu get-together, it’s a sweet solution that pleases a crowd.
Feel free to customize it—add your favorite flavors or textures to make it your own. I love how it brings a little joy and calm to my kitchen, and I hope it does the same for you. If you try it, I’d love to hear how you make it yours or what tweaks you add. Sweet moments are better shared.
FAQs About Creamy Chocolate Icebox Cake with Whipped Cream
Can I make this icebox cake ahead of time?
Absolutely! In fact, chilling it overnight is best for perfect texture and flavor melding.
What can I use if I don’t have heavy cream?
For a similar texture, whipping coconut cream works as a dairy-free alternative, though the flavor will differ slightly.
How do I store leftover icebox cake?
Keep it covered in the fridge for up to 3 days. Avoid freezing if possible, as it changes the texture.
Can I add other flavors to the whipped cream?
Yes! Vanilla is classic, but almond extract, espresso powder, or even a splash of liqueur can add a fun twist.
What’s the best way to cut the cake cleanly?
Use a sharp knife warmed under hot water and wiped dry between cuts for neat slices without cracking.
Pin This Recipe!
Creamy Chocolate Icebox Cake Recipe Easy No-Bake Dessert with Whipped Cream

A no-bake, creamy chocolate icebox cake layered with chocolate wafers and whipped cream, perfect for an indulgent yet easy dessert that melts in your mouth.
- Prep Time: 15 minutes
- Cook Time: 0 minutes
- Total Time: 6 hours 15 minutes
- Yield: 12 servings 1x
- Category: Dessert
- Cuisine: American
Ingredients
- 36 chocolate wafers or thin chocolate cookies (e.g., Nabisco Famous Chocolate Wafers)
- 2 cups (480 ml) cold heavy whipping cream
- 1/3 cup (40 g) powdered sugar, sifted
- 1/4 cup (20 g) unsweetened cocoa powder, sifted (Dutch-processed recommended)
- 1 teaspoon vanilla extract
- Pinch of salt
- Optional: 1/2 teaspoon espresso powder
- Optional: chocolate shavings or chips for layering or topping
Instructions
- Chill your mixing bowl and beaters in the fridge for at least 15 minutes before starting.
- Pour 2 cups of cold heavy whipping cream into the chilled bowl. Using an electric mixer, beat on medium speed until it starts to thicken (about 2 minutes).
- Gradually add 1/3 cup powdered sugar, 1/4 cup sifted cocoa powder, 1 teaspoon vanilla extract, and a pinch of salt. Continue beating on medium-high until soft peaks form (about 1-2 more minutes). Avoid overbeating.
- In a 9×13 inch (23×33 cm) baking dish, spread a thin layer of the chocolate whipped cream on the bottom.
- Arrange chocolate wafers in a single layer over the cream, breaking a few to fit as needed.
- Spread another layer of the chocolate whipped cream over the wafers (about one-third of the total cream), smoothing gently with a spatula.
- Repeat wafer and cream layers two more times, finishing with a final cream layer on top.
- Cover the dish tightly with plastic wrap or a lid and refrigerate for at least 6 hours, preferably overnight.
- Before serving, optionally dust with extra cocoa powder or sprinkle chocolate shavings. Cut into squares with a sharp knife, wiping the blade between cuts for clean slices.
Notes
Keep all equipment and cream cold for best whipping results. Do not overbeat the cream to avoid turning it into butter. Chill the cake overnight for best texture and flavor melding. Use a sharp knife warmed in hot water and wiped dry between cuts for clean slices. Optional additions include espresso powder, chocolate chips, or fresh berries for variation.
Nutrition
- Serving Size: 1 slice (1/12th of t
- Calories: 250
- Fat: 18
- Carbohydrates: 15
- Protein: 3
Keywords: chocolate icebox cake, no-bake dessert, whipped cream dessert, easy chocolate cake, chocolate wafers, creamy dessert