Let me tell you, the scent of rich cocoa mingling with a hint of tangy buttermilk, wafting from the oven, is enough to make anyone’s mouth water. The first time I baked these decadent red velvet lava cakes for two, I was instantly hooked—the kind of moment where you pause, take a deep breath, and just smile because you know you’re onto something truly special. When I was knee-high to a grasshopper, my grandma used to bake the most luscious chocolate treats, and this recipe feels like a grown-up twist on those warm memories.
Honestly, I wish I’d discovered this dangerously easy recipe years ago. My family couldn’t stop sneaking these little beauties off the cooling rack (and I can’t really blame them). Whether you’re planning a romantic night in or just craving a sweet treat for yourself, these red velvet lava cakes are pure, nostalgic comfort wrapped up in a mug of molten chocolate and velvet cake.
You know what’s perfect? These cakes are tailor-made for potlucks, cozy date nights, or brightening up your Pinterest dessert board with something that looks fancy but is shockingly simple to make. I’ve tested this recipe more times than I can count—in the name of research, of course—and it’s become a staple for family gatherings and gifting. Trust me, this dessert feels like a warm hug, and you’re going to want to bookmark this one.
Why You’ll Love This Recipe
After many trials (and a few tasty mishaps), I can confidently say this recipe brings together everything you want in a dessert for two. It’s not just good; it’s the kind of indulgence that makes you close your eyes after the first bite. Here’s why these decadent red velvet lava cakes stand out:
- Quick & Easy: Comes together in under 30 minutes, perfect for busy weeknights or last-minute cravings.
- Simple Ingredients: No fancy grocery trips needed; you likely already have everything in your kitchen.
- Perfect for Romantic Evenings: Great for date nights or special occasions when you want something intimate and impressive.
- Crowd-Pleaser: Always gets rave reviews from kids and adults alike—trust me, it’s a winner.
- Unbelievably Delicious: The contrast of molten chocolate center with the tender, velvety cake is next-level comfort food.
This isn’t just another red velvet cake recipe. The secret lies in the molten core that oozes out when you dig in—thanks to a perfectly timed bake and a little extra cream cheese in the batter for richness. It’s comfort food reimagined—fast, easier, but with the same soul-soothing satisfaction you’d expect from a classic dessert. You’ll impress your guests without breaking a sweat, or simply treat yourself to something truly memorable.
What Ingredients You Will Need
This recipe uses simple, wholesome ingredients to deliver bold flavor and satisfying texture without the fuss. Most are pantry staples, and substitutions are easy if you need them.
- For the Batter:
- Unsalted butter – 4 tablespoons, melted (adds richness and moisture)
- Sugar – 1/3 cup (white granulated for classic sweetness)
- Large egg – 1, room temperature (helps with structure)
- Buttermilk – 2 tablespoons (or plain yogurt as a substitute for tanginess)
- Red food coloring – 1 tablespoon (for that signature red velvet hue; gel works best)
- Vanilla extract – 1 teaspoon (deepens flavor)
- All-purpose flour – 1/3 cup (for the cake base)
- Cocoa powder – 2 tablespoons, unsweetened (adds subtle chocolate notes)
- Baking powder – 1/4 teaspoon (for lightness)
- Salt – a pinch (balances sweetness)
- Cream cheese – 2 tablespoons, softened (secret ingredient for creaminess inside)
- For the Molten Center:
- Semisweet chocolate chips – 1/4 cup (high quality like Ghirardelli recommended for best melt)
- Optional Toppings:
- Powdered sugar, for dusting
- Fresh berries or whipped cream, for serving
If you want to keep it dairy-free, swap out butter and cream cheese for plant-based versions, and use almond or oat milk instead of buttermilk. For gluten-free, almond or oat flour works well here, though the texture will shift slightly.
Equipment Needed
To make these decadent red velvet lava cakes for two, you’ll need just a few basic kitchen tools that most home cooks already have:
- Two 6-ounce (180 ml) ramekins or oven-safe custard cups – These create the perfect individual cake shape.
- Mixing bowls – One medium and one small for combining wet and dry ingredients separately.
- Whisk or fork – For mixing the batter smoothly without over-beating.
- Measuring cups and spoons – Accuracy matters for that perfect cake texture.
- Oven mitts – Safety first when handling hot ramekins.
- Spoon or small spatula – For folding ingredients and filling ramekins.
If you don’t have ramekins, small oven-safe coffee mugs can work well, just adjust baking time accordingly. I’ve found silicone ramekins easier to clean and less likely to break, but classic ceramic ones give a nicer crust. If you’re on a budget, thrift shops often have these little dishes for cheap, and they’re worth the investment for desserts like this.
Preparation Method
- Preheat your oven to 425°F (220°C) and butter your ramekins generously to prevent sticking. You can dust them lightly with cocoa powder for extra insurance against sticking and a slight crust.
- Mix the wet ingredients: In a medium bowl, whisk together 4 tablespoons melted butter and 1/3 cup sugar until combined but not grainy. Add 1 large egg, 2 tablespoons buttermilk, 1 tablespoon red food coloring, and 1 teaspoon vanilla extract. Mix until smooth and vibrant red.
- Combine the dry ingredients: In a separate bowl, sift or whisk together 1/3 cup all-purpose flour, 2 tablespoons unsweetened cocoa powder, 1/4 teaspoon baking powder, and a pinch of salt.
- Fold dry into wet: Gently fold the dry ingredients into the wet mixture using a spatula or wooden spoon. Stop mixing as soon as no flour streaks remain; over-mixing can make cakes tough.
- Incorporate cream cheese: Spoon 2 tablespoons softened cream cheese into the batter and fold just enough to create little pockets—this adds luscious creaminess and a slight tang, which balances the sweetness.
- Fill the ramekins: Spoon a thin layer of batter into the bottom of each ramekin (about 2 tablespoons). Then, add about 2 tablespoons of semisweet chocolate chips in the center. Cover the chocolate with the remaining batter, filling ramekins about 3/4 full.
- Bake for 12-14 minutes: The edges should look set, but the center will still jiggle slightly when you gently shake the ramekin. This is the trick to that molten center—don’t overbake!
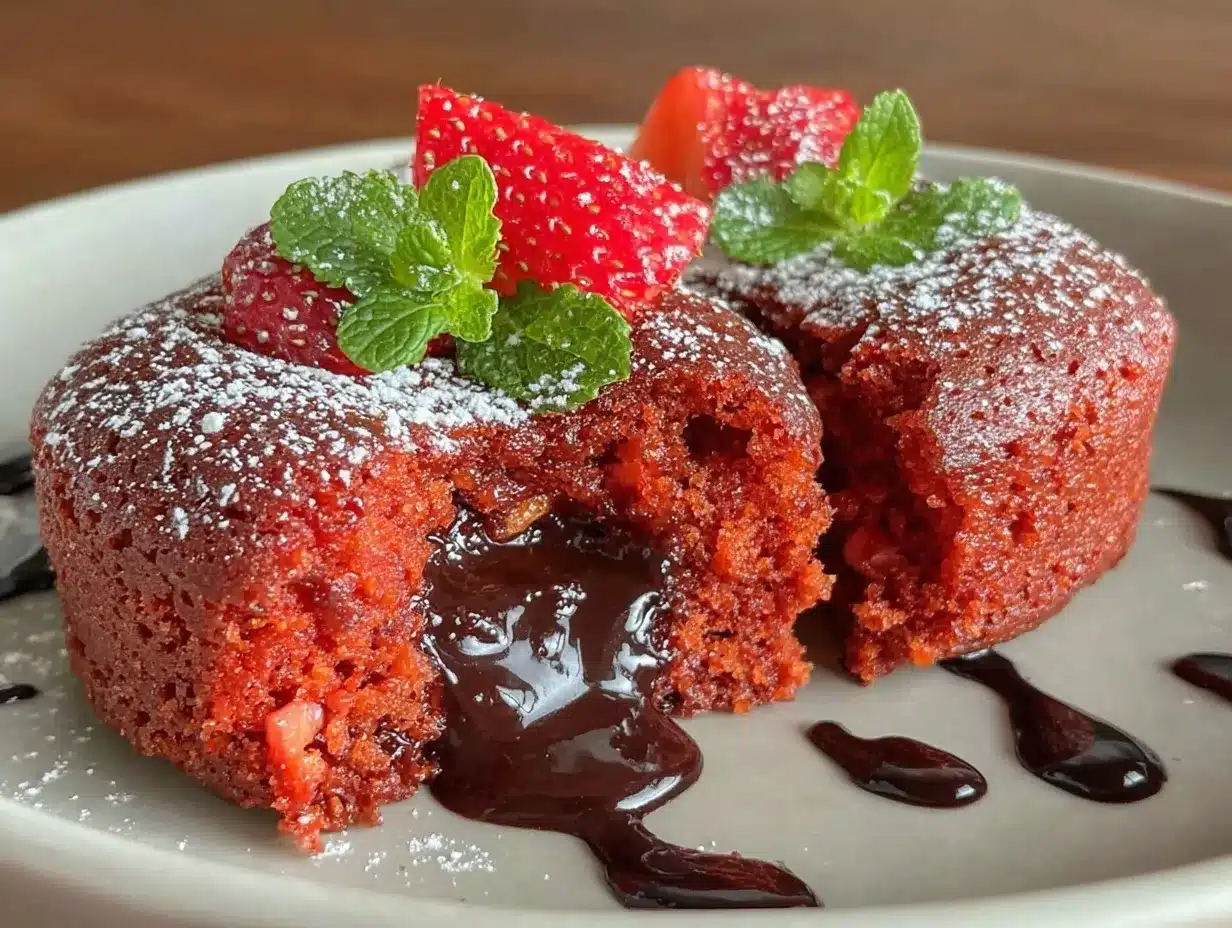
- Rest and serve: Let cakes cool for 2 minutes before inverting onto plates or serving straight from ramekins. Dust with powdered sugar and garnish with fresh berries or whipped cream if desired.
Pro tip: If your oven runs hot, check at 10 minutes to avoid overcooking. The lava cake texture depends on that delicate balance of just-set cake and flowing chocolate. This is a recipe where timing really counts, so set a timer and don’t wander too far!
Cooking Tips & Techniques
Getting these decadent red velvet lava cakes just right can feel a bit like an art, but after a few tries, you’ll get the hang of it. Here are some tips I’ve picked up along the way:
- Room temperature ingredients: Eggs and butter mix better when not cold, giving you a smoother batter and more even rise.
- Don’t overmix: When combining wet and dry ingredients, fold gently to keep the cake tender instead of tough.
- Butter your ramekins well: This helps the cake release cleanly and develop a lovely crust.
- Bake on the middle rack: This ensures even heat distribution and prevents the bottoms from burning.
- Watch your oven closely: Because every oven is different, the difference between molten and overcooked can be mere minutes.
- Let it rest briefly: This allows the lava center to thicken slightly so it doesn’t run off the plate when serving.
- Multitasking: While the cakes bake, whip up quick toppings like whipped cream or slice some berries to save time.
Honestly, the first time I tried to rush the baking, I ended up with a dry cake and sad, solid center. Lesson learned: patience is key! After that, timing and gentle folding became my best friends in this recipe.
Variations & Adaptations
One of the best things about these decadent red velvet lava cakes is how easy they are to customize for different tastes or dietary needs. Here are some variations I’ve tried and loved:
- Chocolate Hazelnut Lava: Swap the semisweet chocolate chips for a spoonful of hazelnut spread in the center for a nutty surprise.
- Vegan Version: Use dairy-free butter, flax egg (1 tablespoon ground flaxseed + 3 tablespoons water), and coconut yogurt instead of buttermilk. Coconut cream or vegan chocolate chips work great for the molten center.
- Spiced Red Velvet: Add a pinch of cinnamon and a drop of almond extract to the batter for a warm, cozy twist.
- Berry Lava Cakes: Replace the chocolate chips with a spoonful of raspberry or cherry jam for a fruity molten center.
For different cooking methods, these cakes can be steamed in a double boiler setup for a more moist texture, though you’ll lose the crisp edges. I’ve also baked them in mini muffin tins for bite-sized portions—just reduce baking time by a few minutes.
Allergen substitutions are straightforward here. If you need gluten-free, almond or oat flour works well, but keep an eye on the texture as it can be slightly more crumbly. For nut allergies, avoid almond flour and stick to all-purpose or a safe gluten-free blend.
Serving & Storage Suggestions
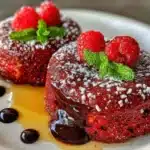
These decadent red velvet lava cakes are best served warm—right out of the oven or after a brief rest. They’re gorgeous plated with a dusting of powdered sugar and a few fresh raspberries or strawberries to cut through the richness.
Pair with a dollop of whipped cream or a scoop of vanilla ice cream for that classic hot-and-cold combo. A cup of freshly brewed coffee or a glass of champagne can really make the moment feel special.
Leftovers (if there are any!) can be stored covered in the refrigerator for up to 2 days. To reheat, pop them in the microwave for 20-30 seconds or warm gently in an oven at 300°F (150°C) for about 5 minutes. The molten center will stay gooey but the cake won’t dry out if you’re careful.
Flavors actually deepen after resting overnight, so these cakes can taste even better the next day—just make sure to reheat gently to revive that molten lava texture.
Nutritional Information & Benefits
Each decadent red velvet lava cake for two clocks in around 300-350 calories, depending on exact ingredient brands and portions. They offer a modest amount of protein from the egg and cream cheese, with some calcium from the dairy.
The cocoa powder contributes antioxidants, and using real butter and cream cheese ensures a satisfying, rich mouthfeel that keeps you feeling full. For those watching carbs, swapping all-purpose flour for almond flour reduces net carbs significantly.
Note: This recipe contains dairy, gluten, and eggs as potential allergens. Dairy-free and gluten-free substitutions are easy to make if needed.
From a wellness perspective, indulging in a small, homemade dessert like this can be a mindful treat that satisfies cravings without overdoing it—perfect for balanced living.
Conclusion
These decadent red velvet lava cakes for two are a little slice of heaven you can whip up in no time. Their gooey centers and tender crumb make them the kind of dessert that feels both fancy and comforting. Whether you’re celebrating a special moment or just craving a sweet pick-me-up, this recipe delivers.
Feel free to customize with your favorite mix-ins or toppings to make it your own. Honestly, I love how this recipe brings a touch of magic to simple ingredients—making dessert feel like an event, even on a regular night.
If you give this a try, leave a comment and let me know how you tweaked it. Share with your loved ones or keep it all to yourself (no judgment here). You’re going to want to make these decadent red velvet lava cakes a regular in your dessert lineup—trust me on this one!
FAQs
Can I make these lava cakes ahead of time?
Yes! You can prepare the batter and fill the ramekins, then refrigerate them for up to 24 hours before baking. Just add a minute or two to the baking time if baking cold.
What if I don’t have buttermilk?
No worries! Use plain yogurt or milk mixed with a teaspoon of lemon juice or vinegar. Let it sit for 5 minutes before using to mimic buttermilk’s tang.
How do I know when the cakes are done?
Look for set edges and a slightly jiggly center when you gently shake the ramekin. The top should spring back lightly but still feel soft.
Can I use dark chocolate instead of semisweet?
Absolutely! Dark chocolate adds a richer, more intense flavor but can be slightly less sweet. Adjust sugar accordingly if you prefer.
What’s the best way to serve these cakes?
Warm with a dusting of powdered sugar and fresh berries, plus whipped cream or ice cream if you like. They’re divine paired with coffee or a dessert wine.
Pin This Recipe!
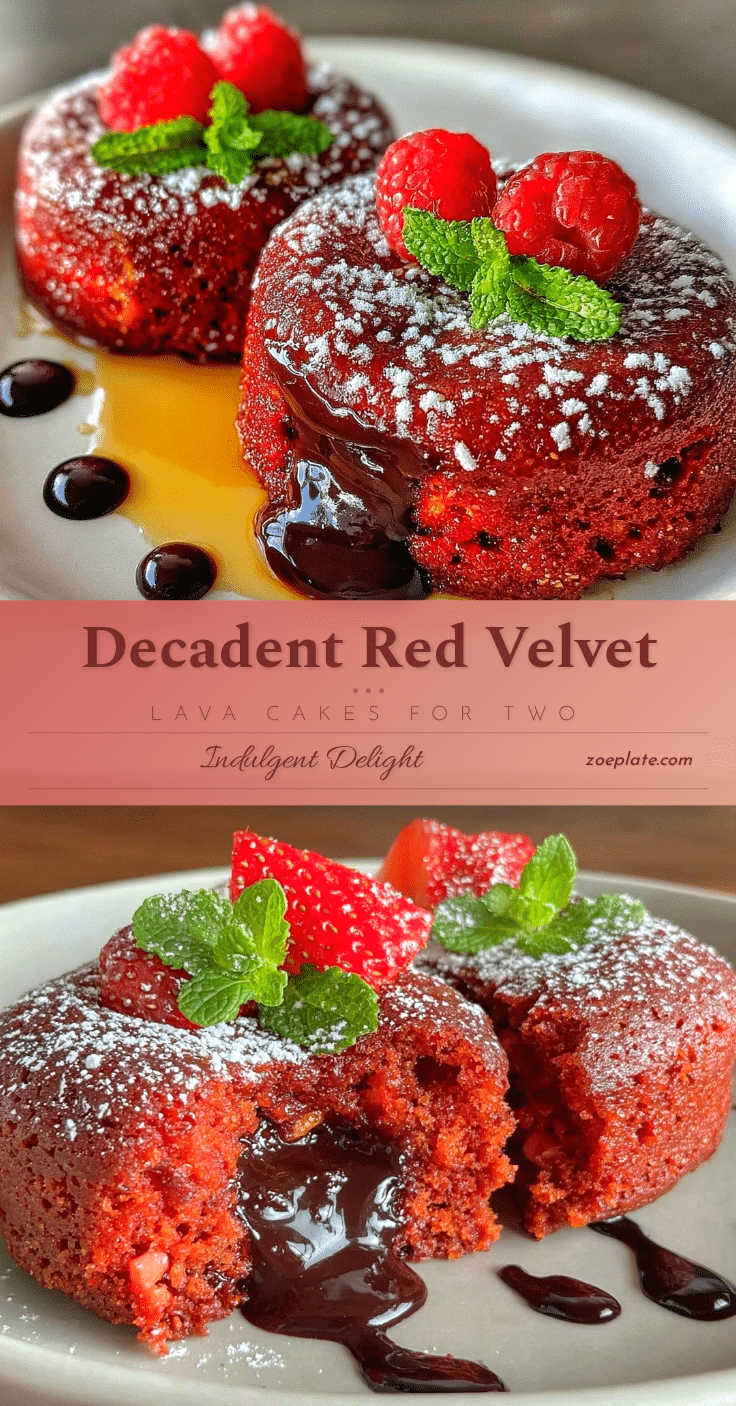
Decadent Red Velvet Lava Cakes for Two
These decadent red velvet lava cakes feature a molten chocolate center and a tender, velvety cake, perfect for romantic evenings or a cozy treat. Ready in under 30 minutes with simple ingredients, they deliver indulgent comfort in every bite.
- Prep Time: 10 minutes
- Cook Time: 14 minutes
- Total Time: 24 minutes
- Yield: 2 servings 1x
- Category: Dessert
- Cuisine: American
Ingredients
- 4 tablespoons unsalted butter, melted
- 1/3 cup sugar (white granulated)
- 1 large egg, room temperature
- 2 tablespoons buttermilk (or plain yogurt as substitute)
- 1 tablespoon red food coloring (gel preferred)
- 1 teaspoon vanilla extract
- 1/3 cup all-purpose flour
- 2 tablespoons unsweetened cocoa powder
- 1/4 teaspoon baking powder
- Pinch of salt
- 2 tablespoons cream cheese, softened
- 1/4 cup semisweet chocolate chips
- Optional toppings: powdered sugar, fresh berries, whipped cream
Instructions
- Preheat your oven to 425°F (220°C) and butter your ramekins generously. Optionally dust with cocoa powder to prevent sticking and add a slight crust.
- In a medium bowl, whisk together melted butter and sugar until combined but not grainy. Add egg, buttermilk, red food coloring, and vanilla extract. Mix until smooth and vibrant red.
- In a separate bowl, sift or whisk together flour, cocoa powder, baking powder, and salt.
- Gently fold the dry ingredients into the wet mixture using a spatula or wooden spoon until no flour streaks remain. Avoid overmixing.
- Fold in softened cream cheese just enough to create little pockets in the batter.
- Spoon about 2 tablespoons of batter into the bottom of each ramekin. Add 2 tablespoons of semisweet chocolate chips in the center. Cover with remaining batter, filling ramekins about 3/4 full.
- Bake for 12-14 minutes until edges are set but center jiggles slightly when shaken.
- Let cakes cool for 2 minutes before serving. Dust with powdered sugar and garnish with fresh berries or whipped cream if desired.
Notes
Use room temperature ingredients for smoother batter and even rise. Do not overmix to keep cake tender. Butter ramekins well to prevent sticking. Bake on middle rack for even heat. Watch oven closely to avoid overbaking; the center should jiggle slightly. Let rest briefly before serving to thicken molten center. For dairy-free or gluten-free versions, substitute ingredients as noted in recipe.
Nutrition
- Serving Size: 1 lava cake (half re
- Calories: 325
- Sugar: 22
- Sodium: 180
- Fat: 20
- Saturated Fat: 11
- Carbohydrates: 35
- Fiber: 2
- Protein: 5
Keywords: red velvet lava cake, molten chocolate cake, dessert for two, easy dessert, romantic dessert, quick dessert, chocolate lava cake