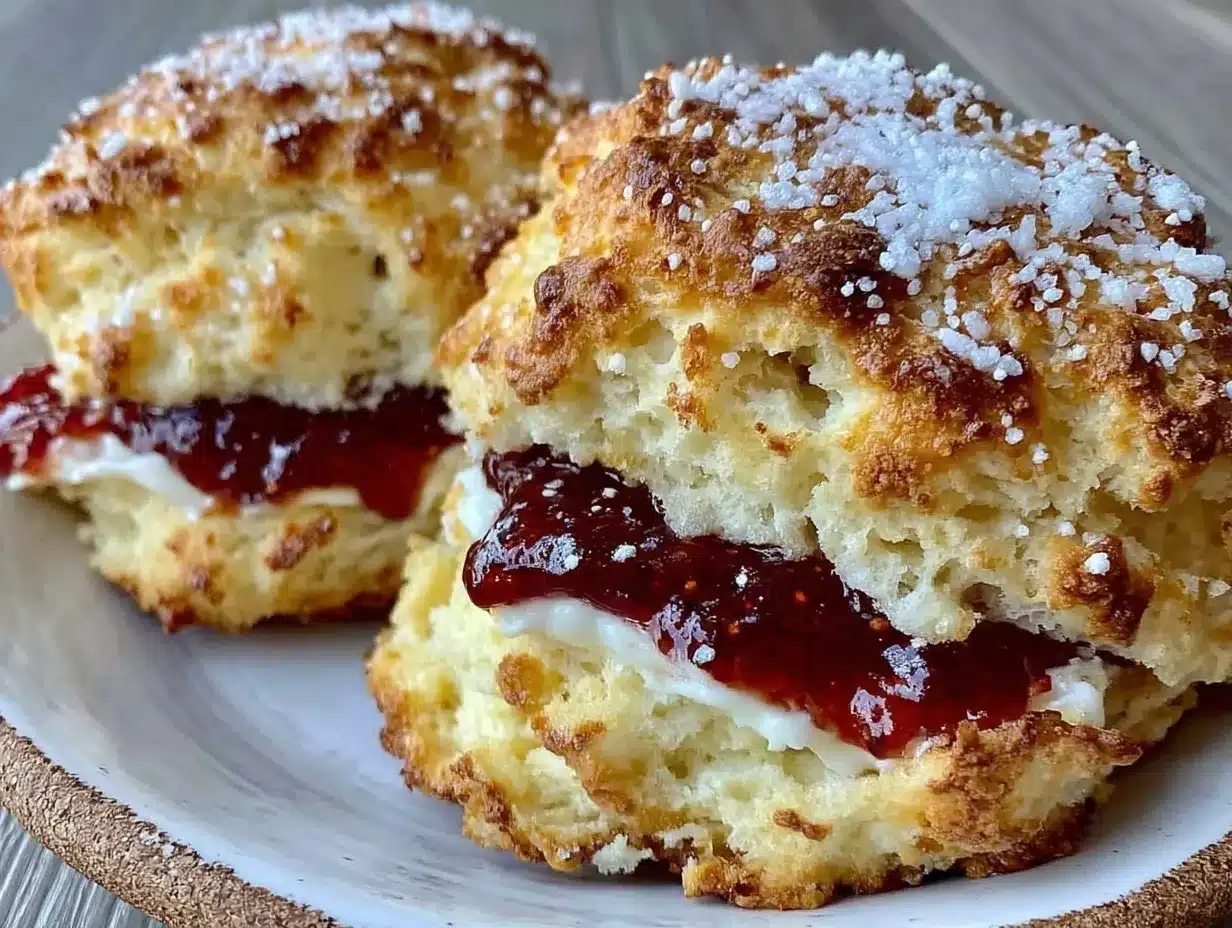
Let me tell you, the scent of freshly baked British-style cream scones wafting from my kitchen is enough to make anyone’s mouth water. There’s something magical about that warm, buttery aroma mingling with the subtle sweetness and tender crumb that just pulls you right in. The first time I baked these fluffy British-style cream scones, I was instantly hooked—the kind of moment where you pause, take a deep breath, and just smile because you know you’re onto something truly special.
Years ago, when I was knee-high to a grasshopper, my grandma used to whip up scones that were the centerpiece of every family teatime. I never quite got her secret, but stumbling upon this recipe felt like rediscovering a piece of my childhood. Honestly, I wish I’d found this recipe years ago—it’s dangerously easy and delivers pure, nostalgic comfort with every bite.
My family couldn’t stop sneaking them off the cooling rack (and I can’t really blame them). These scones have become a staple for family gatherings, gifting, and those cozy, rainy weekend breakfasts. You know what? They’re perfect for potlucks, a sweet treat for your kids, or to brighten up your Pinterest cookie board. After testing this recipe multiple times (in the name of research, of course), I’m confident you’re going to want to bookmark this one.
Why You’ll Love This Recipe
Having spent many afternoons perfecting these British-style cream scones, I can say with a smile that this recipe stands out for several reasons. Whether you’re a seasoned baker or just starting out, these scones deliver consistent, delightful results every time.
- Quick & Easy: Comes together in under 30 minutes, perfect for busy mornings or last-minute tea parties.
- Simple Ingredients: No fancy grocery trips needed; you likely already have everything in your pantry.
- Perfect for Any Occasion: Great for brunch, afternoon tea, or cozy weekend breakfasts.
- Crowd-Pleaser: Always gets rave reviews from kids and adults alike – it’s hard to stop at just one!
- Unbelievably Delicious: The texture and flavor combo is next-level comfort food, with a buttery crumb that melts in your mouth.
What really makes this recipe different? It’s all about the cream. Using heavy cream instead of milk or buttermilk gives the scones a tender, flaky texture that’s hard to beat. Plus, the gentle folding technique keeps them light and fluffy without overworking the dough. This isn’t just another scone recipe—it’s your best version, the one that’ll have you closing your eyes after the first bite, savoring that perfect balance of buttery richness and soft crumb.
Honestly, this recipe feels like comfort food reimagined—simple, faster, but with the same soul-soothing satisfaction you expect from traditional British scones. It’s perfect for impressing guests without stress or turning a simple meal into something memorable.
What Ingredients You Will Need
This recipe uses simple, wholesome ingredients to deliver bold flavor and satisfying texture without the fuss. Most of these are pantry staples, and you can easily swap a few for dietary needs or preferences.
- All-purpose flour – 2 ½ cups (315g), for the soft yet sturdy base.
- Baking powder – 1 tablespoon, to give that lovely rise and fluffiness.
- Granulated sugar – 2 tablespoons, just enough to add a subtle sweetness.
- Salt – ½ teaspoon, to balance flavors.
- Unsalted butter – 6 tablespoons (85g), cold and cubed (adds richness and buttery texture). I recommend Kerrygold for best flavor.
- Heavy cream – 1 cup (240ml), plus extra for brushing (this is the secret to that tender crumb).
- Vanilla extract – 1 teaspoon, optional but adds a lovely aroma.
- Egg – 1 large, lightly beaten (for brushing the tops to get that golden finish).
For variations, you can add a handful of currants or dried fruit, or swap regular sugar for brown sugar for a deeper flavor. Use almond flour for a gluten-free twist or coconut cream instead of heavy cream if you want a dairy-free option. Looking for a seasonal change? Toss in fresh berries or lemon zest for a bright note during warmer months.
Equipment Needed
- Mixing bowls: One large for dry ingredients, one smaller for wet.
- Baking sheet: A rimmed baking sheet to hold your scones as they bake.
- Parchment paper or silicone mat: For easy cleanup and to prevent sticking.
- Pastry cutter or fork: To cut butter into flour. If you don’t have one, your fingers work fine (just don’t warm the butter too much).
- Rolling pin: Not essential—can shape dough by hand, but helpful for even thickness.
- Pastry brush: For brushing cream and egg wash on top.
I’ve tried making these scones both with a stand mixer and by hand, and honestly, hand-mixing gives you better control over the dough’s texture. If you’re on a budget, a simple fork and bowl set will do the trick just fine. Keep your butter cold and your tools dry for best results.
Preparation Method
- Preheat your oven to 425°F (220°C). Line a baking sheet with parchment paper or a silicone baking mat to prevent sticking and help with even baking.
- Mix dry ingredients: In a large bowl, whisk together 2 ½ cups (315g) all-purpose flour, 1 tablespoon baking powder, 2 tablespoons granulated sugar, and ½ teaspoon salt. Give it a good mix so everything is evenly combined.
- Cut in the butter: Add 6 tablespoons (85g) cold, cubed unsalted butter to the flour mixture. Using a pastry cutter or your fingertips, quickly work the butter into the flour until the mixture resembles coarse crumbs with pea-sized bits of butter visible. Don’t overwork it—those butter chunks are what make your scones flaky!
- Add wet ingredients: Make a well in the center of your flour mixture. Pour in 1 cup (240ml) heavy cream and 1 teaspoon vanilla extract (if using). Stir gently with a wooden spoon or spatula until the dough just comes together. It will be slightly sticky but manageable—don’t add extra flour unless absolutely necessary.
- Shape the dough: Tip the dough onto a lightly floured surface. Pat it into a round disk about 1-inch (2.5 cm) thick. Use a floured knife or bench scraper to cut the disk into 8 equal wedges (like slicing a pizza). You can also use a floured round cutter if you prefer traditional round scones.
- Prepare for baking: Transfer the wedges to your prepared baking sheet, spacing them about 1 inch apart. Brush the tops with a mix of the beaten egg and a splash of cream (or just cream) to get that golden, shiny finish.
- Bake: Pop the scones into your preheated oven and bake for 12-15 minutes until puffed up and golden brown. Keep an eye on them—ovens vary, and you want that perfect color without drying them out.
- Cool and serve: Remove from the oven and let cool on the baking sheet for 5 minutes before transferring to a wire rack. These scones are best enjoyed warm, slathered with clotted cream and jam (if you want to get traditional about it!).
Pro tip: If your butter melts too quickly while cutting in, pop the dough in the fridge for 10 minutes before shaping. This helps keep the layers distinct and the texture buttery and flaky.
Cooking Tips & Techniques
One of the trickiest parts of making British-style cream scones is getting that fluffy, tender texture without them turning dense or dry. Here’s what I’ve learned through trial and error:
- Keep everything cold: Butter and cream should be cold to avoid melting before baking. This creates those flaky layers you love.
- Don’t overmix: Once the wet ingredients hit the dry, mix just until combined. Overworking the dough develops gluten, making scones tough instead of tender.
- Use heavy cream: It’s the secret weapon here. The fat content makes for a richer, more delicate crumb than milk or buttermilk.
- Cut the butter in quickly: I like to use a pastry cutter, but fingers work if you’re fast and keep the butter chilled.
- Shape gently: When patting out your dough, handle it lightly to maintain air pockets that help your scones rise.
- Brush with cream or egg wash: This step gives scones their iconic golden, slightly crisp top.
- Watch the oven: Baking times can vary; start checking at 12 minutes to avoid overbaking.
Remember, every oven is a little different. I like to keep a close eye during the last few minutes. If you want extra height, try chilling the dough for a bit before baking. And honestly, don’t be discouraged if your first batch isn’t perfect—it gets easier and better each time!
Variations & Adaptations
These British-style cream scones are a wonderfully versatile base. Here are a few ways to make them your own:
- Fruit additions: Stir in a handful of currants, raisins, or chopped dried apricots for a sweet surprise in every bite.
- Cheese scones: Swap sugar for 1 tablespoon of savory herbs and add ½ cup grated sharp cheddar for a savory twist.
- Gluten-free option: Use a gluten-free flour blend designed for baking. Make sure to add a teaspoon of xanthan gum if your blend doesn’t include it.
- Dairy-free variation: Replace heavy cream with full-fat coconut milk or a thick coconut cream and use a dairy-free butter alternative.
- Flavor boosts: Add zest of lemon or orange for a bright, citrusy note, or a pinch of cinnamon and nutmeg for a cozy, spiced version.
I once tried adding chopped fresh rosemary and cracked black pepper—surprisingly delicious and great alongside a hot cup of tea. Feel free to experiment; these scones are forgiving and adapt well to different tastes.
Serving & Storage Suggestions
Serve these fluffy British-style cream scones warm, ideally fresh from the oven, with a generous dollop of clotted cream and your favorite jam. They’re also fantastic simply buttered or with honey drizzled on top. Pair with a fresh pot of tea or a cup of coffee for a perfect teatime treat.
If you have leftovers (which is rare, but hey, it happens), store scones in an airtight container at room temperature for up to two days. For longer storage, freeze cooled scones wrapped tightly in plastic wrap and placed in a freezer bag for up to 3 months.
To reheat, pop frozen scones in a preheated 350°F (175°C) oven for 8-10 minutes until warmed through. Avoid the microwave if you want to keep that delicate, flaky texture intact—oven reheating will refresh that just-baked crispness.
Over time, flavors mellow and the scones become even more tender. I sometimes make scones the day before a brunch and find they taste just as good if properly stored and gently reheated.
Nutritional Information & Benefits
Each scone (assuming 8 per batch) contains approximately 280 calories, 15g fat, 30g carbohydrates, 4g protein, and 1g fiber. While these are indulgent treats, the use of real butter and heavy cream provides satisfying richness without artificial ingredients.
Heavy cream adds vitamin A and calcium, and butter contributes fat-soluble vitamins that your body needs. Using quality ingredients helps avoid preservatives and additives common in store-bought scones.
These scones are naturally gluten-containing due to all-purpose flour, so they’re not suitable for those with gluten intolerance unless using a gluten-free flour blend. The recipe contains dairy and eggs, so be mindful of allergies.
From a wellness angle, enjoying these scones as an occasional treat brings comfort and joy—two things that matter as much as nutrition sometimes!
Conclusion
If you’re searching for a recipe that gives you fluffy British-style cream scones with that perfect buttery texture—look no further. This recipe is straightforward, forgiving, and delivers consistent, delicious scones every time. Feel free to tailor the flavors and add-ins to suit your mood or occasion.
Personally, I love how this recipe connects me to family memories and simple pleasures. It’s that warm hug in pastry form you didn’t know you needed. Give it a try, and don’t forget to share how you made it your own—I always love hearing your twists and tips!
Ready to make teatime a little more special? Grab your ingredients, roll up your sleeves, and get baking. Then, come back and drop a comment or share your photos—I’m rooting for your scone success!
FAQs
Can I use baking soda instead of baking powder for these scones?
It’s best to stick with baking powder here. Baking soda needs an acid to activate, which this recipe doesn’t have, so using it alone might result in flat scones.
How do I store leftover scones to keep them fresh?
Store cooled scones in an airtight container at room temperature for up to two days, or freeze them wrapped tightly for up to 3 months. Reheat in the oven to keep them fresh.
What’s the secret to getting fluffy scones every time?
Keep your butter cold, don’t overmix the dough, and use heavy cream. Also, work quickly and bake immediately for the best rise.
Can I make these scones dairy-free?
Yes! Replace heavy cream with coconut cream or your favorite dairy-free alternative, and use a dairy-free butter substitute. Texture might vary slightly but still delicious.
Why are my scones dense instead of fluffy?
This usually happens from overmixing or using warm butter. Try to mix just until combined and keep butter and cream cold for fluffy scones.
Pin This Recipe!

Fluffy British-Style Cream Scones

These fluffy British-style cream scones deliver a tender, flaky texture with a buttery crumb that melts in your mouth. Perfect for teatime, brunch, or cozy weekend breakfasts, they come together quickly with simple ingredients.
- Prep Time: 10 minutes
- Cook Time: 15 minutes
- Total Time: 25 minutes
- Yield: 8 scones 1x
- Category: Breakfast, Snack, Tea Time
- Cuisine: British
Ingredients
- 2 ½ cups (315g) all-purpose flour
- 1 tablespoon baking powder
- 2 tablespoons granulated sugar
- ½ teaspoon salt
- 6 tablespoons (85g) unsalted butter, cold and cubed
- 1 cup (240ml) heavy cream, plus extra for brushing
- 1 teaspoon vanilla extract (optional)
- 1 large egg, lightly beaten (for brushing tops)
Instructions
- Preheat your oven to 425°F (220°C). Line a baking sheet with parchment paper or a silicone baking mat.
- In a large bowl, whisk together the flour, baking powder, sugar, and salt until evenly combined.
- Add the cold, cubed butter to the flour mixture. Use a pastry cutter or your fingertips to work the butter into the flour until the mixture resembles coarse crumbs with pea-sized bits of butter visible. Do not overwork.
- Make a well in the center of the flour mixture. Pour in the heavy cream and vanilla extract (if using). Stir gently with a wooden spoon or spatula until the dough just comes together. It will be slightly sticky.
- Turn the dough onto a lightly floured surface. Pat it into a round disk about 1 inch (2.5 cm) thick. Cut the disk into 8 equal wedges or use a floured round cutter for traditional round scones.
- Transfer the wedges to the prepared baking sheet, spacing them about 1 inch apart. Brush the tops with a mixture of the beaten egg and a splash of cream (or just cream) for a golden, shiny finish.
- Bake for 12-15 minutes until puffed up and golden brown. Keep an eye on them to avoid overbaking.
- Remove from the oven and let cool on the baking sheet for 5 minutes before transferring to a wire rack. Serve warm with clotted cream and jam or butter.
Notes
Keep butter and cream cold to ensure flaky layers. Do not overmix the dough to avoid tough scones. Brush tops with egg wash or cream for a golden finish. If butter melts too quickly, chill dough for 10 minutes before shaping.
Nutrition
- Serving Size: 1 scone
- Calories: 280
- Fat: 15
- Carbohydrates: 30
- Fiber: 1
- Protein: 4
Keywords: British scones, cream scones, fluffy scones, teatime recipe, easy scones, buttery scones, homemade scones