“You don’t have to eat the crusts.” That line echoed from the kitchen as I wrestled with my peanut butter and jelly sandwich back in the day. Honestly, the classic PB&J was one of those simple joys that somehow felt like a treat, even if it was just a lunchbox staple. But here’s the thing — not all PB&Js are created equal. I remember the slightly sad, squished sandwiches from school, sometimes dry, sometimes overly sticky, and usually made with whatever jam was lurking in the fridge.
One late afternoon, after an exhausting day juggling work and errands, I found myself craving that exact childhood comfort but with a grown-up twist. I grabbed fresh bread, a jar of creamy peanut butter I actually loved, and homemade strawberry jam I’d whipped up earlier that week. Slathering the peanut butter thickly and layering the jam carefully, I took a bite and realized this was the kind of PB&J I deserved as a kid — not rushed, not half-hearted, but made with intention and real flavor.
Since then, the Homemade Classic PB&J has become a little ritual — a quick comfort, a nostalgic pause, and honestly, sometimes the perfect solo supper. It’s the sandwich that’s stood the test of time and taste, reminding me that some childhood favorites just get better with a little care and good ingredients.
Why You’ll Love This Recipe
So, why bother with a homemade version of a peanut butter and jelly sandwich? Well, here’s what I’ve found after making this recipe over and over (sometimes more than once a week):
- Quick & Easy: This sandwich takes less than 10 minutes from start to finish. Perfect for busy days or those moments when you just want something simple but satisfying.
- Simple Ingredients: No need for fancy or hard-to-find items — just good bread, quality peanut butter, and your favorite jam. I usually keep a jar of Smucker’s Natural Peanut Butter and homemade jam in the fridge for this exact reason.
- Perfect for Any Occasion: Whether it’s a nostalgic lunch, a quick snack after school, or a cozy midnight bite, this PB&J fits the bill every time.
- Crowd-Pleaser: Kids love it, adults crave it. It’s a universally loved combo that’s a safe bet for potlucks or family dinners.
- Unbelievably Delicious: The magic is in balancing the creamy peanut butter with just the right amount of jam and fresh bread texture — it’s comforting and indulgent without being heavy.
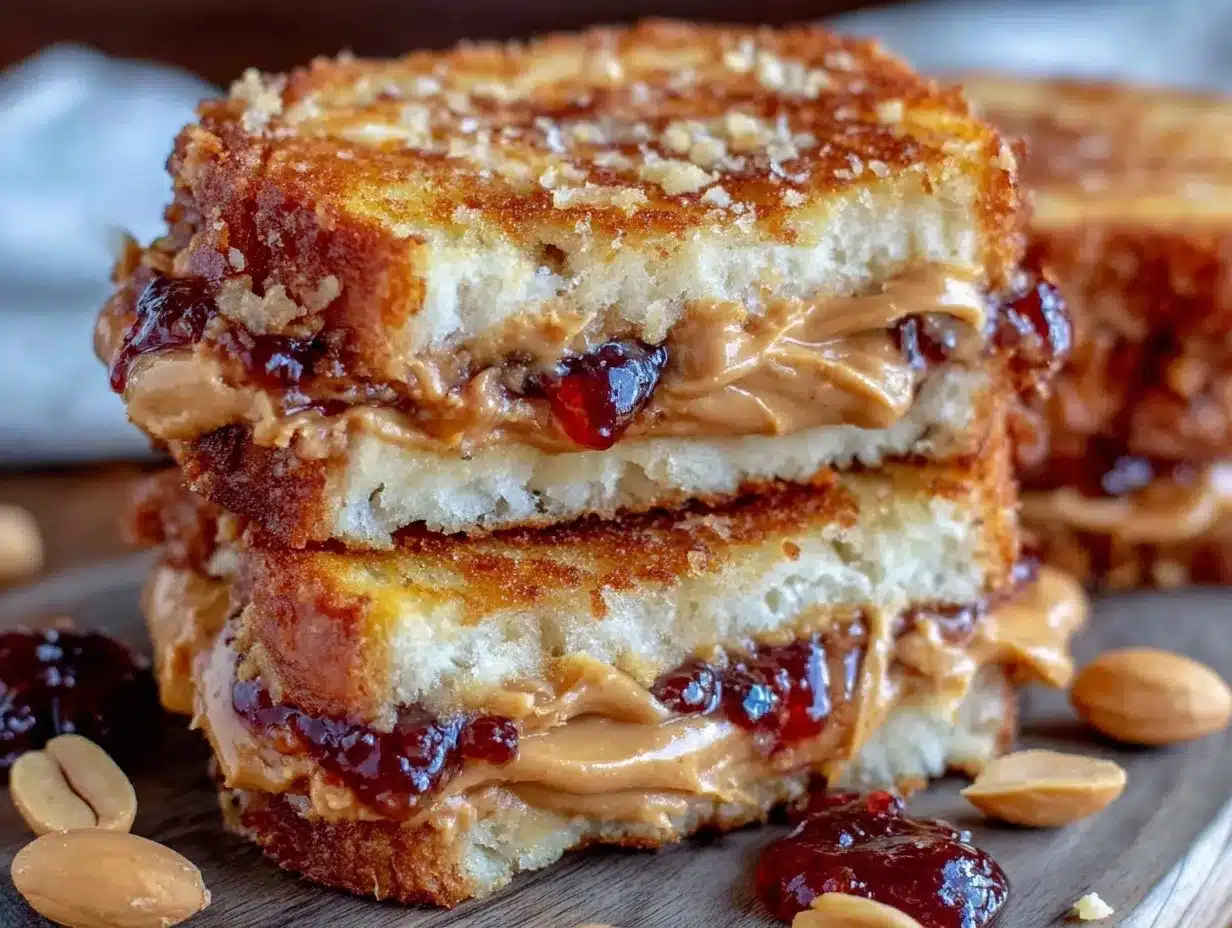
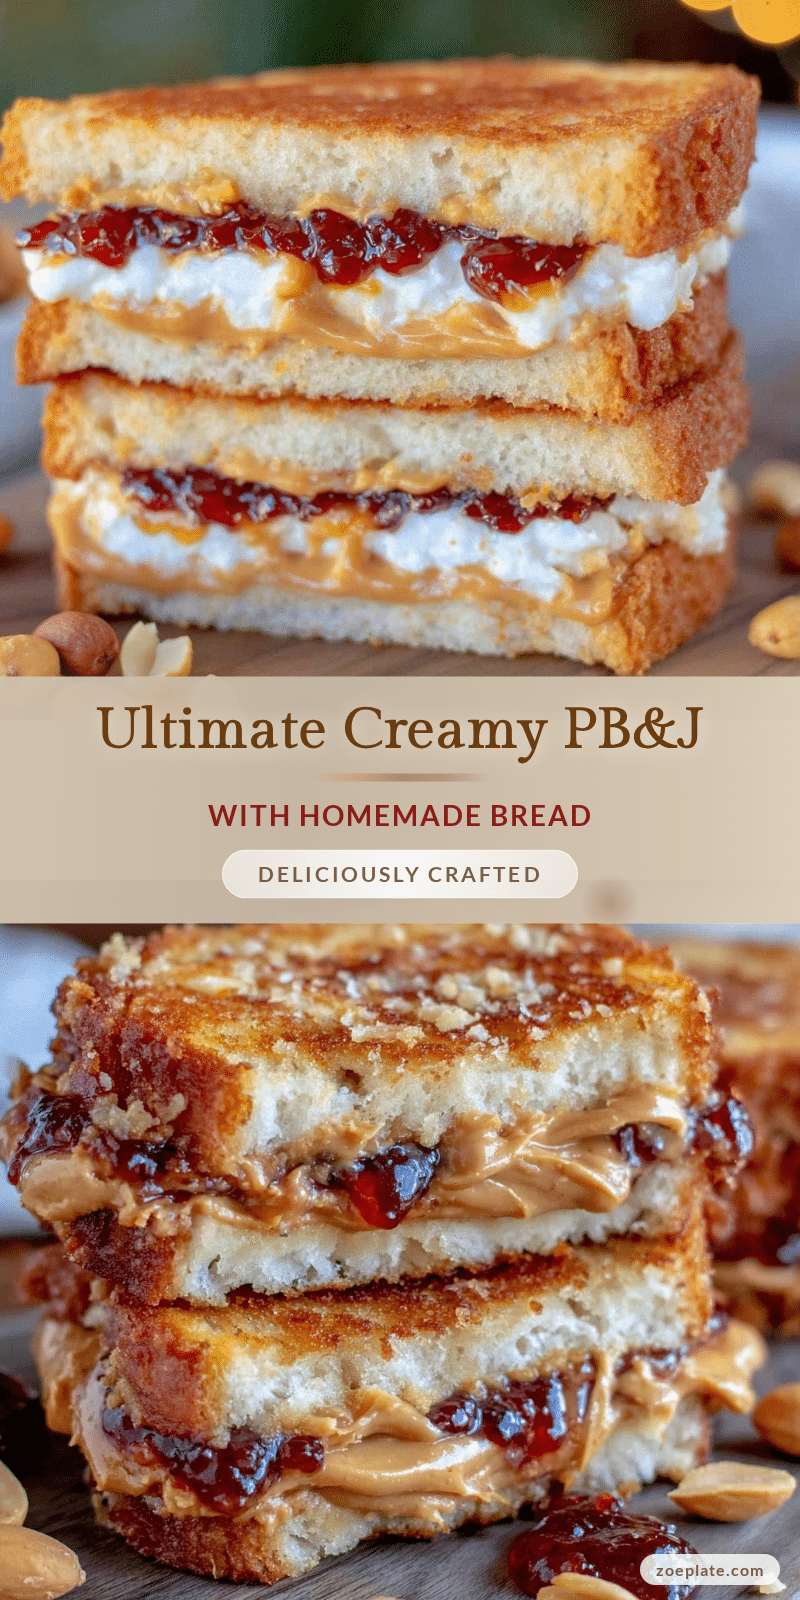
This isn’t just any PB&J. It’s crafted with care, using a little trick I picked up from a friend — lightly toasting the bread just enough to hold the peanut butter without sogginess, but not so much that it loses its soft charm. And instead of the usual grocery store jam, I love using a homemade or artisanal fruit spread for a burst of real flavor. Honestly, this sandwich makes you close your eyes after the first bite and smile — that’s the kind of classic comfort food magic we all deserve.
What Ingredients You Will Need
This recipe uses simple, wholesome ingredients to deliver bold flavor and satisfying texture without the fuss. You probably have most of these in your pantry or fridge already.
- Bread: 2 slices of soft white or whole wheat bread (I prefer bakery-fresh sandwich bread or a good-quality brioche for richness)
- Peanut Butter: 2 tablespoons creamy peanut butter (I recommend natural peanut butter like Smucker’s Natural for that clean, nutty flavor without added sugars)
- Jam or Jelly: 2 tablespoons strawberry or raspberry jam (homemade or store-bought, look for varieties with real fruit pieces and minimal added sugar)
- Optional Butter: 1 teaspoon unsalted butter, softened (for spreading on the outside if you want a grilled PB&J twist)
Substitution Tips: You can swap peanut butter for almond or sunflower seed butter if allergies are a concern. For a gluten-free option, try your favorite gluten-free sandwich bread. In summer, fresh berry jams or even sliced fresh strawberries work beautifully to add extra freshness. If you want a vegan version, use plant-based bread and a nut butter of choice.
Equipment Needed
- Butter knife or spreader – for even peanut butter and jam application
- Toaster or skillet (optional) – if you want to lightly toast or grill the sandwich
- Cutting board – for assembling and slicing the sandwich
- Spatula – useful if you choose to grill the sandwich to flip it easily
Honestly, this recipe doesn’t require fancy equipment. I like using a non-stick skillet when I want to make a grilled PB&J with buttery crusts— it’s a quick way to add a golden crunch. If you’re on a budget, a regular toaster and a butter knife are all you need. Keeping your knives sharp makes spreading easier and your sandwich neater, trust me on that one!
Preparation Method
- Prepare your bread: Lay out 2 slices of your chosen bread on a clean cutting board. If you prefer, lightly toast them in a toaster or skillet for about 1-2 minutes until just golden but still soft.
- Spread peanut butter: Using a butter knife, spread about 2 tablespoons of creamy peanut butter evenly across one slice of bread. Aim for a smooth, even layer that reaches the edges but isn’t too thick to overwhelm the sandwich.
- Apply jam or jelly: On the second slice, spread 2 tablespoons of your favorite jam. If the jam is homemade or thicker, you might want to warm it slightly for easier spreading — just a few seconds in the microwave.
- Assemble the sandwich: Carefully place the slice with jam on top of the peanut butter slice, jam side down. Gently press together to meld the layers without squeezing out the filling.
- Optional grilling: If you want a grilled version, melt 1 teaspoon of unsalted butter in a non-stick skillet over medium heat. Place the sandwich in the skillet and cook for 2-3 minutes per side, or until the bread is golden and crispy.
- Slice and serve: Using a sharp knife, cut the sandwich diagonally or straight down the middle, whichever you prefer. Serve immediately for the best texture and flavor.
Preparation Notes: When spreading the peanut butter, make sure it’s soft but not runny — natural peanut butter sometimes separates, so stirring it well before spreading helps. Also, don’t overload on jam; too much can make the bread soggy, especially if you’re not grilling the sandwich right away.
Timing Tip: This sandwich can be ready in under 10 minutes, but if you want the bread extra fresh, slice just before serving. For a fun twist, try pairing with a warm drink like the creamy collagen hot chocolate I make when the afternoon slump hits.
Cooking Tips & Techniques
Making the perfect PB&J is deceptively simple, but a few tips can make a world of difference:
- Choose your bread wisely: Soft sandwich bread is classic, but brioche or sourdough can add a new flavor dimension. Just avoid bread that’s too dense or dry.
- Balance your spreads: Too much peanut butter can overpower the jam, and vice versa. The goal is harmony — a smooth peanut butter layer with a fruity pop from the jam.
- Prevent sogginess: If you’re packing this for later, spread a thin layer of peanut butter on both slices of bread to create a moisture barrier before adding jam.
- Grilling technique: When grilling, keep the heat medium to low to allow the bread to toast evenly without burning while the peanut butter softens.
- Knife care: A sharp knife helps slice cleanly without squishing the sandwich. Wiping the blade between cuts keeps things neat.
One time, I made the rookie mistake of spreading cold peanut butter straight from the fridge — it tore the bread and made the sandwich uneven. Lesson learned: always stir and soften natural peanut butter first. Also, if you want to get fancy, spreading a thin layer of cream cheese under the peanut butter adds a subtle tangy creaminess that’s surprisingly delicious.
Variations & Adaptations
The classic PB&J is a canvas for creativity. Here are some ways to mix it up:
- Nut-Free Version: Replace peanut butter with sunflower seed butter or soy nut butter to accommodate allergies without losing that creamy texture.
- Seasonal Fruit Jam: Swap strawberry jam for apricot in spring or spiced apple butter in fall for a seasonal twist.
- Grilled PB&J: Turn it into a warm, melty sandwich by grilling with a little butter in a skillet until golden and crisp, similar to a grilled cheese.
- Added Crunch: Sprinkle crushed nuts or granola on the peanut butter side before assembling for a delightful texture contrast.
- Healthier Spin: Use whole grain or sprouted grain bread and natural peanut butter with no added sugar for a more nourishing sandwich.
Personally, I once tried adding a drizzle of honey and a pinch of cinnamon to the peanut butter before spreading — it brought a cozy warmth that made it feel like a special treat. If you’re curious about wholesome snacks to pair with your sandwich, the easy collagen protein balls make a perfect sidekick.
Serving & Storage Suggestions
The Homemade Classic PB&J is best served fresh and slightly warm if grilled. The contrast of creamy peanut butter, sweet jam, and soft bread is irresistible when enjoyed right away.
For a quick lunchbox idea, wrap tightly in parchment paper or plastic wrap to prevent drying out. Refrigerate if packing for later, but note that the bread might firm up in the fridge. To refresh, let it sit at room temperature for a few minutes or give it a quick toast.
If you’ve made extra jam or want to prepare ahead, this sandwich pairs wonderfully with a cold glass of milk or a cup of the creamy vegan nutritional yeast mac and cheese for a cozy meal combo.
Leftover sandwiches don’t freeze well due to moisture in the jam and peanut butter, so it’s best to enjoy them fresh or within a day. Over time, the flavors tend to meld, which some people love, but the bread can get soggy, so keep that in mind if prepping ahead.
Nutritional Information & Benefits
This classic sandwich packs a decent nutritional punch, especially when you choose wholesome ingredients:
- Peanut butter provides healthy fats, protein, and fiber, helping keep you full and energized.
- Jam adds natural fruit sugars and antioxidants, especially if you choose varieties with real fruit and minimal added sugar.
- Whole grain or sprouted bread increases fiber and B vitamins, supporting digestion and energy levels.
For those watching allergens, peanut butter and wheat bread are common triggers, but there are plenty of alternatives to suit gluten-free or nut-free diets. This sandwich can fit into balanced diets and offers a quick source of energy, especially for kids or anyone needing a comforting, easy meal.
Conclusion
The Homemade Classic PB&J You Deserved as a Kid is more than just a sandwich — it’s a little comfort wrapped in soft bread, a reminder that sometimes simple food is the best kind. Whether you’re revisiting childhood favorites or making a quick meal for yourself or your family, this recipe strikes the perfect balance of nostalgia and deliciousness.
Feel free to tweak the jams, nut butters, or bread to match what you love most. I keep coming back to this recipe because it’s reliable, satisfying, and honestly, it just feels like a warm hug on a plate. If you try it, I’d love to hear how you make it your own or what memories it stirs up!
Don’t forget to leave a comment below sharing your favorite PB&J twist or pairing, and if you’re interested in snacks that complement this sandwich, check out these crispy nutritional yeast popcorn recipes for a fun, savory crunch.
FAQs
What type of peanut butter works best for PB&J?
Natural creamy peanut butter with minimal added sugar and oil separation is ideal for the best texture and flavor. However, regular creamy peanut butter also works if you prefer a sweeter taste.
Can I use other types of bread for this sandwich?
Absolutely! White, whole wheat, brioche, sourdough, or gluten-free breads all work well. Just pick a soft bread that complements the creamy and sweet fillings.
How do I prevent the sandwich from becoming soggy?
Spread a thin layer of peanut butter on both slices of bread before adding jam to create a moisture barrier. Also, pack the sandwich tightly and keep it refrigerated if not eating immediately.
Is it okay to grill a PB&J sandwich?
Yes! Grilling adds a lovely crunch and melts the peanut butter slightly, making for a warm, indulgent twist. Use medium-low heat and butter the outside lightly for best results.
Can I make this sandwich vegan or allergy-friendly?
Definitely. Use plant-based bread and seed butters like sunflower seed butter for nut allergies. Choose vegan jams without gelatin or honey to keep it fully vegan.
Pin This Recipe!
Homemade Classic PB&J

A quick and easy peanut butter and jelly sandwich made with quality ingredients and a little care, perfect for nostalgic lunches or cozy snacks.
- Prep Time: 5 minutes
- Cook Time: 5 minutes
- Total Time: 10 minutes
- Yield: 1 sandwich 1x
- Category: Snack
- Cuisine: American
Ingredients
- 2 slices of soft white or whole wheat bread (bakery-fresh sandwich bread or brioche preferred)
- 2 tablespoons creamy peanut butter (natural peanut butter recommended)
- 2 tablespoons strawberry or raspberry jam (homemade or store-bought with real fruit pieces)
- 1 teaspoon unsalted butter, softened (optional, for grilling)
Instructions
- Lay out 2 slices of your chosen bread on a clean cutting board. Lightly toast them in a toaster or skillet for about 1-2 minutes until just golden but still soft, if desired.
- Using a butter knife, spread about 2 tablespoons of creamy peanut butter evenly across one slice of bread.
- On the second slice, spread 2 tablespoons of your favorite jam. Warm the jam slightly if it is thick for easier spreading.
- Carefully place the slice with jam on top of the peanut butter slice, jam side down. Gently press together without squeezing out the filling.
- Optional: Melt 1 teaspoon of unsalted butter in a non-stick skillet over medium heat. Place the sandwich in the skillet and cook for 2-3 minutes per side until golden and crispy.
- Using a sharp knife, cut the sandwich diagonally or straight down the middle. Serve immediately.
Notes
Stir natural peanut butter before spreading to avoid separation. Avoid overloading jam to prevent sogginess. For packed lunches, spread peanut butter on both slices to create a moisture barrier. Use medium-low heat when grilling to prevent burning.
Nutrition
- Serving Size: 1 sandwich
- Calories: 350
- Sugar: 12
- Sodium: 250
- Fat: 18
- Saturated Fat: 3
- Carbohydrates: 35
- Fiber: 4
- Protein: 10
Keywords: peanut butter and jelly, PB&J, sandwich, quick snack, easy recipe, homemade jam, peanut butter sandwich