“You seriously have to try these,” my coworker said, sliding a small, powdery ball across the breakroom table. I eyed it skeptically—protein balls didn’t typically grab me, and then collagen? Honestly, I was doubtful. But one bite, and I was hooked. That day, juggling deadlines and a fading afternoon slump, these easy collagen protein balls felt like a little burst of energy and care rolled into one. Soft, subtly sweet, and with a hint of something wholesome that just made me feel… grounded. It wasn’t just a snack; it was a quiet reset.
Weeks later, I found myself making these almost obsessively—testing tweaks, adding a dash of cinnamon here, swapping almond butter for peanut butter there. The recipe grew into something I reach for when I want a nourishing pick-me-up that feels mindful, especially when the day’s chaos has me craving something simple but meaningful. You know, the kind of snack that fits perfectly between a hectic morning and a late afternoon rush, without fuss or guilt.
What surprised me most was how this easy collagen protein balls recipe managed to balance indulgence with real nourishment. It’s not just about protein or collagen powders thrown together. It’s about a texture that’s chewy but not dry, a sweetness that’s natural, and a flavor profile that feels like it’s made to support you—not just fill you up. I’ve since shared it with friends who are all about healthy snacking, and it’s become a little ritual for us, a reminder that taking care of ourselves can be straightforward, tasty, and even a bit comforting.
So, if you’re curious about a nourishing anti-aging snack that feels like a treat and a boost all at once, this recipe might just become your new favorite. No complicated steps, no weird ingredients, just a simple way to carry a bit of wellness with you wherever you go.
Why You’ll Love This Recipe
This easy collagen protein balls recipe is one of those rare finds that combines health benefits with everyday convenience. After making it several times, here’s what really stands out:
- Quick & Easy: Comes together in about 15 minutes, perfect for busy mornings or a quick afternoon snack.
- Simple Ingredients: No need for specialty stores—most are pantry staples or easy to find at your local market.
- Perfect for On-the-Go: These balls are portable and mess-free, great for work, travel, or post-workout fuel.
- Crowd-Pleaser: Mild sweetness and a nutty flavor that both kids and adults tend to enjoy.
- Unbelievably Delicious: The texture is chewy and satisfying, with a hint of vanilla and a touch of natural sweetness that feels like a treat.
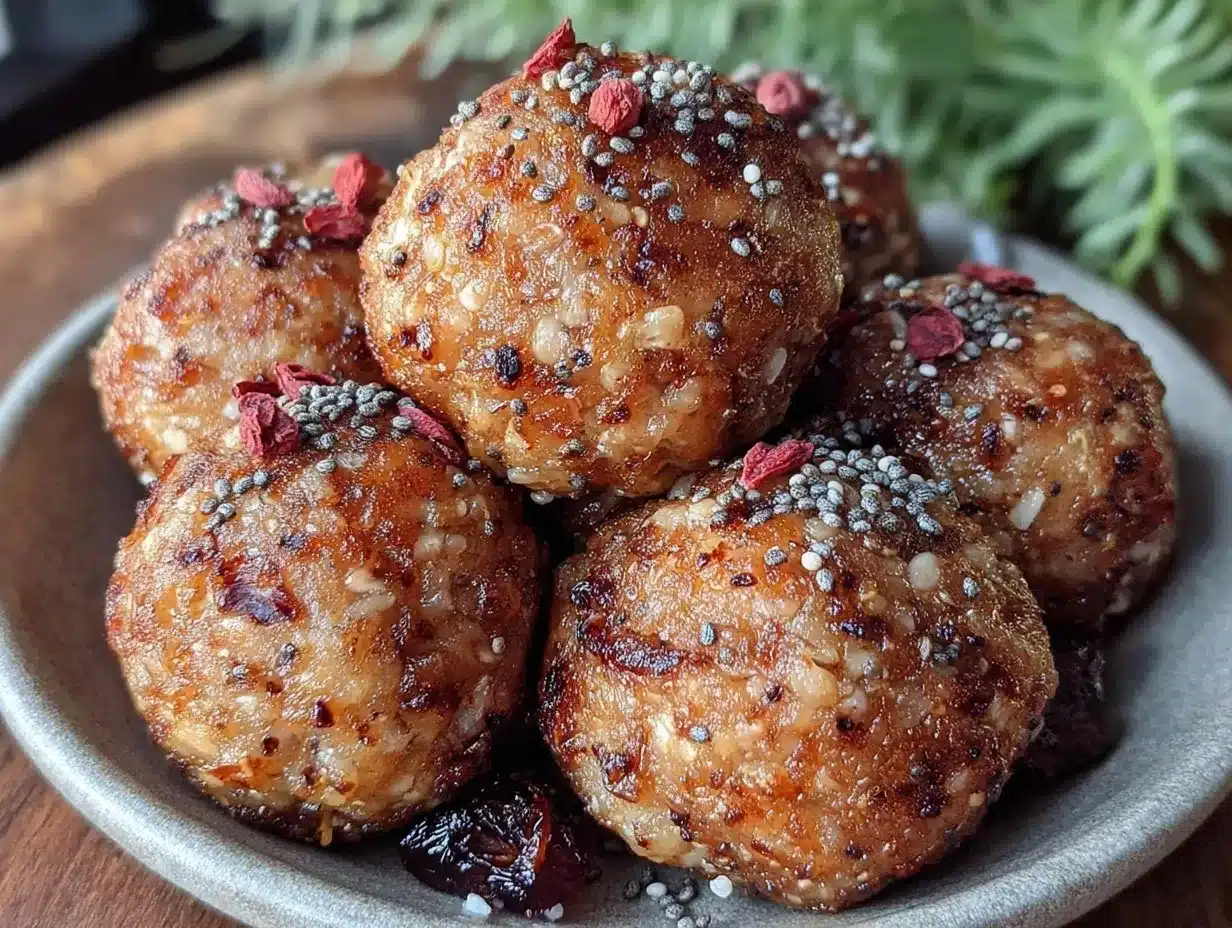
What makes this recipe different? Well, it’s not just tossing collagen powder into any protein ball mix. The balance of nut butter, oats, and a touch of honey creates a binding base that keeps these balls moist and chewy. Plus, the addition of chia seeds adds a subtle crunch and boosts fiber. I’ve tried other recipes that ended up too dry or crumbly, but this one nails the texture every time.
Honestly, these protein balls feel like a little act of kindness toward yourself. They’re the kind of snack that you don’t just eat mindlessly—you take a moment, enjoy the flavor and texture, and feel good knowing you’re supporting your skin and joints with collagen. It’s like a tiny self-care ritual that fits right into a busy day.
What Ingredients You Will Need
This recipe uses simple, wholesome ingredients to deliver bold flavor and satisfying texture without the fuss. Most of these are staples, and substitutions are easy if you want to customize.
- Old-fashioned rolled oats (1 cup / 90 g) – provides chewy texture and fiber
- Collagen peptides (1/4 cup / 30 g) – the star ingredient for anti-aging support; I prefer Vital Proteins for its neutral taste
- Natural almond butter (1/2 cup / 125 g) – use unsweetened and smooth for best binding; peanut butter works too but changes the flavor
- Honey (1/4 cup / 85 g) – adds natural sweetness; maple syrup is a great vegan-friendly swap
- Chia seeds (2 tablespoons / 20 g) – bring a subtle crunch and boost omega-3s
- Vanilla extract (1 teaspoon) – enhances flavor and rounds out sweetness
- Ground cinnamon (1/2 teaspoon) – optional but adds warmth and depth
- Pinch of sea salt – balances sweetness and enhances flavor
- Mini dark chocolate chips (optional, 1/4 cup / 45 g) – for a touch of indulgence without overpowering
Look for firm, fresh almond butter without added oils for best texture. If you want to make these gluten-free, just double-check your oats are certified gluten-free. In summer, I sometimes swap honey for a lighter agave syrup when I want a less sticky finish.
Equipment Needed
- Mixing bowl: A medium to large size, preferably glass or stainless steel, for easy mixing and cleanup.
- Spoon or spatula: To stir the ingredients thoroughly.
- Measuring cups and spoons: For accurate ingredient portions – helps keep texture consistent.
- Baking sheet or tray: To place the rolled balls on while they chill.
- Parchment paper or silicone mat: Prevents sticking and makes cleanup easier.
- Refrigerator: For firming up the balls before serving.
If you don’t have parchment paper, lightly greasing the tray works fine too. I used to roll these on my kitchen counter before getting a silicone mat, and it worked just as well—just a little more cleanup! No fancy equipment needed here, which is great if you want a quick and fuss-free snack.
Preparation Method
- Combine the dry ingredients: In your mixing bowl, add 1 cup (90 g) old-fashioned rolled oats, 1/4 cup (30 g) collagen peptides, 2 tablespoons (20 g) chia seeds, 1/2 teaspoon ground cinnamon, and a pinch of sea salt. Stir them gently to distribute everything evenly. This should take about 2 minutes.
- Add the wet ingredients: To the dry mix, add 1/2 cup (125 g) natural almond butter, 1/4 cup (85 g) honey, and 1 teaspoon vanilla extract. Use a sturdy spoon or spatula to mix everything thoroughly until a sticky dough forms. This step might require about 3-5 minutes of mixing. If the mixture feels too dry, add a teaspoon of water or almond milk at a time until it holds together well.
- Fold in optional chocolate chips: If you want a little extra indulgence, gently fold in 1/4 cup (45 g) mini dark chocolate chips. They add a nice surprise in every bite. This step takes about 1 minute.
- Shape the balls: Use your hands to scoop and roll the mixture into roughly 1-inch (2.5 cm) balls. You should get about 12-14 balls. If sticky, slightly wet your hands first to make rolling easier. This usually takes 5-7 minutes.
- Chill and set: Place the balls on a parchment-lined baking sheet or tray and pop them into the fridge for at least 30 minutes. This helps them firm up and keeps their shape. Once chilled, store them in an airtight container in the fridge for up to a week.
Pro tip: If you find your balls crumble too much, it usually means the almond butter isn’t binding well enough or the mixture is too dry. Adding a bit more honey or a splash of almond milk helps fix that. The texture should be firm but chewy, not crumbly or overly sticky. You’ll know it’s right when the balls hold their shape but still feel soft to the bite.
Cooking Tips & Techniques
Making these collagen protein balls isn’t complicated, but a few tricks can make all the difference:
- Choose the right nut butter: I’ve learned that natural, unsweetened almond butter works best for binding without overpowering flavor. Avoid those with added oils or sugars, which can affect texture and taste.
- Mix thoroughly but gently: Overmixing can make the balls tough. Stir just enough to combine ingredients evenly, then switch to folding in extras like chocolate chips.
- Adjust sweetness carefully: The honey adds moisture and sweetness, but every batch of nut butter or oats can vary. Taste the mixture before rolling—if it feels bland, a little more honey or vanilla helps.
- Chill before serving: This step is crucial. It firms up the balls and helps flavors meld. I usually make a batch in the morning for a snack later in the day.
- Handle sticky mixtures: Wetting your hands slightly before rolling prevents sticking and saves a lot of cleanup.
One time, I skipped chilling and tried to pack these for a hike. Big mistake—the balls fell apart halfway through my walk! Since then, I’ve learned the chilling step is non-negotiable for a snack that travels well.
Variations & Adaptations
One of the best things about this recipe is how easy it is to make it your own:
- Dietary swaps: Use sunflower seed butter to make it nut-free, and swap honey for maple syrup to keep it vegan.
- Flavor twists: Add a tablespoon of cocoa powder for a chocolatey version or sprinkle in dried cranberries or chopped dates for fruity sweetness.
- Cooking method change: If you prefer a smoother texture, pulse the oats in a food processor before mixing (but don’t overdo it—you want some chew!).
- Boost protein: Stir in a scoop of your favorite plant-based or whey protein powder along with the collagen peptides to up the protein content.
- Spice it up: A pinch of cayenne or ginger powder adds a subtle kick that pairs surprisingly well with the sweetness.
Personally, after making the basic version a dozen times, I tried adding a teaspoon of matcha powder for an antioxidant boost. The earthy flavor was unexpected but really complemented the vanilla and honey. Definitely a fun twist if you like green tea flavors.
Serving & Storage Suggestions
These easy collagen protein balls are best served cold or at room temperature. They make a perfect companion to a cup of herbal tea or your morning coffee. I often grab a couple alongside my breakfast, or pack them in my bag for a mid-afternoon pick-me-up.
For storing, keep them in an airtight container in the refrigerator for up to one week. They also freeze beautifully—just pop them in a freezer-safe container, and thaw a few at a time as needed. When thawing, I let them sit at room temperature for about 15 minutes for the best chewiness.
Flavors tend to deepen after a day or two in the fridge, so if you make a batch ahead, you might find them even tastier the next day. Just don’t skip the chilling step before eating, or they can get a bit too soft.
For a little extra flair, you can roll the balls in finely shredded coconut, crushed nuts, or cocoa powder before chilling. It’s a simple way to add texture and a pop of color.
Nutritional Information & Benefits
Each collagen protein ball contains roughly:
| Nutrient | Per Ball (approx.) |
|---|---|
| Calories | 90-100 kcal |
| Protein | 5-6 grams |
| Fat | 6-7 grams (mostly healthy fats) |
| Carbohydrates | 7-8 grams |
| Fiber | 2 grams |
Collagen peptides support skin elasticity, joint health, and overall tissue repair, making these balls a nourishing addition to any anti-aging routine. The chia seeds add omega-3 fatty acids and fiber, which help with satiety and digestion. Using natural nut butter provides healthy fats, while oats give a steady release of energy without spiking blood sugar.
For those with gluten sensitivity, using certified gluten-free oats keeps the recipe safe. The recipe is naturally dairy-free and can be made vegan by swapping honey for maple syrup.
Conclusion
This easy collagen protein balls recipe stands out because it’s both nourishing and genuinely enjoyable to eat. It’s the kind of snack that feels thoughtful without being complicated—perfect for those moments when you want to care for yourself but don’t want to spend ages in the kitchen.
Feel free to tweak it to your taste, whether that means swapping nut butters, adding a pinch of spice, or boosting the protein. I love how these little balls have become a quiet ritual in my routine, a small daily reminder that self-care can be simple and delicious.
Give this recipe a try and see how it fits into your day. And if you’re curious about other easy, satisfying meals, you might enjoy the easy flavor-packed Korean beef bowl or the tender garlic butter baked cod recipe—both quick, tasty, and fuss-free.
Frequently Asked Questions
Can I use other nut butters instead of almond butter?
Yes! Peanut butter, cashew butter, or sunflower seed butter (for nut-free) all work well. Just keep in mind the flavor and texture will vary slightly.
How long do collagen protein balls last in the fridge?
Stored in an airtight container, they last up to one week. For longer storage, freeze them and thaw as needed.
Can I make these protein balls without collagen powder?
You can omit collagen and still have tasty protein balls, but you’ll lose the specific anti-aging benefits collagen provides.
Are these protein balls suitable for a vegan diet?
To make them vegan, swap honey for maple syrup or agave nectar. The rest of the ingredients are plant-based.
Can I add protein powder to boost protein content?
Absolutely! Adding a scoop of your favorite protein powder works well—just adjust wet ingredients slightly to keep the right texture.
Pin This Recipe!
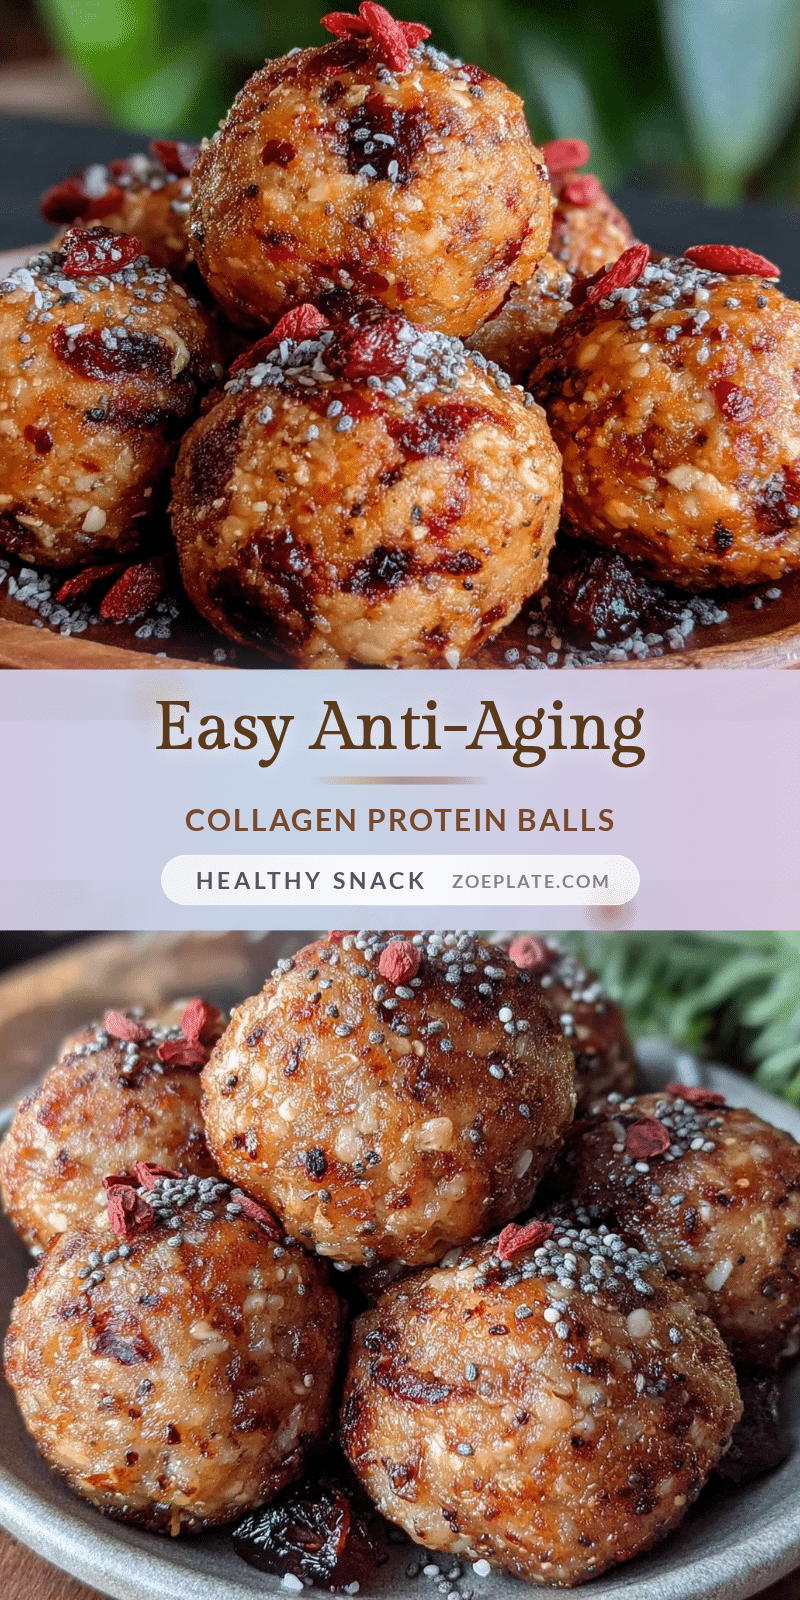
Easy Collagen Protein Balls Recipe

A quick and nourishing anti-aging snack that combines collagen peptides with wholesome ingredients for a chewy, subtly sweet protein ball perfect for on-the-go energy.
- Prep Time: 10 minutes
- Cook Time: 0 minutes
- Total Time: 40 minutes
- Yield: 12-14 balls 1x
- Category: Snack
- Cuisine: American
Ingredients
- 1 cup old-fashioned rolled oats (90 g)
- 1/4 cup collagen peptides (30 g)
- 1/2 cup natural almond butter (125 g), unsweetened and smooth
- 1/4 cup honey (85 g) or maple syrup for vegan option
- 2 tablespoons chia seeds (20 g)
- 1 teaspoon vanilla extract
- 1/2 teaspoon ground cinnamon (optional)
- Pinch of sea salt
- 1/4 cup mini dark chocolate chips (optional, 45 g)
Instructions
- Combine the dry ingredients: In a mixing bowl, add rolled oats, collagen peptides, chia seeds, ground cinnamon, and sea salt. Stir gently to distribute evenly (about 2 minutes).
- Add the wet ingredients: Add almond butter, honey, and vanilla extract to the dry mix. Mix thoroughly with a spoon or spatula until a sticky dough forms (3-5 minutes). If too dry, add water or almond milk one teaspoon at a time until mixture holds together.
- Fold in optional chocolate chips gently (about 1 minute).
- Shape the balls: Scoop and roll the mixture into roughly 1-inch balls, about 12-14 total. Wet hands slightly if sticky (5-7 minutes).
- Chill and set: Place balls on a parchment-lined tray and refrigerate for at least 30 minutes to firm up. Store in an airtight container in the fridge for up to one week.
Notes
Use natural, unsweetened almond butter without added oils for best texture. Chilling is essential to firm the balls and help flavors meld. Wet hands slightly before rolling to prevent sticking. For vegan option, substitute honey with maple syrup or agave nectar. Optional add-ins include cocoa powder, dried cranberries, protein powder, or spices like cayenne or ginger powder.
Nutrition
- Serving Size: 1 ball
- Calories: 90100
- Sugar: 45
- Sodium: 40
- Fat: 67
- Saturated Fat: 1
- Carbohydrates: 78
- Fiber: 2
- Protein: 56
Keywords: collagen protein balls, anti-aging snack, healthy snack, easy protein balls, collagen peptides, no-bake snack, nutritious snack