My first batch of monster eyeball popcorn balls looked less like something from a haunted house and more like a science experiment gone wrong. The popcorn refused to stick together, the candy eyes slid off like they were trying to escape, and the green food coloring turned everything a weird shade of swamp water. Honestly, I stood there in my kitchen covered in sticky marshmallow goo, questioning every life choice that led me to that moment. I wanted to scrap the whole idea and just hand out store-bought candy bars like a normal person.
But then I remembered my nephew’s face from the year before when he saw a picture of monster popcorn balls online. He asked me if we could make them together, and I promised we would. So I scraped the failed attempt into the trash, took a deep breath, and tried again. And again. And one more time after that. By the fourth batch, something clicked. The popcorn held its shape, the colors stayed vibrant, and the eyeballs actually looked like they were staring back at me with a mischievous little gleam.
That is how these spooky monster eyeball popcorn balls were born. Not from a family recipe passed down through generations, but from pure stubbornness and a promise to a six-year-old. They are the kind of Halloween treat that makes people laugh when they see them. The kind that kids fight over at parties. And honestly, the kind that makes you feel like a kitchen wizard when you nail the technique. Let me show you how to skip all my mistakes and get it right the first time.
Why You Will Love This Recipe
These monster eyeball popcorn balls are not just another Halloween dessert. They are the perfect combination of sweet, salty, and completely ridiculous in the best possible way. I have tested this recipe more times than I care to admit, and I can tell you with confidence that every single detail has been refined for maximum success.
- Quick and Easy: From start to finish, you can have these ready in under 30 minutes. No complicated techniques or fancy equipment needed.
- Simple Ingredients: You probably already have most of these in your pantry. Butter, marshmallows, popcorn, and food coloring are all you need for the base.
- Perfect for Halloween Parties: These are the life of any spooky gathering. Kids go absolutely wild for them, and adults secretly love them too.
- Crowd-Pleaser: I have brought these to school parties, neighborhood gatherings, and family Halloween dinners. They disappear faster than anything else on the table.
- Unbelievably Fun: There is something deeply satisfying about biting into a popcorn ball and seeing candy eyeballs staring back at you. It is silly, playful, and absolutely delicious.
What sets this recipe apart from other popcorn ball recipes is the technique. I figured out exactly how to get the marshmallow mixture to the perfect consistency so the popcorn holds together without turning into a rock-hard brick. The color stays vibrant without bleeding, and the candy eyes actually stay put instead of falling off the moment someone picks one up. It is the kind of Halloween treat that makes you look like a pro, even if you have never made popcorn balls before in your life.
What Ingredients You Will Need
This recipe uses simple, everyday ingredients to create something truly memorable. No weird specialty items here. Just good old-fashioned pantry staples that come together in a spectacularly spooky way.
For the Popcorn Balls
- 12 cups popped popcorn (about 1/2 cup unpopped kernels or one 3-ounce bag of microwave popcorn). I prefer using plain air-popped popcorn because it has no added butter or salt that could mess with the marshmallow coating. If you use microwave popcorn, go with the lightly salted or unsalted version.
- 1/4 cup unsalted butter (56 grams). Use the real stuff here, not margarine. Butter gives the popcorn balls a rich flavor and helps the marshmallow mixture stay smooth.
- 10 ounces marshmallows (about 40 regular marshmallows or 4 cups of mini marshmallows). I have tested this with both regular and mini marshmallows, and they both work great. Mini marshmallows melt faster and more evenly, which is nice.
- 1/2 teaspoon vanilla extract (adds warmth and depth to the sweetness).
- 1/4 teaspoon salt (balances the sweetness and makes the flavors pop).
- Gel food coloring in green, purple, and orange. I really recommend gel food coloring over the liquid stuff. Liquid food coloring can make the marshmallow mixture too wet, which leads to soggy popcorn balls. Gel coloring gives you vibrant colors without adding extra moisture. I like the Wilton brand for consistency.
For the Monster Decorations
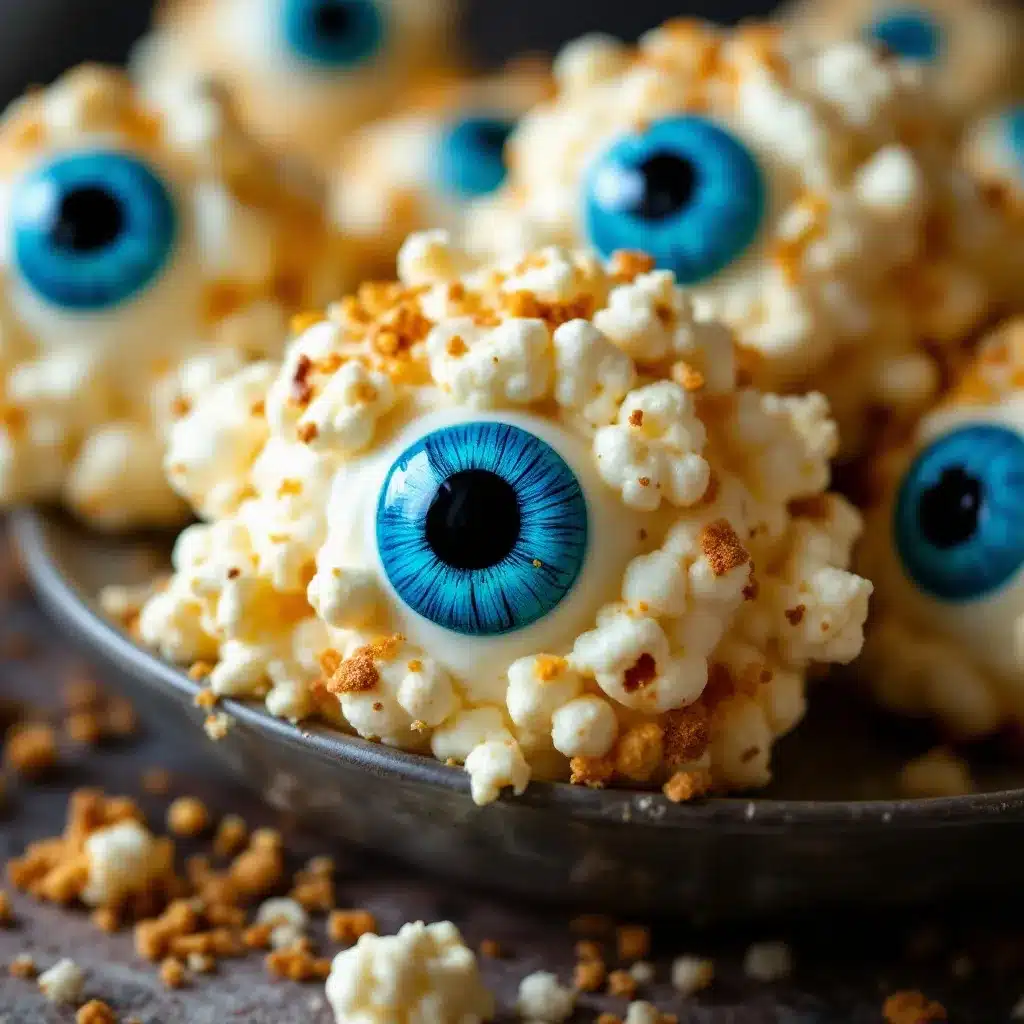
- 1 cup candy eyeballs (available at most craft stores or online). You want the kind with flat backs so they stick easily. I have found that the larger eyeballs (about 1/2 inch) work best for making the monsters look properly ridiculous.
- 1/2 cup candy melts in black or dark chocolate (for attaching the eyeballs and drawing monster mouths).
- 1 tablespoon coconut oil or vegetable shortening (to thin the candy melts for easier drizzling).
- Optional decorations: orange and black sprinkles, edible glitter, or crushed graham crackers for a “dirt” effect.
For Greasing Your Hands
- 1 tablespoon butter or coconut oil (for rubbing on your hands so the marshmallow mixture does not stick to you). This is non-negotiable. Trust me on this one.
One thing I learned the hard way is that the quality of your marshmallows really matters. I have tried this with store-brand marshmallows and they just do not melt as smoothly. They tend to get grainy and weird. Stick with Jet-Puffed or another name brand for the best results. Your popcorn balls will thank you.
Equipment Needed
You do not need a fancy kitchen to make these monster eyeball popcorn balls. Here is what you will need:
- Large stockpot or Dutch oven (at least 6 quarts). You need room to stir the popcorn with the marshmallow mixture without making a mess.
- Medium saucepan for melting the marshmallow mixture.
- Rubber spatula (silicone works best because nothing sticks to it).
- Parchment paper or silicone baking mats for letting the popcorn balls cool.
- Baking sheet to hold the cooling popcorn balls.
- Small microwave-safe bowl for melting the candy melts.
- Measuring cups and spoons.
- Kitchen scissors or a sharp knife for cutting the candy eyeballs apart if they are connected.
If you do not have a stockpot, you can use a large mixing bowl and a separate saucepan. Just be careful when mixing everything together. I have definitely spilled marshmallow-coated popcorn all over my counter more times than I want to admit. A deep pot really does make life easier.
For the candy melts, I use a cheap squeeze bottle from the craft store. It makes drawing monster mouths so much easier than using a piping bag. But honestly, a zip-top bag with the corner snipped off works just fine too.
Preparation Method
Step 1: Pop Your Popcorn
Pop your popcorn using whatever method you prefer. I use an air popper because it is quick and produces fluffy popcorn without any oil. If you are using microwave popcorn, pop one 3-ounce bag and remove any unpopped kernels. You want exactly 12 cups of popped popcorn. Measure it out and set it aside in your largest bowl or stockpot.
Here is a tip I learned after my third failed batch: remove the unpopped kernels. Nothing ruins a popcorn ball faster than biting into a hard kernel when you are expecting a soft, chewy treat. Pick through the popcorn and get rid of any stubborn kernels that refused to pop.
Step 2: Prepare Your Work Surface
Line a baking sheet with parchment paper or a silicone baking mat. Lightly grease the parchment paper with a thin layer of butter or nonstick spray. This prevents the popcorn balls from sticking while they cool. Set this aside where you can reach it easily.
Step 3: Melt the Marshmallow Mixture
In a medium saucepan over low heat, melt the 1/4 cup of unsalted butter. Once the butter is fully melted, add the 10 ounces of marshmallows. Stir constantly with your rubber spatula until the marshmallows are completely melted and smooth. This usually takes about 5 to 7 minutes. Do not walk away from the saucepan during this step. Marshmallows can burn quickly if you are not paying attention.
Once the marshmallows are melted, remove the saucepan from the heat. Stir in the vanilla extract and salt. The mixture should be smooth, glossy, and slightly stretchy when you lift the spatula.
Step 4: Add the Food Coloring
Divide the marshmallow mixture into three separate bowls if you want multiple colors. I usually make one batch green, one batch purple, and one batch orange. Add a small amount of gel food coloring to each bowl and stir until the color is evenly distributed. Start with a tiny amount and add more until you reach your desired shade. Remember, you can always add more color, but you cannot take it away.
If you are making a single color, just add the gel food coloring directly to the saucepan and stir well. For green monster eyeball popcorn balls, I use about 1/4 teaspoon of neon green gel coloring. It gives a vibrant, slightly eerie shade that looks perfect for Halloween.
Step 5: Combine with Popcorn
Working quickly while the marshmallow mixture is still warm, pour the colored marshmallow mixture over the popcorn. Use your rubber spatula to gently fold everything together. Be careful not to crush the popcorn. You want every piece coated, but you also want the popcorn to stay intact.
This is where the timing gets a little tricky. The marshmallow mixture will start to set as it cools, so you need to work fast. If it gets too stiff, you can microwave it for 10 to 15 seconds to soften it up again.
Step 6: Shape the Popcorn Balls
Here is the most important step. Rub a generous amount of butter or coconut oil all over your hands. This is what prevents the marshmallow mixture from sticking to your skin like superglue. I cannot stress this enough. Do not skip this step. I have made this mistake and spent 20 minutes trying to peel marshmallow off my fingers.
Take a handful of the coated popcorn and gently press it into a ball shape. Use light pressure. You want the popcorn to stick together, but you do not want to compress it into a dense, hard ball. Aim for a shape that is roughly the size of a tennis ball. Place each finished popcorn ball onto the prepared baking sheet. Repeat until all the popcorn mixture is used up. This recipe makes about 12 to 14 popcorn balls, depending on the size.
Step 7: Let Them Set
Allow the popcorn balls to cool and set at room temperature for about 10 to 15 minutes. Do not put them in the refrigerator. The condensation can make the popcorn soggy. Just let them sit on the counter until they are firm enough to hold their shape.
Step 8: Add the Monster Faces
While the popcorn balls are cooling, melt your candy melts. Place the black candy melts and 1 tablespoon of coconut oil in a microwave-safe bowl. Microwave in 30-second intervals, stirring between each interval, until the mixture is smooth and fully melted. Be careful not to overheat the candy melts. They can seize up and become grainy if they get too hot.
Transfer the melted candy to a small squeeze bottle or a zip-top bag with a tiny corner snipped off. Now comes the fun part. Draw little monster mouths on each popcorn ball. You can make them silly, scary, or somewhere in between. I like to do a mix of open mouths with jagged teeth and simple crooked smiles.
While the candy melt is still wet, press two candy eyeballs onto each popcorn ball. Press gently so they stick without breaking the popcorn ball apart. For extra personality, you can add more than two eyes. Three-eyed monsters are always a hit with kids.
Step 9: Final Decorations
If you are using sprinkles or edible glitter, sprinkle them over the popcorn balls while the candy melt is still wet. This helps everything stick in place. Let the candy melt fully set before serving or storing. This usually takes about 10 minutes at room temperature.
Cooking Tips and Techniques
I have made more batches of these monster eyeball popcorn balls than I can count, and I have learned a few things along the way. Let me save you some trouble.
Work in small batches. If you are making multiple colors, do not try to mix all the popcorn at once. Work with one color at a time. This keeps the marshmallow mixture warm and workable, and it prevents you from rushing and making a mess.
Keep your hands greased. Reapply butter or coconut oil to your hands between each popcorn ball. The marshmallow mixture will start to stick as it cools, and you do not want to end up with a sticky mess on your fingers halfway through.
Do not overmix. When you combine the marshmallow mixture with the popcorn, fold gently and stop as soon as everything is evenly coated. Overmixing crushes the popcorn and leads to dense, sad popcorn balls.
Test the temperature. If the marshmallow mixture is too hot, it will make the popcorn soggy. If it is too cool, it will not coat the popcorn evenly. Aim for a warm, pourable consistency. When you lift the spatula, the mixture should drip off in a slow, steady stream.
Use fresh popcorn. Day-old popcorn is stale and will not hold together well. Pop your popcorn fresh for the best results. Stale popcorn also has a weird texture that does not improve with marshmallow coating.
One mistake I made early on was pressing the popcorn balls too tightly. I thought they needed to be compact to hold together, but that just made them hard and difficult to eat. A gentle touch is all you need. Think of it like making a snowball. You want it to hold its shape, but you do not want to squeeze all the air out.
Variations and Adaptations
These monster eyeball popcorn balls are incredibly versatile. Here are some fun variations I have tried.
Chocolate Drizzled Monster Balls
After shaping the popcorn balls, drizzle melted white or dark chocolate over the top. Let it set before adding the candy eyes. The chocolate adds a rich flavor and makes the popcorn balls look even more decadent. I did this for a Halloween party last year and they were gone in 10 minutes.
Peanut Butter Monster Balls
Add 1/4 cup of creamy peanut butter to the marshmallow mixture when you add the vanilla extract. Stir until fully combined before adding the food coloring. The peanut butter adds a savory note that balances the sweetness beautifully. Just make sure to check for peanut allergies if you are serving these at a school party.
Gluten-Free and Vegan Options
This recipe is naturally gluten-free as long as you use certified gluten-free popcorn. For a vegan version, substitute the butter with vegan butter and use vegan marshmallows. Dandies brand makes excellent vegan marshmallows that melt just as well as the regular kind. I have tested both versions and they work perfectly.
Spicy Monster Balls
For the adventurous eaters, add a pinch of cayenne pepper or chili powder to the marshmallow mixture. The heat pairs surprisingly well with the sweet popcorn. Start with 1/4 teaspoon and adjust to your taste. My brother-in-law loves these and requests them every year.
Mini Monster Bites
Instead of making large popcorn balls, shape the mixture into smaller, bite-sized pieces. These are perfect for snacking or for filling treat bags. Kids love the mini versions because they can eat a whole one in one bite. If you enjoy making bite-sized treats, you might also like these crispy air fryer churro bites with spicy Mexican hot chocolate dip for another fun handheld dessert.
Serving and Storage Suggestions
These monster eyeball popcorn balls are best served at room temperature. Arrange them on a large platter or cake stand for maximum visual impact. They look amazing as a centerpiece for a Halloween dessert table. I like to place them on a bed of orange and black sprinkles for extra flair.
For storage, place the popcorn balls in an airtight container at room temperature. Layer them between sheets of parchment paper to prevent them from sticking together. They will stay fresh for up to 5 days, but honestly, they never last that long in my house.
Do not store these in the refrigerator. The moisture will make the popcorn soft and chewy in a bad way. If you need to make them ahead of time, prepare them the day before your event and store them in a cool, dry place.
For reheating, if the popcorn balls start to lose their crunch, you can pop them in a 300°F oven for 3 to 5 minutes. Let them cool completely before serving. This revives the texture and makes them taste freshly made again.
The flavors actually develop a bit over time. The marshmallow coating settles into the popcorn, creating a more cohesive texture. I actually prefer them the day after they are made because the flavors have had time to meld together.
These pair wonderfully with other Halloween treats. I love serving them alongside creamy no-bake banana pudding eclair icebox cake for a dessert spread that has both spooky and classic options.
Nutritional Information and Benefits
While these monster eyeball popcorn balls are definitely a treat, they do have some redeeming qualities. Popcorn is a whole grain, which means it contains fiber that helps with digestion and keeps you feeling full. Air-popped popcorn is naturally low in calories and fat, making it a better base than many other dessert options.
Here are the estimated nutritional values per popcorn ball (based on 12 servings):
- Calories: 185
- Total Fat: 7 grams
- Saturated Fat: 4 grams
- Carbohydrates: 30 grams
- Fiber: 2 grams
- Sugar: 18 grams
- Protein: 2 grams
These values will vary depending on the specific brands and ingredients you use. The candy eyeballs and candy melts add extra sugar and calories, so keep that in mind if you are watching your intake.
For those with dietary restrictions, this recipe can be easily adapted. Use vegan marshmallows and butter for a dairy-free version. The popcorn itself is naturally gluten-free, making this a safe option for many people with gluten sensitivities. Just make sure to check all your ingredient labels for potential cross-contamination.
I personally love that these popcorn balls are portion-controlled. Each one is a single serving, which makes it easier to enjoy a treat without overindulging. Not that I have ever stopped at just one, but the option is there.
Frequently Asked Questions
Can I use microwave popcorn for this recipe?
Yes, you can use microwave popcorn. Just make sure to choose a lightly salted or unsalted variety. The butter-flavored microwave popcorn can make the marshmallow coating too greasy, which prevents it from sticking properly to the popcorn. Also, remove any unpopped kernels before adding the marshmallow mixture.
Why did my popcorn balls fall apart?
This usually happens for one of three reasons. The marshmallow mixture was not hot enough when you combined it with the popcorn. The popcorn was stale and did not have enough moisture to help the coating stick. Or you did not press the popcorn balls firmly enough. Next time, make sure your marshmallow mixture is warm and pourable, use freshly popped popcorn, and press the balls gently but firmly.
How do I keep the candy eyeballs from falling off?
The key is to use melted candy melts as the adhesive. Press the candy eyeballs into the wet candy melt and hold them in place for a few seconds. Make sure the candy melt has fully set before moving the popcorn balls. If you are having trouble, you can also use a tiny dab of frosting or royal icing to attach the eyes.
Can I freeze these popcorn balls?
I do not recommend freezing these popcorn balls. The texture of the popcorn changes significantly when frozen and thawed. They become soft and lose their crunch. If you need to make them ahead of time, prepare them up to two days in advance and store them in an airtight container at room temperature.
How do I make the popcorn balls less sweet?
You can reduce the amount of marshmallows by about 25 percent if you prefer a less sweet treat. Alternatively, add a pinch of salt to the marshmallow mixture to balance the sweetness. Using salted butter instead of unsalted butter also helps cut through the sugar. I have tried all three methods, and adding a little extra salt is my personal favorite.
Conclusion
These spooky monster eyeball popcorn balls are everything a Halloween treat should be. They are fun to make, hilarious to look at, and absolutely delicious to eat. Every time I bring them to a party, they spark conversations and laughter. People cannot resist picking one up and admiring the silly monster face before taking a bite.
I love that this recipe lets you get creative. You can make the monsters as goofy or as creepy as you want. You can experiment with different colors and decorations. Each batch turns out a little different, and that is part of the charm. There is no wrong way to make a monster face.
If you are looking for other Halloween recipes to round out your party menu, I highly recommend checking out these flavorful loaded quesabirria tacos with rich consommé dip for a savory option that balances out all the sweets.
I would love to see your monster creations. Tag me in your photos and let me know how they turned out. Did your kids help make them? Did you come up with a new monster design? Share your stories in the comments below. That is my favorite part of sharing recipes online. Seeing how other people make them their own.
So grab your popcorn, your marshmallows, and your silliest candy eyeballs. It is time to make some monsters. And remember, the messier your kitchen gets, the more fun you are probably having. Happy Halloween, friends.
Pin This Recipe!
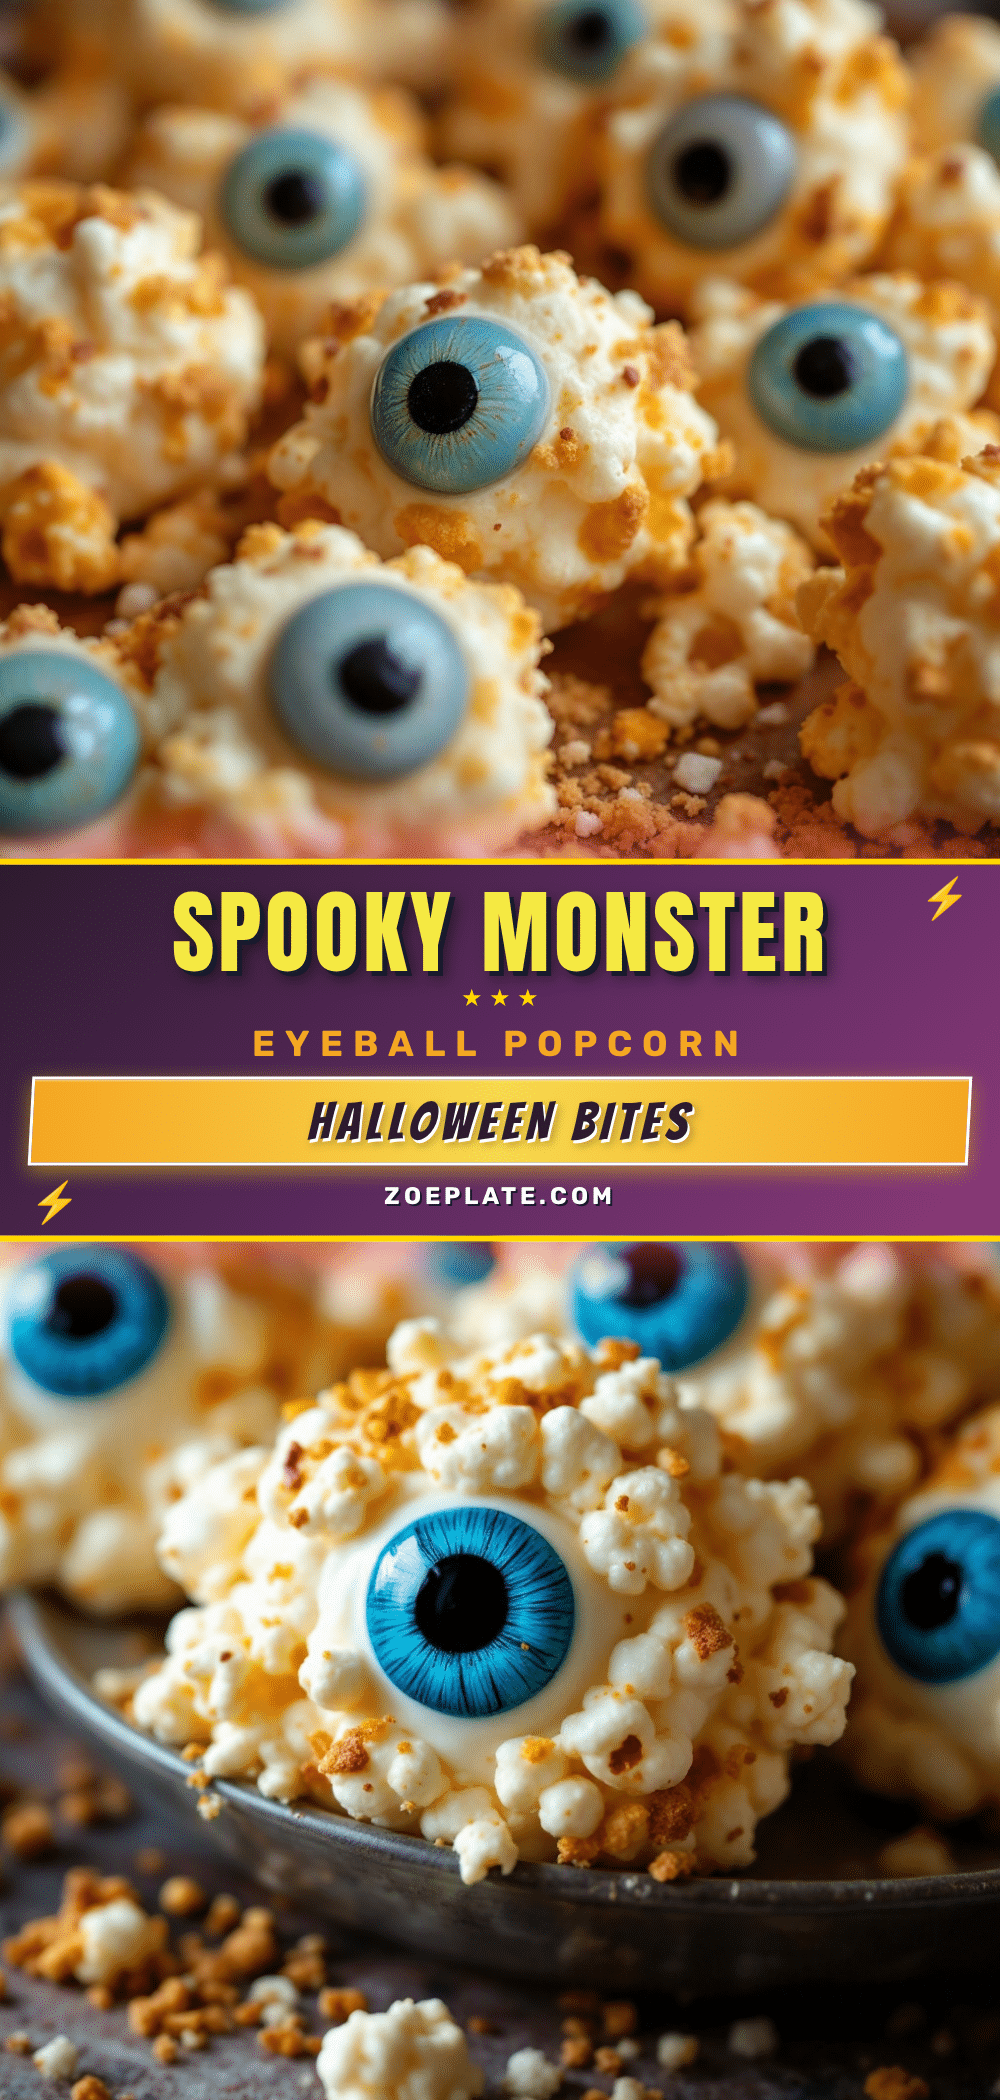
Spooky Monster Eyeball Popcorn Balls: Easy Halloween Treat
These spooky monster eyeball popcorn balls are the perfect Halloween treat—fun to make, hilarious to look at, and absolutely delicious. With vibrant colors and candy eyeballs, they’re a crowd-pleaser at any spooky gathering.
- Prep Time: 15 minutes
- Cook Time: 10 minutes
- Total Time: 25 minutes
- Yield: 12-14 servings 1x
- Category: Dessert
- Cuisine: American
Ingredients
- 12 cups popped popcorn (about 1/2 cup unpopped kernels or one 3-ounce bag of microwave popcorn)
- 1/4 cup unsalted butter (56 grams)
- 10 ounces marshmallows (about 40 regular or 4 cups mini marshmallows)
- 1/2 teaspoon vanilla extract
- 1/4 teaspoon salt
- Gel food coloring in green, purple, and orange
- 1 cup candy eyeballs (flat-backed, about 1/2 inch)
- 1/2 cup candy melts in black or dark chocolate
- 1 tablespoon coconut oil or vegetable shortening
- Optional: orange and black sprinkles, edible glitter, or crushed graham crackers
- 1 tablespoon butter or coconut oil (for greasing hands)
Instructions
- Pop your popcorn using an air popper or microwave. Measure out 12 cups and remove any unpopped kernels. Set aside in a large bowl or stockpot.
- Line a baking sheet with parchment paper or a silicone baking mat. Lightly grease with butter or nonstick spray.
- In a medium saucepan over low heat, melt 1/4 cup unsalted butter. Add 10 ounces marshmallows and stir constantly until completely melted and smooth (5-7 minutes). Remove from heat and stir in vanilla extract and salt.
- Divide the marshmallow mixture into separate bowls for multiple colors. Add gel food coloring to each bowl and stir until evenly distributed. Start with a small amount and add more as needed.
- Working quickly while the mixture is warm, pour the colored marshmallow mixture over the popcorn. Gently fold with a rubber spatula until every piece is coated, being careful not to crush the popcorn.
- Rub butter or coconut oil generously on your hands. Take a handful of coated popcorn and gently press into a ball shape about the size of a tennis ball. Place on the prepared baking sheet. Repeat with remaining mixture, reapplying oil to hands as needed. Makes 12-14 popcorn balls.
- Let the popcorn balls cool and set at room temperature for 10-15 minutes. Do not refrigerate.
- Melt black candy melts with 1 tablespoon coconut oil in a microwave-safe bowl in 30-second intervals, stirring between each, until smooth. Transfer to a squeeze bottle or zip-top bag with a snipped corner.
- Draw monster mouths on each popcorn ball with the melted candy. While the candy is still wet, press two candy eyeballs onto each ball. Add extra eyes or decorations as desired.
- If using sprinkles or edible glitter, sprinkle over the popcorn balls while the candy melt is still wet. Let the candy melt fully set (about 10 minutes) before serving or storing.
Notes
Work in small batches if making multiple colors. Keep hands greased between each ball. Do not overmix or press too tightly. Use fresh popcorn for best results. Store in an airtight container at room temperature for up to 5 days. Do not refrigerate. To revive crunch, reheat in a 300°F oven for 3-5 minutes.
Nutrition
- Serving Size: 1 popcorn ball
- Calories: 185
- Sugar: 18
- Sodium: 95
- Fat: 7
- Saturated Fat: 4
- Carbohydrates: 30
- Fiber: 2
- Protein: 2
Keywords: Halloween treats, popcorn balls, monster eyeballs, easy Halloween recipe, spooky snacks, kid-friendly Halloween