The power went out at 4:30 PM on Halloween. Just like that. The hum of the refrigerator died, the oven light flickered off, and my kitchen plunged into a darkness that felt suspiciously like a movie set. I was in the middle of frosting a batch of pumpkin bars when the lights cut. Panic is a funny thing; it makes you forget how to open a cabinet. I stood there in the dim glow of the hallway, holding a piping bag of orange icing, wondering if I should just eat the whole batch and call it a day.
My kids were already dressed. The doorbell had rung ten minutes ago with the first wave of trick-or-treaters, and I had promised them “the spooky treat.” You know that feeling when you’ve promised something elaborate and now you’re staring at a dead oven? It’s pure dread. I had chocolate dough sitting on the counter, ready to go, but no way to bake it. I couldn’t risk leaving it out too long, and I certainly couldn’t wait for the power to come back.
I looked at the chocolate dough. It was rich, dark, and perfect for something dramatic. Then I looked at the leftover royal icing I’d made for the pumpkin bars. White. Stark. Bright. It hit me then. If I couldn’t bake them right, I could at least prep them to look terrifying once the power returned. Or, I could just make them no-bake? No, the dough was too soft. I had to bake them. I grabbed my battery-powered camping lantern and shoved the tray into the oven, hoping the seal held.
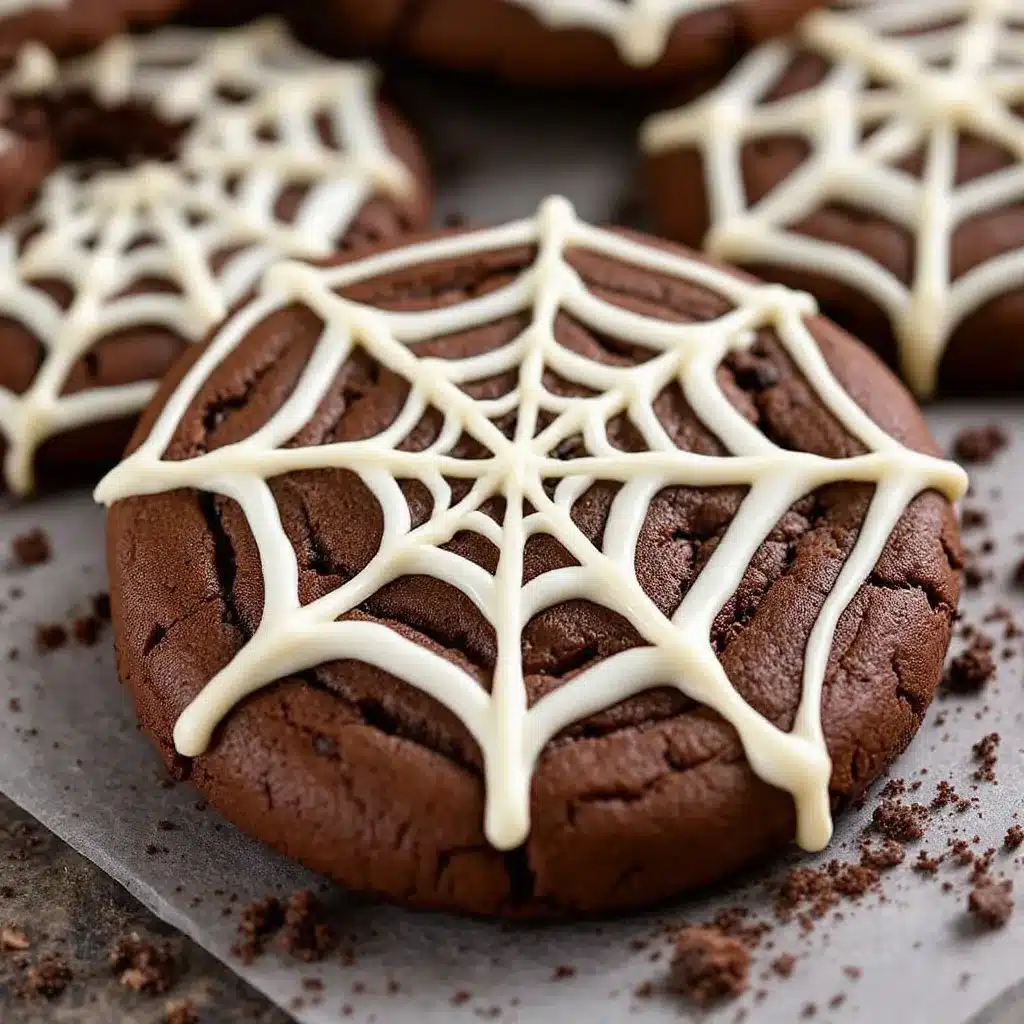
The cookies came out perfect, though they looked like little black discs. Boring. Desperate times call for desperate measures. I grabbed a toothpick and the white icing. I dragged the icing from the center out in jagged lines, mimicking a web. It looked messy at first. Then I added the little black dots. Suddenly, they didn’t look like failed pumpkin bars. They looked like spider webs. The kids went wild. It wasn’t the plan, but it was better than the plan. Honestly, these spider web cookies are my favorite because they were born from chaos.
Why You’ll Love This Recipe
Let’s be real for a second. Baking with kids can feel like a battlefield. You want something that looks professional, tastes incredible, and doesn’t require a degree in pastry arts to pull off. These spider web chocolate cookies check every single box. I’ve tested this recipe through multiple Halloween seasons, and it’s the one that consistently gets saved to your “Favorites” folder for a reason.
Here is why this recipe stands out from the crowd:
- Quick & Easy: You can have these from bowl to plate in under 30 minutes. That is crucial when you have hungry little monsters (or adults) waiting. It’s perfect for busy weeknights or last-minute Halloween parties.
- Simple Ingredients: You likely already have everything in your pantry. Chocolate chips, butter, sugar, flour, and an egg. No fancy grocery trips needed. If you have a tube of chocolate cookie dough, you can skip the mixing entirely, but the from-scratch version is worth the extra ten minutes.
- Perfect for Halloween: This isn’t just a cookie; it’s a prop. Great for classroom parties, haunted house snacks, or cozy dinners where you want to add a little seasonal flair without the stress.
- Crowd-Pleaser: Always gets rave reviews from kids and adults alike. The visual impact is huge, but the taste is just a rich, fudgy chocolate cookie. It’s a win-win.
- Unbelievably Delicious: The texture is soft in the center with slightly crisp edges. The white royal icing adds a subtle sweetness that contrasts perfectly with the dark chocolate. It’s next-level comfort food.
What makes this recipe different from the rest? It’s the technique for the web. Most people just pipe lines randomly. I found that using a toothpick to drag the icing creates that authentic, delicate web structure that looks like it came from a bakery window. It’s a small trick, but it makes all the difference. This isn’t just another Halloween treat—it’s the kind of cookie that makes you feel like a pro baker, even if you’re just winging it.
What Ingredients You Will Need
This recipe relies on high-quality, simple ingredients to deliver bold flavor and satisfying texture without the fuss. The key here is balancing the richness of the chocolate with the crispness of the icing. You don’t need exotic spices or hard-to-find items.
Here is what you will need to make the perfect spider web cookies:
For the Chocolate Cookie Base
- Unsalted butter, softened: Use high-quality butter. I recommend brands like Kerrygold or Plugra for the best flavor. Softened means it should yield to gentle pressure but not be melted grease.
- Granulated sugar: Standard white sugar gives that slight crisp edge. (1 cup)
- Brown sugar, packed: This adds moisture and a hint of caramel flavor. Dark brown sugar is nice for a deeper taste. (1/2 cup)
- Large eggs, room temperature: Room temp eggs emulsify better into the dough. (1 large egg)
- Vanilla extract: Pure vanilla is non-negotiable here. It lifts the chocolate flavor. (1 tsp)
- All-purpose flour: The backbone of the structure. (1 1/2 cups)
- Cocoa powder, unsweetened: Use a good quality Dutch-process cocoa if you can find it. It makes the cookies darker and richer. (1/4 cup)
- Baking powder: Just a little bit to help them spread. (1/2 tsp)
- Salt: Enhances the chocolate flavor. (1/2 tsp)
- Chocolate chips: Semi-sweet or dark chocolate chips add pockets of melty goodness. (1/2 cup)
For the Spider Web Royal Icing
- Confectioners’ sugar (powdered sugar): Must be sifted to avoid lumps. (1 cup)
- Meringue powder: This makes the icing safe to eat and stable. (1 tbsp)
- Water: Add gradually to get the right consistency. (2-3 tbsp)
- Food coloring, black: Gel food coloring works best because it doesn’t thin out the icing. (A small drop)
- Food coloring, white: Standard white icing for the webs. (Keep as is)
Substitution Tip: If you are allergic to eggs, you can use a meringue powder substitute or just stick to a simple glaze made with milk and powdered sugar, though it won’t harden as quickly. For a gluten-free option, swap the all-purpose flour for a 1:1 gluten-free baking flour blend.
Equipment Needed
You don’t need a fancy kitchen to make these, but having the right tools helps.
- Mixing bowls: One large bowl for the dough and one small bowl for the icing.
- Electric mixer or whisk: A hand mixer makes creaming the butter and sugar much easier. If you don’t have one, a strong whisk and elbow grease will work.
- Baking sheets: Standard half-sheet pans. I recommend using parchment paper or silicone baking mats. This prevents sticking and makes cleanup a breeze. Honestly, silicone mats are worth the investment.
- Toothpicks: Essential for dragging the icing to create the web pattern. Wooden toothpicks work best.
- Piping bags or small ziplock bags: For the icing. If you don’t have piping bags, just cut a tiny corner off a ziplock bag.
- Oven: Obviously. But make sure it’s calibrated. An oven that runs hot will burn the edges before the centers set.
Preparation Method
Let’s get into the nitty-gritty. Follow these steps closely for the best results.
Step 1: Make the Dough (10 minutes)
- Cream the butter and sugars: In a large bowl, beat the softened butter, granulated sugar, and brown sugar together until light and fluffy. This takes about 2-3 minutes with a mixer. If you’re doing it by hand, just keep going until it looks pale.
- Add wet ingredients: Crack in the egg and pour in the vanilla extract. Mix until fully combined. The mixture might look a bit curdled at first; don’t worry, it will come together.
- Mix dry ingredients: In a separate bowl, whisk together the flour, cocoa powder, baking powder, and salt. Sifting the cocoa powder here is a good idea to avoid bitter lumps.
- Combine: Gradually add the dry ingredients to the wet mixture. Mix on low speed until just combined. Do not overmix, or your cookies will be tough. Fold in the chocolate chips by hand.
- Chill (Optional but recommended): If the dough feels too sticky, pop it in the fridge for 15 minutes. This makes scooping easier.
Step 2: Bake the Cookies (12-14 minutes)
- Preheat oven: Set your oven to 350°F (175°C).
- Scoop: Use a cookie scoop or tablespoon to drop dough balls onto the parchment-lined baking sheets. Space them about 2 inches apart because they will spread.
- Bake: Bake for 10-12 minutes. You want the edges to be set but the centers to still look slightly soft and underbaked. They will firm up as they cool. Overbaking makes them crumbly.
- Cool: Let them cool on the baking sheet for 5 minutes, then transfer to a wire rack to cool completely. You cannot ice warm cookies; the icing will melt.
Step 3: Make the Royal Icing (5 minutes)
- Mix icing: In a small bowl, whisk the confectioners’ sugar, meringue powder, and water until smooth. It should be thick but pipeable. Add water drop by drop if it’s too thick.
- Divide: Keep one portion white. Add a tiny drop of black gel food coloring to the rest. Mix until you get a deep, dark black. If it’s too thin, add a pinch more sugar.
Step 4: Create the Spider Web (5 minutes per batch)
- Dot the center: Pipe a small dot of white icing in the center of each cooled cookie.
- Drag the lines: Using a toothpick, drag the white icing outward from the center in straight lines. Do this about 6-8 times, like the spokes of a wheel. Don’t drag all the way to the edge; stop about halfway.
- Create the web: Now, drag the toothpick in small, curved arcs from the outer edge of the white icing toward the center, alternating directions. This creates the concentric web circles.
- Add the spider: Pipe a small dot of black icing in the center or on the edge for the spider body. Add two tiny dots for legs if you’re feeling fancy.
- Set: Let the icing dry for about 15-20 minutes before handling.
Cooking Tips & Techniques
I’ve made a few mistakes along the way, so you don’t have to. Here is what I’ve learned.
- Don’t overbake: The biggest mistake people make is baking these until they look hard. They should look soft in the middle. They crisp up as they cool.
- Consistency is key: Your icing needs to be thick. If it’s too runny, the web pattern will blur. If it’s too thick, it won’t spread when you drag the toothpick. Test it on a plate first.
- Work quickly: Royal icing dries fast. If you’re making a large batch, keep the icing covered with a damp paper towel to prevent it from crusting over.
- Use a toothpick, not a knife: A toothpick gives you the precision needed for those delicate web lines. A knife is too blunt.
- Temperature matters: Make sure the cookies are 100% cool before icing. Any residual heat will melt the icing and ruin the design.
Variations & Adaptations
While the classic black and white is iconic, there are plenty of ways to twist this recipe.
- Green Goblin Web: Use green food coloring for the icing and add orange dots for a Halloween villain vibe.
- Pumpkin Spice Cookies: Add 1 teaspoon of pumpkin pie spice to the dough for a seasonal twist.
- Red Velvet Web: Swap the cocoa powder for red velvet cake mix for a bright red cookie with white webs. Super spooky.
- Gluten-Free: As mentioned, use a 1:1 gluten-free flour blend. The texture might be slightly more tender, which is actually nice.
- Vegan: Use vegan butter and a flax egg (1 tbsp ground flax + 3 tbsp water) instead of the regular egg. The icing can be made with aquafaba instead of meringue powder.
Serving & Storage Suggestions
These cookies are best served at room temperature. The icing should be set and slightly crisp.
- Storage: Store in an airtight container at room temperature for up to 5 days. Place parchment paper between layers if stacking them to prevent the icing from sticking.
- Freezing: You can freeze the baked cookies (without icing) for up to 3 months. Thaw before icing. Do not freeze iced cookies; the icing will get soggy.
- Reheating: Not necessary, but if you want them warm, microwave for 10 seconds. The icing will soften slightly.
- Serving: These are perfect for Halloween party favors. Package them in clear cellophane bags with a black ribbon for a cute touch.
Nutritional Information & Benefits
While these are definitely a treat, they are made with simple ingredients.
- Calories: Approximately 150-180 calories per cookie, depending on size.
- Fat:主要来自 butter and chocolate chips.
- Carbohydrates: From sugar and flour.
- Protein: Minimal, from the egg and flour.
From a wellness perspective, these are a fun, occasional treat. The dark chocolate offers some antioxidants, and using meringue powder for the icing avoids raw egg concerns. They are a great way to get kids involved in cooking without too much sugar crash if eaten in moderation.
Conclusion
These spider web chocolate cookies are a Halloween staple for a reason. They are visually stunning, easy to make, and taste amazing. I love that they can be made from scratch or with store-bought dough, making them flexible for any baker’s skill level.
I hope you try this recipe and have as much fun making them as I did. Feel free to experiment with colors and shapes. If you make them, please leave a comment below and let me know how they turned out! Tag me on social media if you post a photo—I love seeing your spooky creations.
Happy baking, and happy Halloween!
FAQs
Can I use store-bought cookie dough for this recipe?
Yes! This is a great shortcut. Use any chocolate or double-chocolate cookie dough. Just scoop, bake, cool, and ice. It saves a lot of time.
Why is my royal icing too runny?
You likely added too much water. Add more confectioners’ sugar, one tablespoon at a time, until it thickens. It should hold its shape when piped.
How do I store these cookies?
Store them in an airtight container at room temperature. Do not refrigerate, as the icing can sweat and lose its shine.
Can I make the icing ahead of time?
You can, but it will crust over. Keep it covered with a damp paper towel or in an airtight container. Whisk it back up before using.
What if I don’t have meringue powder?
You can make a simple glaze with powdered sugar and milk or lemon juice. It won’t harden as much, so handle with care.
Pin This Recipe!

Best Spider Web Chocolate Cookies: Easy Halloween Treats

These spooky spider web chocolate cookies are a perfect Halloween treat that looks professional but is surprisingly easy to make. With a rich, fudgy chocolate base and delicate royal icing webs, they are a crowd-pleaser for parties and trick-or-treating.
- Prep Time: 15 minutes
- Cook Time: 12 minutes
- Total Time: 27 minutes
- Yield: 24 cookies 1x
- Category: Dessert
- Cuisine: American
Ingredients
- 1 cup unsalted butter, softened
- 1 cup granulated sugar
- 1/2 cup brown sugar, packed
- 1 large egg, room temperature
- 1 tsp vanilla extract
- 1 1/2 cups all-purpose flour
- 1/4 cup unsweetened cocoa powder
- 1/2 tsp baking powder
- 1/2 tsp salt
- 1/2 cup semi-sweet or dark chocolate chips
- 1 cup confectioners’ sugar (powdered sugar), sifted
- 1 tbsp meringue powder
- 2–3 tbsp water
- Black gel food coloring
- White food coloring (optional, for contrast)
Instructions
- Preheat oven to 350°F (175°C) and line baking sheets with parchment paper or silicone mats.
- In a large bowl, cream the softened butter, granulated sugar, and brown sugar together until light and fluffy (about 2-3 minutes).
- Add the egg and vanilla extract, mixing until fully combined.
- In a separate bowl, whisk together the flour, cocoa powder, baking powder, and salt.
- Gradually add the dry ingredients to the wet mixture, mixing on low speed until just combined. Fold in the chocolate chips by hand.
- Chill dough for 15 minutes if too sticky (optional).
- Scoop dough balls onto prepared baking sheets, spacing them 2 inches apart.
- Bake for 10-12 minutes until edges are set but centers look slightly soft. Cool on the sheet for 5 minutes, then transfer to a wire rack to cool completely.
- In a small bowl, whisk confectioners’ sugar, meringue powder, and water until smooth and thick but pipeable.
- Divide icing: keep one portion white and add a drop of black gel coloring to the rest.
- Pipe a small dot of white icing in the center of each cooled cookie.
- Using a toothpick, drag the white icing outward from the center in 6-8 straight lines (spokes).
- Drag the toothpick in small, curved arcs from the outer edge toward the center to create concentric web circles.
- Pipe a small dot of black icing in the center for the spider body and add tiny dots for legs.
- Let icing dry for 15-20 minutes before handling.
Notes
Do not overbake the cookies; they should look soft in the middle as they crisp up while cooling. Ensure cookies are 100% cool before icing to prevent melting. Royal icing dries quickly, so keep it covered with a damp paper towel if not using immediately. For gluten-free options, use a 1:1 gluten-free flour blend. For vegan options, use vegan butter and a flax egg.
Nutrition
- Serving Size: 1 cookie
- Calories: 165
- Sugar: 15
- Sodium: 95
- Fat: 9
- Saturated Fat: 5
- Carbohydrates: 22
- Fiber: 1
- Protein: 2
Keywords: Halloween cookies, spider web cookies, chocolate cookies, royal icing, easy baking, holiday treats, kids baking


