The first time I made these bars, I was skeptical. You know how it goes. You spend twenty dollars on almond flour and xanthan gum, only to end up with a dessert that tastes like sawdust and regret. I had tried so many pumpkin recipes before that ended in a sad, dense lump in the center of my pan. I was ready to just order takeout and call it a day.
But then I added a little extra cream cheese and whisked it until my arm actually hurt. I stopped worrying about the “rules” of gluten-free baking for a second and just trusted my senses. The batter looked thick, yes, but it smelled like autumn in a jar. Cinnamon, nutmeg, and that deep, earthy pumpkin flavor filled the kitchen.
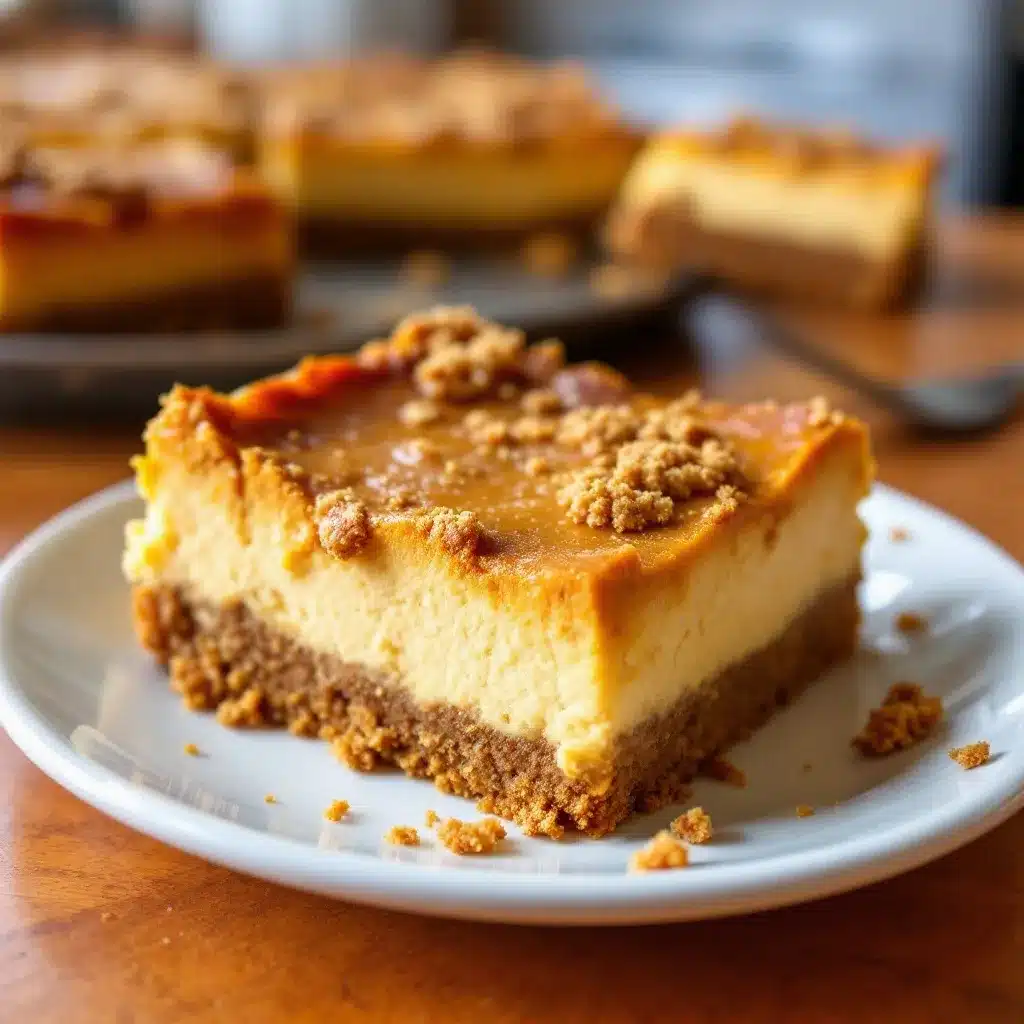
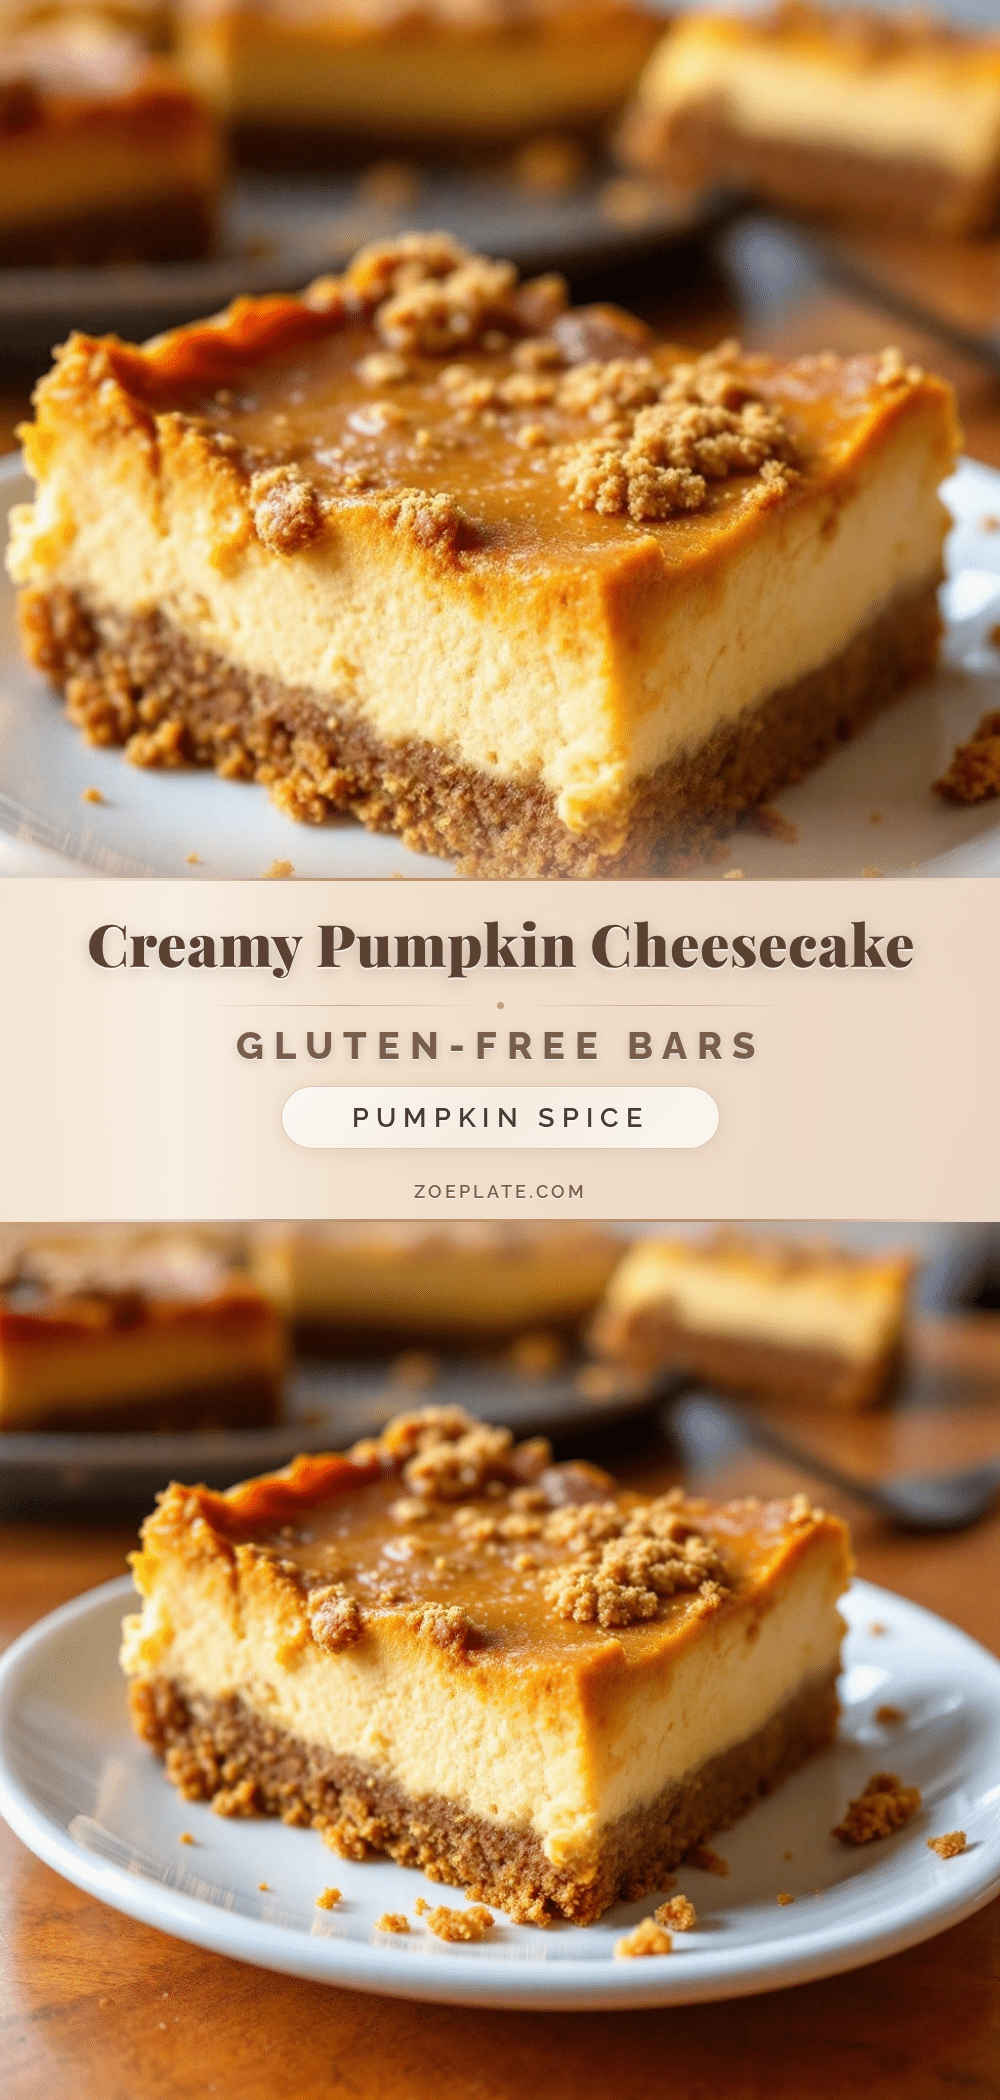
When I pulled the pan out of the oven, it didn’t crack. It didn’t sink. It just sat there, wobbly and perfect, smelling like a bakery window. I took one bite while it was still warm, and honestly, I almost cried. It was creamy, rich, and completely indistinguishable from a traditional dairy-heavy cheesecake. My husband, who is usually picky about texture, asked for seconds before the plate was even cleared.
That was the moment I realized that being gluten-free doesn’t mean giving up on comfort food. It just means you have to pay a little more attention to the details. These bars have become my go-to for any gathering where I know someone has sensitivities, but I also want everyone to enjoy the same delicious slice. It’s not just a workaround; it’s actually the best version I’ve ever made.
Why You’ll Love This Recipe
There is a specific kind of magic that happens when you combine the smoothness of cream cheese with the warmth of pumpkin spice, but you do it without the gluten. I’ve tested this recipe dozens of times, tweaking the ratios and swapping flours, to get to this exact point. It’s not just a substitute; it’s a standout dessert that stands on its own merits.
- Quick & Easy: This comes together in under thirty minutes of active prep time. You don’t need to spend hours in the kitchen. It’s perfect for busy weeknights or when you need a last-minute dessert for a potluck.
- Simple Ingredients: No fancy grocery trips needed. You likely already have most of this in your pantry. The crust uses simple nuts and oats, and the filling relies on standard dairy and spices.
- Perfect for Fall: Whether it’s Thanksgiving, a cozy dinner party, or just a rainy Tuesday, these bars fit the season perfectly. They bring that warm, spiced vibe without being too heavy.
- Crowd-Pleaser: Kids love the sweetness, and adults appreciate the rich texture. I’ve served these to people who don’t eat gluten-free, and they have no idea the difference. They just know it’s good.
- Unbelievably Delicious: The texture is next-level. It’s not grainy or dry. It’s smooth, dense, and satisfying in the best way possible. It’s comfort food reimagined for a modern kitchen.
What makes this recipe different is the balance. A lot of gluten-free baked goods try too hard to mimic the chew of wheat. This recipe embraces its nature. It’s creamy and firm, holding its shape beautifully. I use a blend of almond flour and certified gluten-free oats in the crust to give it a nutty crunch that contrasts with the soft filling. It’s my best version, and I think you’ll agree once you take that first bite.
What Ingredients You Will Need
This recipe uses simple, wholesome ingredients to deliver bold flavor and satisfying texture without the fuss. You don’t need a specialty store to make this; you just need to pick the right items. The key is quality. Since there are so few ingredients, each one shines.
For the Crust
- Almond flour: I recommend Bob’s Red Mill for best texture. It’s fine and consistent, which helps bind the crust without needing too much butter.
- Certified gluten-free rolled oats: Make sure these are certified GF, as regular oats are often cross-contaminated. They add a hearty chew to the base.
- Granulated sugar: White sugar works best here to keep the crust sweet but not overpowering.
- Unsalted butter: Melted butter binds everything together. Use high-quality butter for the best flavor.
- Cinnamon: Just a teaspoon to add warmth.
- Salt: A pinch to balance the sweetness.
For the Cheesecake Filling
- Cream cheese: Full-fat is non-negotiable. Low-fat versions can make the filling watery. Let it come to room temperature before starting.
- Granulated sugar: For sweetness and structure.
- Heavy cream: This adds the extra richness and helps keep the texture silky. Don’t skip it.
- Large eggs: Room temperature eggs blend more smoothly into the batter.
- Pure pumpkin puree: Not pumpkin pie filling. Make sure it’s 100% pure pumpkin. Canned brands like Libby’s are reliable.
- Pumpkin pie spice: A mix of cinnamon, ginger, nutmeg, and cloves. It’s easier than measuring five different spices.
- Vanilla extract: Real vanilla makes a huge difference in flavor depth.
- Gluten-free flour blend: A small amount of all-purpose gluten-free flour helps stabilize the filling so it doesn’t collapse.
If you need a dairy-free option, you can swap the cream cheese for a high-quality vegan alternative, though the texture will be slightly different. For the crust, you can substitute the oats with gluten-free graham crackers if you prefer a sweeter base.
Equipment Needed
You don’t need much fancy gear for this, which is part of the appeal. A standard 9×13 inch baking pan is all you really need. Line it with parchment paper, leaving an overhang on the sides. This is crucial for lifting the bars out later. If you don’t have parchment, grease it well with butter or non-stick spray, but parchment is easier.
A hand mixer or stand mixer is helpful for the filling. You want to beat the cream cheese until it’s completely smooth before adding anything else. If you mix by hand, it will take some elbow grease. Also, get a fine-mesh sieve or a spatula to smooth the top of the filling. It helps remove any air bubbles so you get a flat, professional-looking finish.
For the crust, a food processor makes quick work of pulsing the oats and almonds together, but a bowl and fork work fine too. Just make sure the oats are broken down a bit so they aren’t too chunky. A cooling rack is essential. You need to let the bars cool completely in the pan before cutting them, or they will fall apart.
Preparation Method
Start by preheating your oven to 350°F (175°C). Grease your 9×13 inch baking pan and line it with parchment paper. This step saves you from digging out stuck bits later.
- Make the crust mixture: In a medium bowl, combine the almond flour, gluten-free oats, sugar, cinnamon, and salt. Pour in the melted butter and stir until the mixture looks like wet sand. It should clump together when you squeeze it.
- Press the crust: Pour the mixture into the prepared pan. Use your fingers or the bottom of a measuring cup to press it down firmly and evenly. You want a tight layer. Bake for 10 minutes. Remove and let it cool while you make the filling.
- Beat the cream cheese: In a large bowl, beat the softened cream cheese on medium speed until it is smooth and creamy. This should take about 2-3 minutes. Scrape down the sides of the bowl. If there are lumps, the final texture will be grainy.
- Add sugar and cream: Add the granulated sugar and heavy cream to the cream cheese. Beat until combined and smooth. Don’t overmix once the eggs are added, as that can incorporate too much air.
- Incorporate eggs: Add the eggs one at a time, mixing on low speed just until blended. Add the vanilla extract.
- Mix in pumpkin and spices: Add the pumpkin puree, pumpkin pie spice, and the gluten-free flour blend. Mix on low speed until everything is uniform. The batter will be thick and orange.
- Combine and bake: Pour the filling over the pre-baked crust. Smooth the top with a spatula. Bake for 35-40 minutes. The edges should be set, but the center should still have a slight jiggle. It will firm up as it cools.
- Cool completely: Let the bars cool in the pan on a wire rack for at least 2 hours. Then, refrigerate for at least 4 hours, preferably overnight. This step is critical for clean slicing.
How do I know when they are done?
The center should still wobble slightly like Jell-O, not look liquid. If it looks runny, it needs more time. If it’s completely firm, it might be overbaked.
Why do my bars crack?
Cracks usually happen from overmixing or baking at too high a temperature. Make sure you mix the eggs gently and don’t open the oven door too often while baking.
Cooking Tips & Techniques
One of the biggest mistakes people make with cheesecake is not letting the ingredients reach room temperature. Cold cream cheese and eggs create lumps that are hard to beat out. Take your cream cheese out of the fridge at least two hours before you start. If you’re short on time, you can microwave it in short bursts, but be careful not to melt it.
Another tip is to avoid overmixing the batter once you add the eggs. Overmixing incorporates air bubbles, which expand in the oven and then collapse, leading to cracks. Mix just until combined. I usually switch to a spatula for the final folds to be safe.
Also, don’t rush the cooling process. Cheesecake continues to cook as it sits in the residual heat of the pan. If you cut it warm, it will be mushy. Patience is key. I know it’s hard, but waiting overnight in the fridge makes a huge difference in the final texture. It allows the flavors to meld and the structure to set properly.
If you want a perfectly clean cut, dip your knife in hot water and wipe it dry between each slice. This prevents the bars from sticking to the blade and keeps the edges neat. It’s a small trick that makes a big difference in presentation.
Variations & Adaptations
While the classic pumpkin spice flavor is a fall favorite, there are plenty of ways to tweak this recipe. If you want to add some crunch, sprinkle chopped pecans or walnuts on top of the crust before baking. The nuts toast slightly and add a nice contrast.
For a chocolate twist, you can add a layer of chocolate chips or a drizzle of melted chocolate on top of the chilled bars. It pairs surprisingly well with the pumpkin. If you prefer a tangier flavor, add a tablespoon of lemon juice to the filling. It brightens the richness of the cream cheese.
You can also change up the crust. Instead of almond flour, you can use crushed gluten-free ginger snap cookies for a spicier base. Or, use gluten-free graham crackers for a more traditional cheesecake crust. Both options work well and are easy to find.
If you are nut-free, you can swap the almond flour for more oats or use sunflower seed flour. The texture will be slightly different, but it still works. Just make sure to check the binding properties, as sunflower seeds can sometimes make the crust a bit oily.
Serving & Storage Suggestions
These bars are best served chilled. They hold their shape well at room temperature, but the cold enhances the creamy texture. I like to serve them with a dollop of whipped cream or a sprinkle of extra pumpkin spice on top. It’s a nice visual touch that also adds a bit of extra flavor.
For storage, keep the bars in an airtight container in the refrigerator. They will stay fresh for up to five days. If you want to keep them longer, you can freeze them. Wrap individual bars in plastic wrap and then place them in a freezer-safe bag. They can be frozen for up to three months. Thaw them in the refrigerator overnight before eating.
When reheating, I don’t recommend it. Cheesecake is best cold or at room temperature. If you must warm it, do so gently in the microwave for a few seconds, but be aware that the texture will change slightly.
The flavors actually develop over time. The pumpkin and spices meld together after a day or two in the fridge, making the second day even better than the first. It’s one of those desserts that gets better with patience.
Nutritional Information & Benefits
These bars are a rich dessert, so moderation is key. Each bar contains a good amount of healthy fats from the almond flour and cream cheese. The pumpkin puree adds a boost of vitamin A and fiber, which is a nice nutritional perk compared to other sweet treats.
Since this recipe is gluten-free, it’s suitable for those with celiac disease or gluten sensitivity. However, always check your oats and flour blends to ensure they are certified gluten-free to avoid cross-contamination.
From a wellness perspective, I like that this recipe uses real food ingredients. There’s no artificial coloring or flavoring. The sweetness comes from sugar, but you can reduce it by a quarter cup if you prefer a less sweet dessert without compromising the texture too much.
Conclusion
Making these Creamy Gluten-Free Pumpkin Cheesecake Bars is a rewarding experience. It proves that you don’t need gluten to make something truly indulgent. The combination of the nutty crust and the smooth, spiced filling is a match made in heaven. I hope you give this recipe a try and enjoy every bite.
Feel free to customize it with your favorite toppings or crust variations. If you make this, I’d love to hear how it turned out. Leave a comment below with your thoughts or share a photo on social media. Tag me so I can see your creations!
Thanks for stopping by. Happy baking!
Frequently Asked Questions
Can I use pumpkin pie filling instead of pure pumpkin puree?
No, avoid using pumpkin pie filling. It contains added sugars and spices that will throw off the balance of sweetness in your cheesecake. Stick to 100% pure pumpkin puree for the best results.
Why did my cheesecake bars sink in the middle?
Sinking can happen if the bars are overbaked or if the oven temperature was too high. The structure collapses as it cools. Make sure to check them a few minutes before the timer goes off and remove them when the center still jiggles slightly.
Can I make this recipe in a springform pan?
Yes, you can use a 9-inch springform pan. Adjust the baking time slightly, as the depth will be greater. It might take 5-10 minutes longer to bake. The cooling process remains the same.
Are these bars very sweet?
They are moderately sweet, typical for a cheesecake. If you prefer less sweetness, you can reduce the sugar in the filling by 25% without affecting the texture significantly. The pumpkin flavor will still come through nicely.
Can I freeze the unbaked bars?
It’s not recommended to freeze the unbaked bars because the texture of the crust might suffer. It’s better to bake them first, then freeze the finished product. They thaw beautifully when stored properly.
easy no-bake apple cheesecake bars are a great alternative if you want something quicker. For more pumpkin inspiration, check out the easy pumpkin dump cake or the moist brown sugar pumpkin banana bread. If you’re looking for a savory side, the cozy crockpot butternut squash soup is a perfect match.
Pin This Recipe!
Creamy Gluten-Free Pumpkin Cheesecake Bars
Rich, creamy, and completely gluten-free, these pumpkin cheesecake bars feature a nutty almond-oat crust and a smooth, spiced filling that rivals traditional dairy-heavy versions.
- Prep Time: 30 minutes
- Cook Time: 50 minutes
- Total Time: 80 minutes
- Yield: 12 servings 1x
- Category: Dessert
- Cuisine: American
Ingredients
- For the Crust:
- 1 1/2 cups almond flour
- 1/2 cup certified gluten-free rolled oats
- 1/4 cup granulated sugar
- 1/4 cup unsalted butter, melted
- 1 tsp cinnamon
- 1/4 tsp salt
- For the Cheesecake Filling:
- 16 oz cream cheese, full-fat, room temperature
- 3/4 cup granulated sugar
- 1/4 cup heavy cream
- 3 large eggs, room temperature
- 1 tsp vanilla extract
- 1 cup pure pumpkin puree
- 1 1/2 tsp pumpkin pie spice
- 2 tbsp gluten-free flour blend
Instructions
- Preheat oven to 350°F (175°C). Grease a 9×13 inch baking pan and line with parchment paper, leaving an overhang on the sides.
- In a medium bowl, combine almond flour, gluten-free oats, sugar, cinnamon, and salt. Stir in melted butter until the mixture resembles wet sand.
- Press the crust mixture firmly and evenly into the prepared pan. Bake for 10 minutes, then remove and let cool while making the filling.
- In a large bowl, beat the softened cream cheese on medium speed until smooth and creamy (about 2-3 minutes). Scrape down the sides.
- Add granulated sugar and heavy cream to the cream cheese. Beat until combined and smooth.
- Add eggs one at a time, mixing on low speed just until blended. Add vanilla extract.
- Add pumpkin puree, pumpkin pie spice, and gluten-free flour blend. Mix on low speed until uniform. The batter will be thick.
- Pour the filling over the pre-baked crust and smooth the top with a spatula.
- Bake for 35-40 minutes. The edges should be set, but the center should still have a slight jiggle.
- Let the bars cool in the pan on a wire rack for at least 2 hours, then refrigerate for at least 4 hours (preferably overnight) before slicing.
Notes
Ensure cream cheese and eggs are at room temperature to prevent lumps. Do not overmix the batter after adding eggs to avoid cracks. For clean slices, dip your knife in hot water and wipe dry between cuts. Bars are best served chilled and can be stored in the refrigerator for up to 5 days or frozen for up to 3 months.
Nutrition
- Serving Size: 1 bar
- Calories: 320
- Sugar: 18
- Sodium: 180
- Fat: 24
- Saturated Fat: 10
- Carbohydrates: 22
- Fiber: 2
- Protein: 6
Keywords: gluten-free, pumpkin cheesecake, fall dessert, almond flour crust, dairy dessert, easy baking