“You’ve got to bring your A-game if you want to win the office cookoff,” my coworker joked as I nervously carried my pot of chili through the breakroom door. Honestly, I wasn’t expecting much the first time I entered that contest. It started as a last-minute throw-together because I forgot to bring my usual lunch and figured, why not share my chili? The smell alone—the rich, smoky aroma mingling with a hint of warm spices—had everyone crowding around the table before I even took a bite. I remember one colleague raising an eyebrow, skeptical about how flavorful a quick chili could be, but by the end of the lunch hour, people were practically asking for the recipe.
That was three years ago, and somehow this flavorful chili that won the office cookoff three years running became my signature dish. I never aimed to impress a crowd or snag a title—it just happened. The secret’s not just in the spices or the slow simmer, but a few little tweaks I figured out through trial and error. I’ve tweaked the balance between savory and spicy so it feels cozy yet exciting, the kind of comfort food that sticks with you after a long day.
Every year, I find myself quietly proud as people pass by the pot, asking if it’s my chili again. It’s funny how a simple recipe can become a kind of quiet ritual, the dish everyone anticipates. Looking back, I realize this chili is less about competition and more about those small moments of connection—the shared warmth in a chilly office kitchen, the laughter over second helpings, and the little nods of approval from friends who swear it’s the best they’ve tasted. That’s why I keep making it, year after year. It’s not just chili, it’s a small tradition that’s grown right alongside me.
Why You’ll Love This Recipe
After countless batches, multiple tweaks, and feedback from my office crew, this chili recipe shines in ways that make it stand out from the usual crowd. Here’s why it’s been a winning favorite:
- Quick & Easy: It simmers to perfection in about an hour, making it perfect for busy weeknights or those times you want a hearty meal without fuss.
- Simple Ingredients: Nothing fancy or hard to find—just pantry staples and fresh veggies that you probably already have on hand.
- Perfect for Gatherings: Whether it’s a casual potluck or a cozy office lunch, this chili feels like a warm hug in a bowl that everyone appreciates.
- Crowd-Pleaser: Kids, adults, spice lovers, and mild-mannered eaters alike find something to love here.
- Unbelievably Delicious: The blend of smoky chipotle and just the right amount of heat gives it a soul-soothing depth of flavor.
What sets this chili apart is the way it balances bold spices with a smooth, rich base. I use a combination of dried chipotle peppers and smoked paprika that adds a smoky punch without overwhelming the palate. Plus, the secret splash of cocoa powder (yes, cocoa!) rounds out the flavors with a subtle earthiness you wouldn’t expect. It’s not just another chili recipe—it’s the one that makes you pause and savor each spoonful, the kind that sticks with you long after the bowl is empty.
What Ingredients You Will Need
This recipe relies on straightforward, wholesome ingredients that come together to create a bold, satisfying chili. These are mostly pantry staples, with a few fresh touches to keep it vibrant and hearty.
- Ground beef (1 lb / 450 g): Choose lean ground beef for a good balance of flavor and fat.
- Yellow onion (1 medium, diced): Adds sweetness and depth.
- Garlic cloves (3, minced): Essential for that savory base.
- Green bell pepper (1, diced): For a fresh crunch and color.
- Dried chipotle peppers (2, finely chopped): The star for smoky heat; if you can’t find these, smoked paprika (2 tsp) is a good substitute.
- Smoked paprika (1 tbsp): Adds warmth and a subtle smoky note.
- Ground cumin (1 tbsp): Boosts earthiness.
- Chili powder (2 tbsp): The classic chili backbone.
- Oregano (1 tsp): A pinch of herbal brightness.
- Cocoa powder (1 tbsp unsweetened): A surprising ingredient that adds richness and depth.
- Fire-roasted diced tomatoes (1 can, 14 oz / 400 g): For tang and texture.
- Kidney beans (1 can, 15 oz / 425 g), drained and rinsed: Adds heartiness and fiber.
- Beef broth (1 cup / 240 ml): Helps everything meld together.
- Salt and freshly ground black pepper: To taste.
- Olive oil (2 tbsp): For sautéing.
- Optional toppings: Shredded cheese, sour cream, chopped green onions, or fresh cilantro.
For best results, I recommend using high-quality fire-roasted tomatoes—brands like Muir Glen really bring out that smoky, slightly charred flavor. If you want to keep this gluten-free, double-check the chili powder and broth labels for any hidden gluten. And if you’re after a leaner option, swapping ground turkey for beef works well, just keep the same seasoning ratios.
Equipment Needed
- Large heavy-bottomed pot or Dutch oven (around 5-6 quarts): Essential for even heat distribution and slow simmering.
- Wooden spoon or heatproof spatula: For stirring without scratching your pot.
- Chef’s knife and cutting board: To prep the veggies and peppers safely.
- Measuring spoons and cups: Precise seasoning makes a difference here.
- Can opener: For the tomatoes and beans (unless you buy pre-opened).
If you don’t have a Dutch oven, a heavy saucepan works fine; just watch the heat to avoid burning. I’ve used budget-friendly stainless steel pots with success, but cast iron definitely adds a nice touch, holding heat longer which helps the flavors meld. Also, a sharp knife is worth the investment—nothing ruins a good prep session like a dull blade.
Preparation Method

- Prep the ingredients: Dice the onion, bell pepper, and mince the garlic. Finely chop the dried chipotle peppers, removing seeds if you prefer less heat. Rinse and drain the kidney beans. This should take about 10 minutes.
- Sauté the aromatics: Heat 2 tablespoons of olive oil in your Dutch oven over medium heat. Add the diced onion and green bell pepper, cooking until softened—about 5 minutes. Stir occasionally to avoid browning too much.
- Add garlic and chipotle: Stir in the minced garlic and chopped chipotle peppers, cooking for another minute until fragrant. Be careful not to burn the garlic, or it’ll get bitter.
- Brown the beef: Increase heat to medium-high and add the ground beef. Break it up with your spoon, cooking until no pink remains—around 6 to 8 minutes. Drain excess fat if it looks greasy, but leave a little for flavor.
- Season the chili: Sprinkle in smoked paprika, cumin, chili powder, oregano, and cocoa powder. Stir well to coat the beef and veggies evenly. Let the spices toast for 1-2 minutes, releasing their aroma.
- Add liquids and beans: Pour in the fire-roasted tomatoes and beef broth. Stir in the drained kidney beans. Bring everything to a simmer.
- Simmer low and slow: Reduce heat to low, cover partially, and let the chili simmer gently for 40-45 minutes. Stir occasionally to prevent sticking and encourage melding flavors.
- Taste and adjust: After simmering, taste for seasoning. Add salt, pepper, or a pinch of sugar if the tomatoes feel too acidic. If you want more heat, a dash of hot sauce or cayenne pepper works wonders.
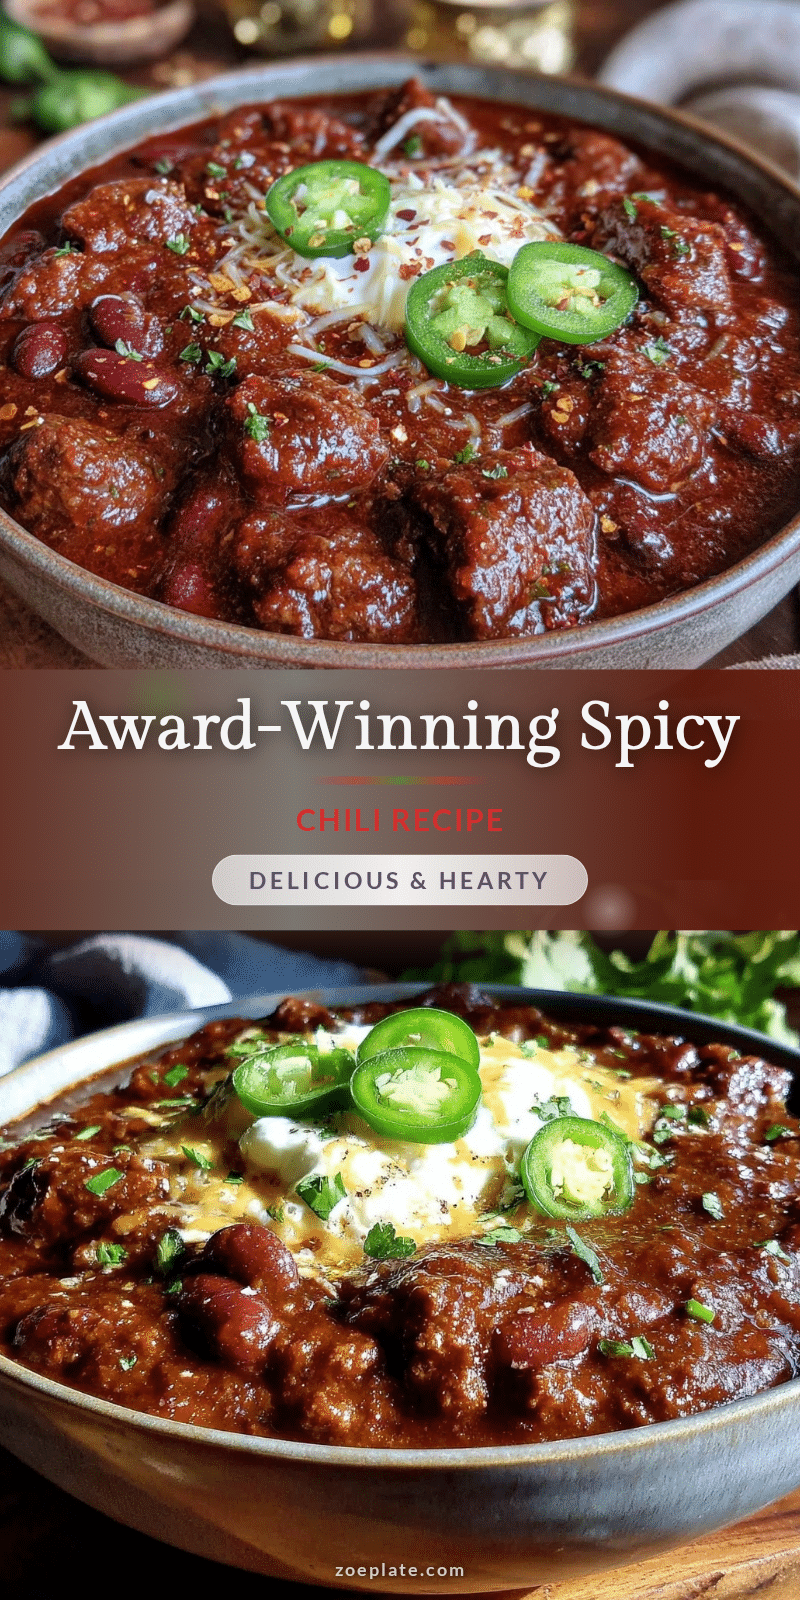
- Serve: Ladle the chili into bowls and top with your choice of shredded cheese, sour cream, green onions, or fresh cilantro.
Pro tip: If time allows, make this chili a day ahead. Flavors deepen beautifully overnight, making it even better reheated. When reheating, add a splash of broth or water if it’s thickened too much.
Cooking Tips & Techniques
Over the years, I learned some handy tricks to keep this chili consistently delicious. First, don’t rush the browning of the beef. Getting a nice sear adds layers of flavor you can’t fake with seasoning alone. Also, to avoid a watery chili, drain some of the fat but keep enough to carry the spices—the oil helps bloom the flavors.
Using dried chipotle peppers instead of just chili powder is a game-changer for smoky depth. If you’re nervous about heat, start with one pepper and adjust next time—better to build heat gradually. I once made a batch that was too spicy to enjoy, so trust me on that one!
When simmering, keep the lid slightly ajar. It lets moisture evaporate slowly, thickening the chili without burning the bottom. Stirring every 10 minutes helps prevent sticking, especially if you’re using a thinner pot.
Multitasking tip: While the chili simmers, you can prep a simple side or even whip up a batch of crispy nutritional yeast popcorn to snack on. It’s a fun combo for game day or casual hangouts.
Variations & Adaptations
One of the best things about this chili is how adaptable it is. Here are a few ways to switch it up:
- Vegetarian version: Replace ground beef with a mix of lentils and chopped mushrooms for a meaty texture. Use vegetable broth instead of beef broth. I often try this alongside my favorite harissa chickpea stew for a plant-powered meal.
- Spice-level adjustments: For a milder chili, omit the chipotle peppers and add sweet paprika instead. For extra heat, toss in a diced jalapeño or a dash of cayenne.
- Slow cooker adaptation: Brown the beef and sauté veggies as usual, then transfer everything to a slow cooker. Cook on low for 6-8 hours or high for 3-4 hours for a hands-off option.
- Seasonal tweaks: In cooler months, add a handful of diced sweet potatoes or butternut squash for a hint of sweetness and extra heartiness.
One time, I added a splash of coffee to the chili—crazy, right? But it subtly boosted the richness without overpowering the spices. Definitely an experiment I recommend if you’re feeling adventurous.
Serving & Storage Suggestions
This chili is best served warm, fresh from the pot, but it also holds up beautifully as leftovers. For a classic presentation, ladle it into bowls and garnish with shredded cheddar, a dollop of sour cream, and a sprinkle of fresh cilantro or green onions. Cornbread or crusty bread on the side makes the meal complete.
If you’re packing it for lunch or taking it to a potluck, consider bringing toppings separately to keep everything fresh. A squeeze of lime juice right before serving adds a nice brightness that cuts through the richness.
Store leftovers in airtight containers in the refrigerator for up to 4 days. For longer storage, chili freezes well—just portion it out, cool completely, and freeze for up to 3 months. When reheating, warm gently on the stove or microwave, stirring occasionally and adding a splash of broth if it thickens too much.
Flavors tend to deepen after a day or two in the fridge, so don’t hesitate to make it ahead of time. I often make a big batch on Sunday to enjoy throughout the week, which saves a lot of time and hassle.
Nutritional Information & Benefits
Per serving (about 1 ½ cups / 350 g), this chili offers roughly:
| Calories | 320 |
|---|---|
| Protein | 28 g |
| Carbohydrates | 20 g |
| Fiber | 7 g |
| Fat | 12 g |
This chili packs a solid protein punch thanks to the beef and beans, supporting muscle repair and satiety. The beans add fiber, which is great for digestion and blood sugar control. The spices like cumin and chili powder have antioxidant properties and may support metabolism. Just be mindful of sodium if you’re watching salt intake—opt for low-sodium broth and beans if preferred.
While this recipe contains common allergens like beef and beans, it can be adapted for different diets—swap ground turkey for lower fat, or make it vegetarian as mentioned earlier. It’s a hearty, balanced meal that fits well into many eating styles.
Conclusion
What started as a simple pot of chili to fill an unexpected lunch gap has become a tried-and-true favorite that wins hearts and the office cookoff alike. It’s a recipe I tweak here and there but never stray far from, because the balance of smoky, spicy, and rich flavors just works. Plus, it’s easy enough to make on a weekday but impressive enough to share with friends or family.
Feel free to make this chili your own—add more heat, swap ingredients, or try it with a side of creamy vegan mac and cheese for a comforting combo that’s hard to beat. I’d love to hear how you make it your own, so don’t hesitate to drop a comment or share your twists.
Here’s to many more chili-filled gatherings and cozy bowls of comfort that bring people together—one spoonful at a time.
FAQs
Can I make this chili ahead of time?
Absolutely! This chili tastes even better the next day as the flavors meld. Store it in the fridge for up to 4 days or freeze portions for up to 3 months.
What if I don’t have dried chipotle peppers?
No worries! Smoked paprika is a great substitute that still adds a smoky flavor, though it’s milder. You can also use chipotle powder if you have it.
Can I use ground turkey or chicken instead of beef?
Yes, ground turkey or chicken works well—just keep an eye on cooking times since leaner meats cook faster and can dry out.
Is this chili gluten-free?
It can be! Just make sure your chili powder and broth are gluten-free, as some brands add fillers. Beans and veggies are naturally gluten-free.
How spicy is this chili?
It has a pleasant smoky heat, but if you’re sensitive, reduce or omit the chipotle peppers. You can always add hot sauce or cayenne later to control the spice level.
Pin This Recipe!
Flavorful Chili Recipe Easy Best Office Cookoff Winner Three Years

A rich, smoky chili with a perfect balance of savory and spicy flavors that has won the office cookoff three years running. Quick and easy to make with simple pantry staples and fresh veggies.
- Prep Time: 15 minutes
- Cook Time: 50 minutes
- Total Time: 1 hour 5 minutes
- Yield: 6 servings 1x
- Category: Main Course
- Cuisine: American
Ingredients
- 1 lb lean ground beef
- 1 medium yellow onion, diced
- 3 garlic cloves, minced
- 1 green bell pepper, diced
- 2 dried chipotle peppers, finely chopped (or 2 tsp smoked paprika as substitute)
- 1 tbsp smoked paprika
- 1 tbsp ground cumin
- 2 tbsp chili powder
- 1 tsp oregano
- 1 tbsp unsweetened cocoa powder
- 1 can (14 oz) fire-roasted diced tomatoes
- 1 can (15 oz) kidney beans, drained and rinsed
- 1 cup beef broth
- Salt and freshly ground black pepper, to taste
- 2 tbsp olive oil
- Optional toppings: shredded cheese, sour cream, chopped green onions, fresh cilantro
Instructions
- Dice the onion, bell pepper, and mince the garlic. Finely chop the dried chipotle peppers, removing seeds if preferred. Rinse and drain the kidney beans. (About 10 minutes)
- Heat 2 tablespoons olive oil in a large heavy-bottomed pot or Dutch oven over medium heat. Add diced onion and green bell pepper; cook until softened, about 5 minutes, stirring occasionally.
- Add minced garlic and chopped chipotle peppers; cook for 1 minute until fragrant, being careful not to burn the garlic.
- Increase heat to medium-high and add ground beef. Break it up with a spoon and cook until no pink remains, about 6 to 8 minutes. Drain excess fat if greasy, leaving a little for flavor.
- Sprinkle in smoked paprika, cumin, chili powder, oregano, and cocoa powder. Stir well to coat beef and veggies evenly. Let spices toast for 1-2 minutes.
- Pour in fire-roasted diced tomatoes and beef broth. Stir in drained kidney beans. Bring to a simmer.
- Reduce heat to low, cover partially, and simmer gently for 40-45 minutes, stirring occasionally to prevent sticking and encourage flavor melding.
- Taste and adjust seasoning with salt, pepper, or a pinch of sugar if tomatoes are too acidic. Add hot sauce or cayenne pepper for extra heat if desired.
- Ladle chili into bowls and top with shredded cheese, sour cream, green onions, or fresh cilantro as desired.
Notes
Use high-quality fire-roasted tomatoes for best smoky flavor. For leaner meat, substitute ground turkey and keep seasoning ratios the same. Make chili a day ahead to deepen flavors. When reheating, add a splash of broth or water if too thick. Keep lid slightly ajar while simmering to thicken chili without burning. Adjust chipotle peppers for heat preference.
Nutrition
- Serving Size: About 1 ½ cups (350
- Calories: 320
- Fat: 12
- Carbohydrates: 20
- Fiber: 7
- Protein: 28
Keywords: chili, beef chili, smoky chili, easy chili recipe, office cookoff winner, spicy chili, comfort food