Introduction
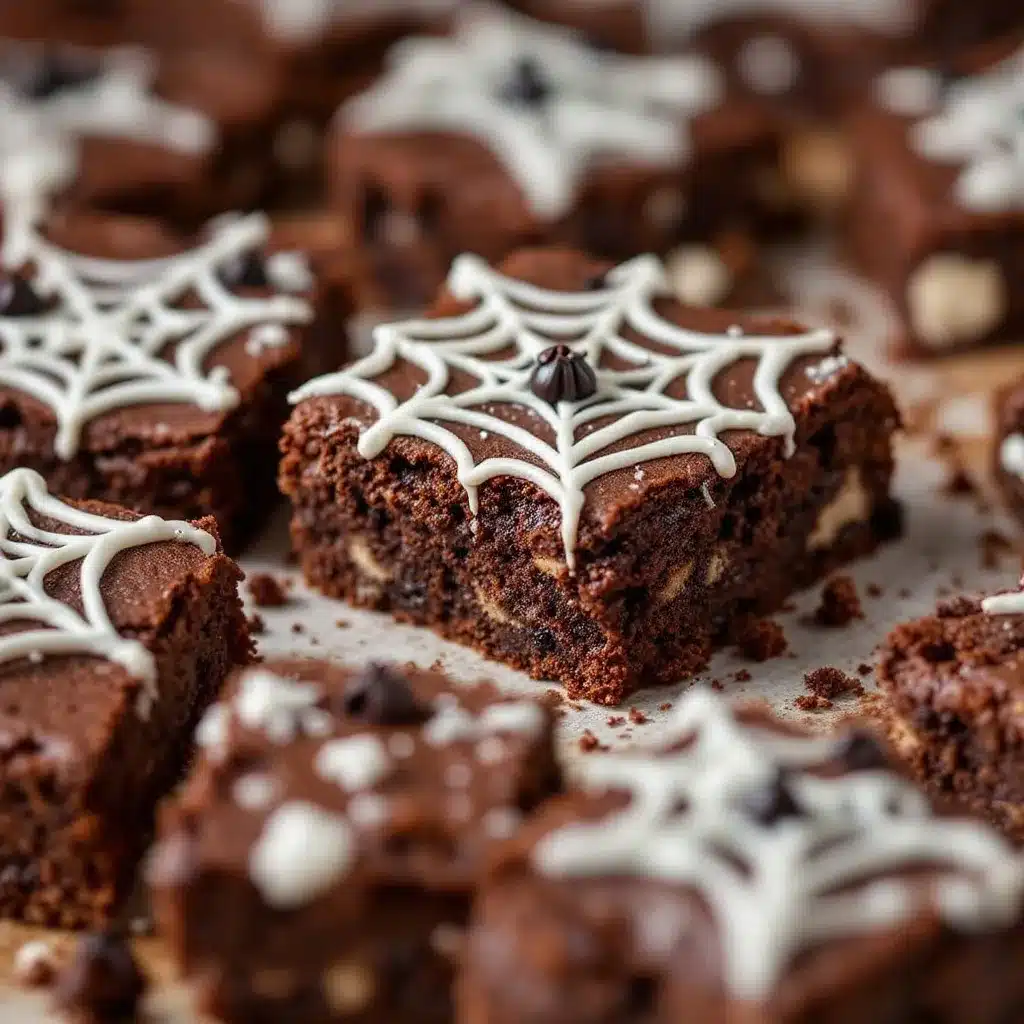
The crackle. That’s what got me. Not the fudgy center or the glossy Nutella top, but the thin, brittle web of white chocolate that shattered under my fork. I made these Easy Spiderweb Nutella Brownies for Halloween on a whim last October, and honestly, I wasn’t expecting much. I just wanted something that looked spooky without tasting like a candy wrapper. But that first bite—the way the crisp web gives way to that dense, almost truffle-like brownie underneath—it was the texture I didn’t know I needed. Everything else is just decoration.
I’d been staring at a half-used jar of Nutella for weeks. You know how that goes. It sits there, calling your name, but you’re not sure what to do with it that feels special. Then I saw a photo of a spiderweb cake on some random food page, and it clicked. Why not put a web on brownies? The contrast between the dark chocolate base and the stark white lines is pure Halloween theater. It’s the kind of dessert that makes people stop mid-conversation and say, “Wait, you made that?”
But here’s the thing—this recipe isn’t about being a pastry chef. It’s about getting that dramatic look with zero stress. The brownie itself is one-bowl, no mixer, and the web is just a squeeze bottle and a toothpick. I’ve made this for two different Halloween parties now, and both times, people ate the web first. They’d pick at the white chocolate lines like kids peeling dried glue off their hands. There’s something satisfying about destroying something beautiful, I guess. And that’s the whole point of Halloween anyway, right? A little bit of mess, a little bit of magic, and a brownie that actually delivers.
Why You’ll Love This Recipe
Let me be honest with you—I’ve tested a lot of brownie recipes over the years. Some are too cakey, some are too greasy, and some just don’t have that deep chocolate punch. These Easy Spiderweb Nutella Brownies are different. They’re the ones I keep coming back to, not just because they look cool, but because they taste like actual brownies should. Here’s why they work:
- One Bowl, No Fuss : You don’t need a stand mixer or even a hand mixer for this. Just a bowl, a whisk, and a spatula. The batter comes together in under ten minutes, which is perfect when you’re juggling Halloween decorations and a sugar-crazed household.
- That Fudgy Texture : The Nutella adds an extra layer of richness and a subtle hazelnut flavor that plays beautifully with the dark cocoa. These brownies are dense, moist, and have that slightly underbaked center that brownie lovers dream about.
- No Special Equipment : The spiderweb effect uses a simple piping bag (or a zip-top bag with the corner snipped off) and a toothpick. You don’t need stencils, fancy tips, or a steady hand. I promise, if I can do it, you can do it.
- Halloween Showstopper : This is the dessert that gets photographed. The white web against the dark brownie is dramatic and festive without being cheesy. It’s sophisticated enough for adult parties but fun enough for kids.
- Make-Ahead Friendly : These brownies actually taste better the next day. The flavors meld, and the texture gets even fudgier. You can bake them a day ahead, add the web the morning of your party, and have zero stress.
What makes this recipe different from other Halloween brownies is the technique. Most spiderweb recipes use a cream cheese or royal icing base, which can be too sweet or too stiff. I use melted white chocolate mixed with a tiny bit of coconut oil. It flows perfectly, sets with a satisfying snap, and doesn’t overpower the brownie. It’s a small detail, but it makes all the difference.
And honestly? This recipe isn’t just for Halloween. I’ve made it for birthday parties and even a casual movie night. The web is easy to customize—you can do different colors, add sprinkles, or skip the web entirely and just enjoy the best Nutella brownies of your life. It’s the kind of recipe that makes you look like you tried really hard when you actually didn’t.
What Ingredients You Will Need
This recipe uses simple, pantry-friendly ingredients to create something that feels extravagant. The Nutella does double duty here—it adds flavor and helps create that fudgy texture without extra butter. Here’s what you’ll need:
For the Brownie Base:
- 1/2 cup (115g) unsalted butter — I prefer European-style butter like Kerrygold for its higher fat content, which makes the brownies richer. But any unsalted butter works fine.
- 1 cup (200g) granulated sugar — Regular white sugar is perfect. It dissolves easily and gives the brownies that crackly top.
- 2 large eggs — Room temperature eggs incorporate better. If you forget to take them out, place them in a bowl of warm water for five minutes.
- 1 teaspoon vanilla extract — Pure vanilla extract adds depth. I use Nielsen-Massey, but any brand is fine.
- 1/3 cup (40g) unsweetened cocoa powder — I recommend Dutch-process cocoa for a darker, more mellow chocolate flavor. Ghirardelli or Valrhona are my go-to brands.
- 1/2 cup (60g) all-purpose flour — Spoon and level your flour. Don’t scoop directly from the bag or you’ll end up with dry brownies.
- 1/4 teaspoon salt — Salt enhances the chocolate flavor. I use fine sea salt.
- 1/2 cup (150g) Nutella — Use the real stuff. Store-brand versions sometimes have a different consistency that can affect the texture.
For the Spiderweb:
- 1/2 cup (85g) white chocolate chips or chopped white chocolate — Use good quality white chocolate that melts smoothly. Ghirardelli or Callebaut are reliable. Avoid white melting wafers if possible—they don’t taste as good.
- 1 teaspoon coconut oil or vegetable oil — This thins the white chocolate just enough to pipe smoothly. Coconut oil adds a subtle flavor that pairs nicely with the hazelnut.
Substitution Guidance: If you don’t have Nutella, you can use any chocolate-hazelnut spread. For a dairy-free version, use vegan butter and dairy-free white chocolate. The texture will be slightly different but still delicious. If you’re gluten-free, swap the all-purpose flour for a 1:1 gluten-free baking blend. I’ve tested this with Bob’s Red Mill and it works perfectly.
Equipment Needed
The beauty of this recipe is that you don’t need a fully stocked bakery to pull it off. Here’s what you’ll need:
- 8×8-inch baking pan — This is the ideal size for thick, fudgy brownies. If you use a 9×9 pan, the brownies will be thinner and bake faster, so reduce the baking time by about 5 minutes.
- Parchment paper — Line your pan with parchment paper, leaving overhang on two sides. This makes lifting the brownies out a breeze. I’ve forgotten to do this before and spent twenty minutes scraping brownie out of corners. Don’t be me.
- Mixing bowls — One medium bowl for the butter and sugar, and one small bowl for the white chocolate.
- Whisk and spatula — A whisk for the wet ingredients and a silicone spatula for folding in the dry ingredients.
- Piping bag or zip-top bag — For the white chocolate web. A small piping bag with a tiny round tip works best, but a zip-top bag with the corner snipped off is perfectly fine.
- Toothpick — This is your web-drawing tool. Have a few extras on hand in case one breaks.
- Cooling rack — The brownies need to cool completely before adding the web. A wire rack speeds this up.
If you don’t have an 8×8 pan, you can use a 9-inch round cake pan. Just adjust the baking time and check for doneness a few minutes early. I’ve also made these in a disposable foil pan for Halloween parties—they work just fine and make cleanup even easier.
Preparation Method
Making these Easy Spiderweb Nutella Brownies is straightforward, but there are a few moments where paying attention makes a big difference. Here’s how I do it:
- Preheat and Prep : Preheat your oven to 350°F (175°C). Line your 8×8 baking pan with parchment paper, leaving overhang on two opposite sides. This is your insurance policy against stuck brownies.
- Melt the Butter : In a medium microwave-safe bowl, melt the butter in 30-second intervals until just melted. Don’t let it boil. You want it warm, not hot. Let it cool for a minute or two.
- Mix Sugar and Butter : Add the granulated sugar to the melted butter and whisk until combined. The mixture will look grainy—that’s normal. Whisk for about a minute until it starts to come together.
- Add Eggs and Vanilla : Crack in the eggs one at a time, whisking well after each addition. The batter should look smooth and glossy. Add the vanilla extract and whisk again. This is where the crackly top starts to develop, so don’t rush this step.
- Fold in Dry Ingredients : Sift the cocoa powder, flour, and salt over the wet mixture. Use your spatula to fold gently until just combined. Overmixing will make the brownies tough. You want to see the last streaks of flour disappear.
- Add the Nutella : Spoon the Nutella into the batter and fold it in with a few broad strokes. Don’t fully incorporate it. You want a few swirls of Nutella visible in the batter—this creates pockets of extra richness in the baked brownies.
- Bake : Pour the batter into the prepared pan and spread it evenly. Bake for 25-30 minutes, or until a toothpick inserted into the center comes out with a few moist crumbs attached. If it comes out clean, you’ve overbaked them. The edges should be set and the center should look slightly underdone.
- Cool Completely : Let the brownies cool in the pan for 10 minutes, then lift them out using the parchment overhang and transfer to a wire rack. Cool completely—this is crucial. If the brownies are even slightly warm, the white chocolate web will melt and turn into a mess. I’ve learned this the hard way.
- Make the Web : Once the brownies are completely cool, melt the white chocolate chips with the coconut oil in a small microwave-safe bowl. Microwave in 20-second intervals, stirring between each, until smooth. Transfer to a piping bag or zip-top bag and snip a tiny corner off.
- Draw the Web : Starting from the center of the brownie, pipe a small dot of white chocolate. Then pipe concentric circles around it, spacing them about 1 inch apart. Work quickly before the white chocolate sets. Use a toothpick to drag lines from the center outward through the circles, creating the web effect. Wipe the toothpick clean between each drag line for the cleanest look.
- Set and Serve : Let the white chocolate set for about 15-20 minutes at room temperature, or pop the brownies in the fridge for 10 minutes. Once the web is firm, slice into squares and serve.
Cooking Tips & Techniques
I’ve made this recipe more times than I care to count, and I’ve picked up a few tricks along the way. Here’s what I wish someone had told me:
Don’t Overbake : This is the number one mistake people make with brownies. The toothpick test should show moist crumbs, not clean batter. If you wait until the toothpick comes out clean, your brownies will be dry. I once overbaked a batch by just three minutes and the difference was heartbreaking. Set your timer for 25 minutes and check from there.
The Toothpick Technique : When drawing the spiderweb, drag the toothpick from the center to the edge in one smooth motion. If you stop mid-line, you’ll get a jagged edge. Also, wipe the toothpick clean after each line. I learned this after my first web turned into a blurry mess because I kept dragging chocolate through chocolate.
White Chocolate Matters : Cheap white chocolate chips often contain stabilizers that prevent smooth melting. If you can, use chopped white chocolate from a bar. It melts more evenly and tastes better. If you only have chips, add an extra 1/2 teaspoon of coconut oil to help them flow.
Room Temperature Eggs : Cold eggs can seize the butter and create a lumpy batter. If you’re in a hurry, place the eggs in a bowl of warm water for five minutes before using. It makes a noticeable difference in the batter’s smoothness.
Multitasking Strategy : While the brownies are baking, measure out your white chocolate chips and coconut oil. Clean your mixing bowls. Set up your piping bag. This way, when the brownies are cool, you’re ready to go. I’ve found that if I prep everything ahead, the web comes together in under five minutes.
Variations & Adaptations
One of the best things about this recipe is how easy it is to adapt. Here are a few variations I’ve tried and loved:
Peanut Butter Spiderweb : Swap the Nutella for creamy peanut butter. The combination of peanut butter and chocolate is classic, and the white web stands out beautifully against the darker brownie. Just be sure to use a natural peanut butter without added sugar, or the brownies will be too sweet.
Gluten-Free Version : Substitute the all-purpose flour with a 1:1 gluten-free baking blend. I’ve used Bob’s Red Mill and King Arthur’s measure-for-measure blends with great results. The texture is slightly more delicate, but the flavor is identical.
Vegan Option : Use vegan butter and a flax egg (1 tablespoon ground flaxseed mixed with 3 tablespoons water) instead of regular eggs. For the web, use vegan white chocolate. The brownies will be a bit more cakey, but they’re still delicious. I made these for a vegan friend’s Halloween party and they disappeared in minutes.
Spooky Color Twist : Add a drop of orange or purple food coloring to the white chocolate for a festive look. Gel food coloring works best because it doesn’t thin the chocolate. I’ve done orange webs for a fall-themed party and they looked incredible.
Extra Crunch : Sprinkle crushed pretzels or chopped toasted hazelnuts over the brownie batter before baking. The salty crunch contrasts beautifully with the fudgy brownie and sweet web. This is my personal favorite variation—I love that salty-sweet combo.
Serving & Storage Suggestions
These brownies are best served at room temperature, when the fudgy center is soft and the web is snappy. I like to cut them into 16 small squares—they’re rich, so a little goes a long way. For a dramatic presentation, place them on a black or orange platter and add a few fake spiders for effect.
Storage : Store the brownies in an airtight container at room temperature for up to 4 days. If you stack them, place a sheet of parchment paper between layers to protect the web. The brownies actually get fudgier on day two, so don’t worry about making them ahead.
Freezer Instructions : You can freeze the brownies without the web for up to 3 months. Wrap them tightly in plastic wrap and then foil. When you’re ready to serve, thaw at room temperature, then add the web. The white chocolate doesn’t freeze well, so always add it fresh.
Reheating : If you want a warm brownie, microwave a single square for 10-15 seconds. The web will soften slightly but will still look beautiful. For a gooey center, reheat in a 300°F oven for 5 minutes.
Flavor Development : These brownies taste even better the next day. The Nutella and cocoa meld together, and the texture becomes more uniform. If you can resist eating them immediately, cover them and let them sit overnight. You won’t regret it.
Nutritional Information & Benefits
Let’s be real—these are indulgent brownies. But that doesn’t mean they can’t have a place in a balanced diet. Here’s the estimated nutritional breakdown per brownie (based on 16 servings):
- Calories : 220
- Fat : 12g
- Carbohydrates : 28g
- Protein : 3g
- Sugar : 20g
- Fiber : 1g
The Nutella adds a small amount of hazelnuts, which provide healthy fats and vitamin E. The cocoa powder is rich in antioxidants called flavonoids, which support heart health. And the eggs contribute high-quality protein and choline, which is important for brain function.
If you’re watching your sugar intake, you can reduce the granulated sugar to 3/4 cup without affecting the texture too much. The Nutella adds sweetness, so the brownies won’t taste bland. For a lower-calorie option, use a sugar substitute like monk fruit sweetener, but note that the texture may be slightly different.
These brownies are not suitable for those with nut allergies due to the Nutella. For a nut-free version, use a chocolate spread made from sunflower seeds or try the peanut butter variation if peanuts are safe for you.
Conclusion
These Easy Spiderweb Nutella Brownies are the Halloween dessert you’ve been looking for. They’re dramatic enough to impress your Instagram followers, but simple enough to whip up on a Tuesday night. The fudgy brownie base is rich and satisfying, and the white chocolate web adds that perfect touch of spooky fun. I’ve made these for costume parties, pumpkin carving nights, and even just for myself when I needed a little seasonal cheer.
What I love most about this recipe is that it’s forgiving. If your web isn’t perfect, it still looks great. If you overbake them slightly, they’re still delicious. It’s the kind of recipe that builds confidence in the kitchen without demanding perfection. And honestly, that’s the best kind of recipe to have in your back pocket.
I’d love to hear how yours turn out. Did you add a twist? Did your kids help with the web? Drop a comment below and share your creation. And if you’re looking for more easy Halloween treats, check out my crispy air fryer churro bites for another festive option. Happy Halloween, and happy baking!
Frequently Asked Questions
Can I use homemade brownie mix instead of from scratch?
Absolutely. If you’re short on time, use your favorite boxed brownie mix. Just prepare it according to the package directions, add the Nutella swirl, and bake. The web technique works exactly the same way on any brownie base.
Why did my white chocolate web turn out lumpy?
White chocolate can seize if it gets too hot or if any water gets into the bowl. Always melt it in short bursts and stir between each. If it does seize, add a teaspoon of coconut oil and stir vigorously—sometimes you can save it. Next time, use a double boiler for more control.
Can I make the spiderweb ahead of time?
Yes, but I recommend adding the web no more than 24 hours before serving. The white chocolate can absorb moisture from the brownies over time and lose its snap. If you need to prep further ahead, bake the brownies, freeze them without the web, and add the web after thawing.
How do I get clean slices without cracking the web?
Use a sharp chef’s knife and cut with one smooth motion. Don’t saw back and forth. Wipe the knife clean between cuts. For the cleanest slices, refrigerate the brownies for 20 minutes before cutting—the web will be firmer and less likely to crack.
Can I use dark chocolate instead of white chocolate for the web?
Technically yes, but it won’t show up as well against the dark brownie. If you want a dark web, pipe it on a lighter background, like a cream cheese frosting layer. For the classic spooky look, white chocolate is your best bet.
Pin This Recipe!
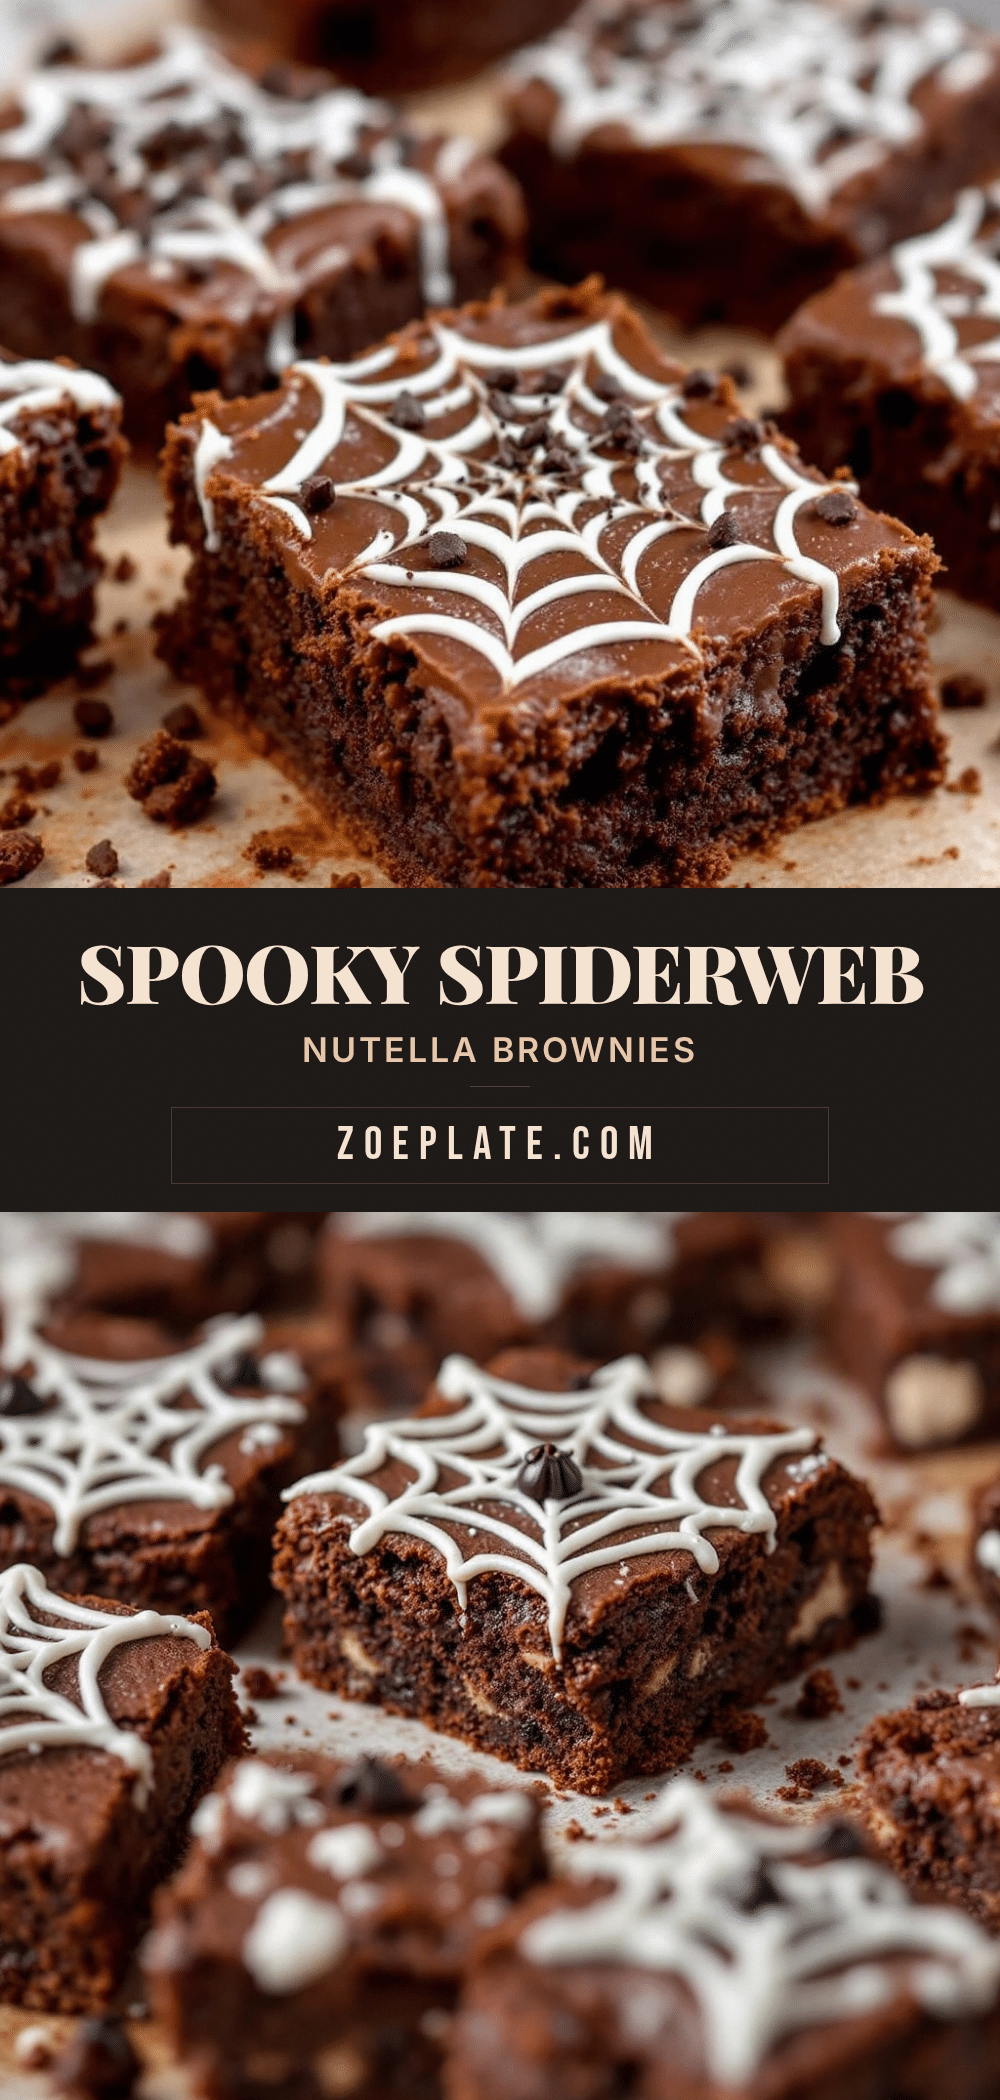
Best Easy Spiderweb Nutella Brownies for Halloween
These fudgy Nutella brownies feature a dramatic white chocolate spiderweb that shatters under your fork. A one-bowl, no-mixer recipe that’s perfect for Halloween parties and delivers a rich, truffle-like texture with a festive look.
- Prep Time: 15 minutes
- Cook Time: 30 minutes
- Total Time: 45 minutes
- Yield: 16 servings 1x
- Category: Dessert
- Cuisine: American
Ingredients
- 1/2 cup (115g) unsalted butter
- 1 cup (200g) granulated sugar
- 2 large eggs, room temperature
- 1 teaspoon vanilla extract
- 1/3 cup (40g) unsweetened cocoa powder (Dutch-process preferred)
- 1/2 cup (60g) all-purpose flour
- 1/4 teaspoon fine sea salt
- 1/2 cup (150g) Nutella
- 1/2 cup (85g) white chocolate chips or chopped white chocolate
- 1 teaspoon coconut oil or vegetable oil
Instructions
- Preheat oven to 350°F (175°C). Line an 8×8-inch baking pan with parchment paper, leaving overhang on two opposite sides.
- In a medium microwave-safe bowl, melt the butter in 30-second intervals until just melted. Let cool for 1-2 minutes.
- Add the granulated sugar to the melted butter and whisk until combined and slightly grainy, about 1 minute.
- Add eggs one at a time, whisking well after each addition. Stir in vanilla extract until smooth and glossy.
- Sift cocoa powder, flour, and salt over the wet mixture. Fold gently with a spatula until just combined—do not overmix.
- Spoon Nutella into the batter and fold with a few broad strokes, leaving visible swirls.
- Pour batter into prepared pan and spread evenly. Bake for 25-30 minutes, until a toothpick inserted in the center comes out with a few moist crumbs. Cool in pan for 10 minutes, then lift out and cool completely on a wire rack.
- Once brownies are completely cool, melt white chocolate chips with coconut oil in a small microwave-safe bowl in 20-second intervals, stirring between each, until smooth.
- Transfer melted white chocolate to a piping bag or zip-top bag and snip a tiny corner off.
- Pipe a small dot of white chocolate in the center of the brownie, then pipe concentric circles around it, spacing about 1 inch apart. Working quickly, drag a toothpick from the center outward through the circles to create a web effect. Wipe toothpick clean between each drag line.
- Let white chocolate set for 15-20 minutes at room temperature, or refrigerate for 10 minutes. Slice into squares and serve.
Notes
Do not overbake—brownies should be slightly underdone in the center for a fudgy texture. Cool brownies completely before adding the web, or the white chocolate will melt. For clean slices, refrigerate for 20 minutes before cutting. Brownies taste even better the next day.
Nutrition
- Serving Size: 1 brownie
- Calories: 220
- Sugar: 20
- Sodium: 95
- Fat: 12
- Saturated Fat: 7
- Carbohydrates: 28
- Fiber: 1
- Protein: 3
Keywords: Halloween brownies, spiderweb brownies, Nutella brownies, easy brownies, fudgy brownies, one-bowl brownies