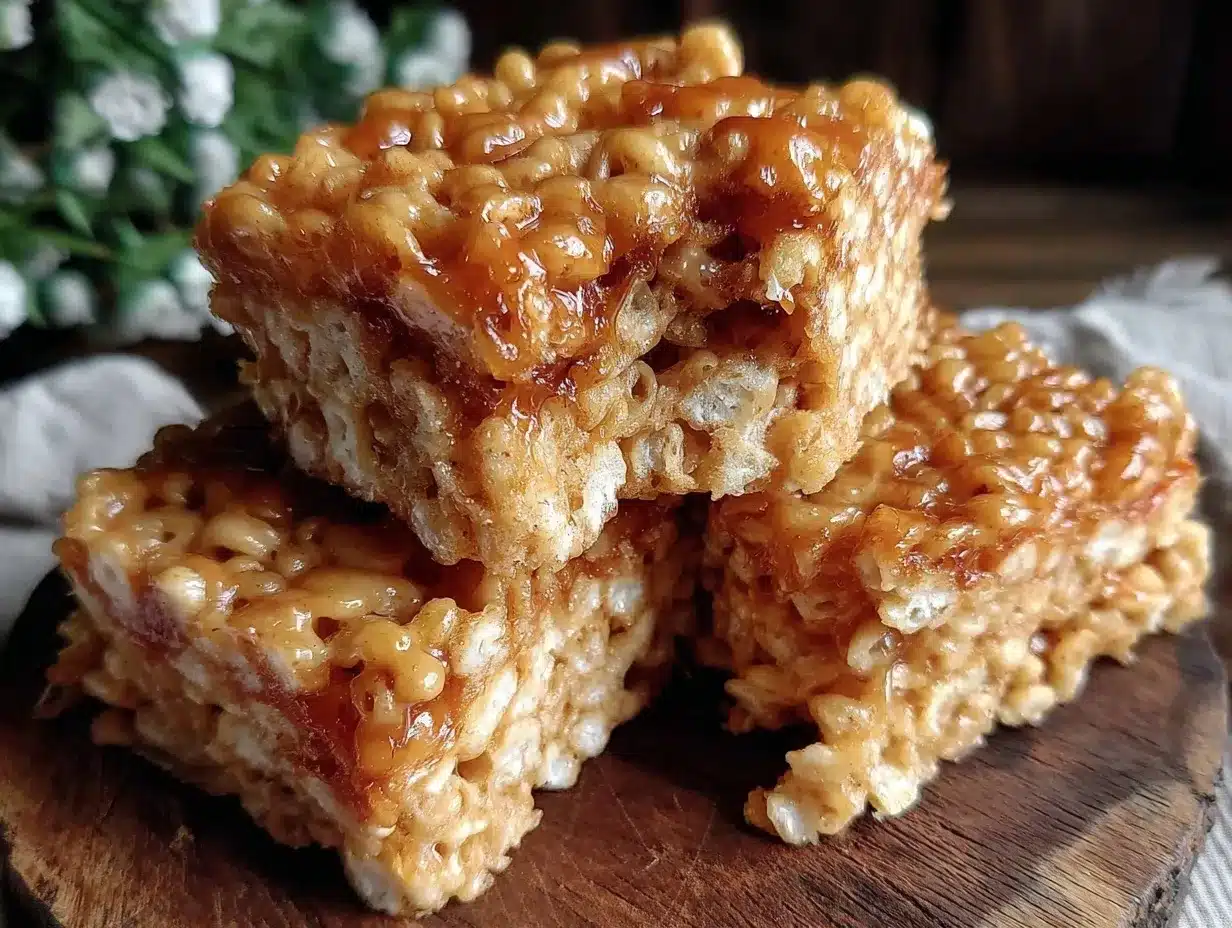
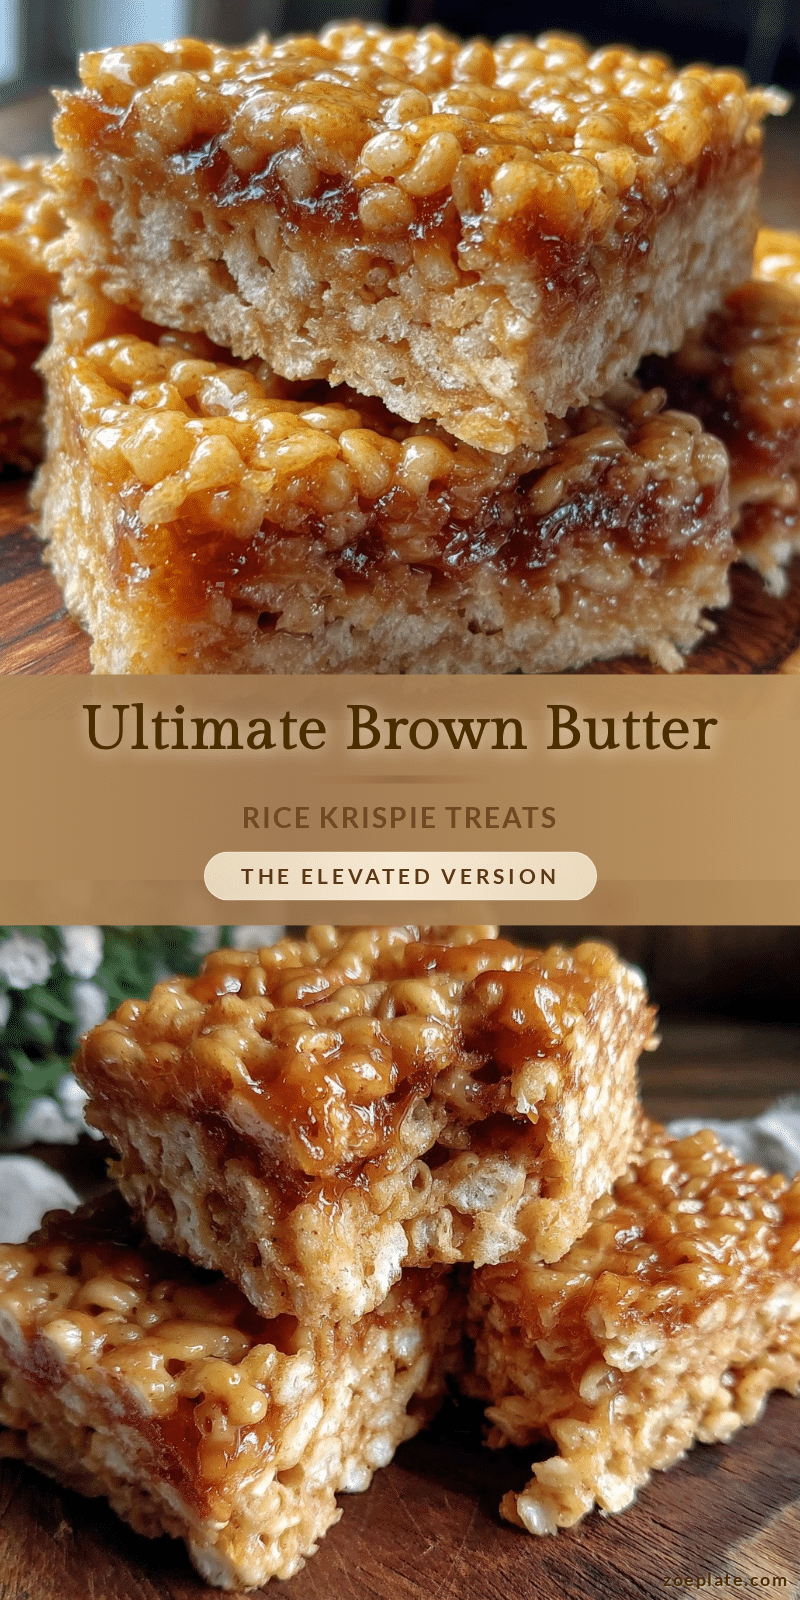
“Are you sure you don’t want to try just one more bite?” My friend’s voice cracked through the quiet kitchen as I fumbled with the last piece of what quickly became my favorite snack: brown butter Rice Krispie treats. Honestly, I wasn’t planning to make Rice Krispie treats that evening—my plan was something a little fancier—but life had other ideas. The clock was ticking, and the pantry was sparse, so I grabbed marshmallows, butter, and the trusty cereal box. But instead of just melting the butter, I let it brown, this little twist turning a simple childhood snack into something unexpectedly irresistible.
That nutty aroma filled the room, wrapping around me like a warm hug on a hectic evening. The first batch came out chewy and rich, a bit different from the usual cloying sweetness. Friends who stopped by couldn’t stop asking for the recipe, and honestly, I found myself making these treats multiple times that week. It’s funny how a small change, like browning butter, can transform the whole experience.
These delicious brown butter Rice Krispie treats stick with you—not just because they’re tasty but because they remind you that sometimes the simplest tweaks make the best comfort food. This recipe became my go-to snack for those evenings when I needed a little sweetness with a grown-up touch, without any fuss. If you’re craving something nostalgic yet a little more grown-up, these treats might just be the answer.
Why You’ll Love This Recipe
Coming from someone who’s made Rice Krispie treats the classic way probably a hundred times, this brown butter version totally won me over. It’s not just about nostalgia—it’s about taste and texture with a little extra oomph that you didn’t know you needed.
- Quick & Easy: You’ll have these treats ready in under 20 minutes, making them perfect for a last-minute snack or surprise guests.
- Simple Ingredients: No complicated shopping trips here—just good old marshmallows, butter, and cereal you likely have on hand.
- Perfect for Any Occasion: Whether it’s a cozy night in, a kids’ party, or a casual get-together, these treats fit right in.
- Crowd-Pleaser: Kids adore them, adults sneak seconds, and they’re always the first dish to disappear at potlucks.
- Unbelievably Delicious: That nutty, caramelized flavor from the brown butter adds depth and richness that lifts these treats beyond the ordinary.
What sets this recipe apart? The secret is in browning the butter slowly until it’s a deep golden color with those toasted notes. It gives the marshmallow base a toasty richness that blends perfectly with the crisp cereal. I’ve also played around with a little pinch of flaky sea salt on top for a subtle contrast that’s just magic. This isn’t just another Rice Krispie treat—it’s the grown-up version I’m proud to share.
Honestly, this recipe is the kind that makes you close your eyes after the first bite and smile. It’s comfort food with a twist—simple, satisfying, and a little bit special.
What Ingredients You Will Need
This recipe calls for straightforward pantry staples, but each one plays a key role in creating the perfect texture and flavor. The brown butter is the star, while the marshmallows provide that classic gooey sweetness. The crisp cereal offers the crunch we love, and a touch of salt balances everything out.
- Unsalted Butter (1/2 cup / 115g) – browned slowly to bring out a nutty flavor; use a good-quality brand like Kerrygold for best results
- Mini Marshmallows (4 cups / about 120g) – these melt faster and more evenly than large ones, perfect for smooth binding
- Rice Krispies Cereal (6 cups / 180g) – classic crispy rice cereal, make sure it’s fresh and crunchy; you can swap for a gluten-free version if needed
- Pure Vanilla Extract (1 tsp) – adds warmth and depth to the mix
- Flaky Sea Salt (optional, a pinch) – a sprinkle on top enhances the brown butter’s richness
You don’t need anything fancy or hard to find. If mini marshmallows aren’t handy, regular marshmallows will work but chop them into smaller pieces for even melting. For a twist, I’ve sometimes swapped half the Rice Krispies for puffed quinoa to add a little extra texture and protein, which pairs surprisingly well.
Equipment Needed
Making these treats doesn’t require a lot of fancy gear, but having the right tools definitely helps. Here’s what I use:
- Large Saucepan: A heavy-bottomed pan is best for browning butter evenly without burning.
- Wooden Spoon or Silicone Spatula: For stirring the marshmallows and butter mixture smoothly.
- 9×13-inch Baking Pan: For pressing and setting the treats evenly.
- Parchment Paper or Nonstick Spray: To line the pan and prevent sticking.
- Instant-Read Thermometer (optional): Handy if you want to check the butter temperature precisely, but not necessary if you watch the color and aroma closely.
If you’re short on a large pan, a medium-sized skillet can work; just be mindful of stirring carefully to avoid marshmallow clumps. For pressing the treats, I usually use a piece of parchment paper over the mixture and press gently with my hands or a flat spatula—this keeps everything neat and smooth without sticking.
Preparation Method
- Brown the Butter (5-7 minutes): Place the 1/2 cup (115g) of unsalted butter in a large saucepan over medium heat. Stir occasionally as the butter melts and begins to foam. Watch carefully as it turns a golden brown with nutty aromas—this is your cue to remove from heat. Be careful not to let it burn; if you see dark spots or smell bitterness, start over.
- Add Marshmallows and Vanilla (2-3 minutes): Immediately add 4 cups (120g) mini marshmallows to the browned butter. Stir continuously until fully melted and smooth. Stir in 1 teaspoon of pure vanilla extract for added flavor.
- Mix in the Cereal (1-2 minutes): Remove the pan from heat and quickly fold in 6 cups (180g) Rice Krispies cereal. Stir gently but thoroughly to coat every piece with the marshmallow mixture.
- Press into Pan (5 minutes): Line a 9×13-inch baking pan with parchment paper or grease it lightly. Transfer the mixture to the pan. Using a piece of parchment paper or wax paper on top, press the mixture evenly and firmly into the pan. Avoid pressing too hard or the treats will be too dense; just enough to hold their shape.
- Sprinkle Sea Salt and Cool (30 minutes): Optionally, sprinkle a pinch of flaky sea salt evenly over the top. Let the treats cool at room temperature for about 30 minutes or until set.
- Cut and Serve: Once cooled, lift the treats from the pan using the parchment edges. Cut into squares or rectangles with a sharp knife. Store leftovers in an airtight container at room temperature.
If you notice the marshmallows aren’t melting smoothly, a quick tip is to lower the heat slightly and add a tablespoon of light corn syrup or honey to help with smoothness next time. The smell of browned butter is your best guide—it should be rich and nutty, not burnt. Also, pressing the treats while warm makes for the best texture.
Cooking Tips & Techniques
Brown butter is a game-changer, but it can be intimidating if you haven’t worked with it before. Here are some tips I picked up after a few burnt batches:
- Use a light-colored pan: This helps you watch the butter’s color change more easily, so you don’t miss the perfect brown stage.
- Stir frequently but gently: This prevents hot spots and burning without causing splatter.
- Remove from heat immediately: Butter will keep cooking in the residual heat, so don’t wait too long to take it off the stove.
- Press treats while warm: Waiting too long makes them hard to shape, but pressing too hot can melt the marshmallows unevenly.
- Don’t skip the vanilla: It adds a subtle warmth that balances the brown butter’s richness.
My first few batches were either too soft or too hard, so I learned to trust the visual cues and the smell more than the clock. Also, mixing in the cereal swiftly helps keep that light crisp texture rather than soggy clumps. If you want a little extra chew, try adding a handful of chopped nuts or toasted coconut flakes.
Variations & Adaptations
This recipe is super flexible and easy to tweak depending on your preferences or dietary needs:
- Gluten-Free: Use gluten-free crispy rice cereal to keep it safe for gluten-sensitive eaters.
- Vegan Option: Swap butter for vegan margarine or coconut oil browned carefully, and use vegan marshmallows (like Dandies brand).
- Nutty Twist: Stir in chopped toasted pecans or almonds for crunch and extra flavor.
- Chocolate Drizzle: Melt some dark or white chocolate and drizzle over the cooled treats for a fancy finish.
- Salted Caramel: Add a teaspoon of caramel extract or swirl in homemade caramel sauce before setting for indulgence.
Personally, I once tried mixing in a bit of collagen protein balls crumble into the mix for an unexpected texture contrast and protein boost—surprisingly good! You can also experiment with different cereals like puffed millet or quinoa for unique textures.
Serving & Storage Suggestions
These treats are best enjoyed fresh but store well too. I like serving them slightly warm when the marshmallows are soft and chewy, but they firm up nicely at room temperature.
- Serving Temperature: Room temperature or slightly warmed (10 seconds in the microwave) to bring out that melty texture.
- Presentation: Cut into neat squares and stack on a rustic wooden board or wrap individually for gifts or lunchbox treats.
- Complementary Pairings: Serve with a creamy hot chocolate like the creamy collagen hot chocolate for an indulgent snack break.
- Storage: Keep in an airtight container at room temperature for up to 3 days. For longer storage, wrap tightly and freeze for up to 1 month.
- Reheating: Pop frozen treats in the microwave for 15-20 seconds to refresh their softness without melting completely.
Over time, the flavors mellow and deepen, so if you’re okay with a chewier texture, letting them rest a day can actually improve the experience.
Nutritional Information & Benefits
While these treats are definitely an indulgence, they do have some redeeming qualities thanks to the ingredients:
| Per Serving (1 square) | Amount |
|---|---|
| Calories | 150-170 kcal |
| Fat | 6-7g (mostly from butter) |
| Carbohydrates | 24-26g (mostly from marshmallows and cereal) |
| Protein | 1-2g |
| Sugar | 15-18g |
The brown butter adds a small dose of antioxidants from the Maillard reaction, and using quality butter means you’re getting some vitamin A and healthy fats. Marshmallows are mostly sugar, so moderation is key, but for a quick energy boost or sweet treat, these hits the spot. Using the recipe with gluten-free cereal makes it accessible for those with sensitivities. If you want to bump up nutrition, consider adding chopped nuts or pairing with a protein-rich drink.
Conclusion
These delicious brown butter Rice Krispie treats are a simple twist on a classic, turning something familiar into a snack you’ll want to make again and again. They’re easy, fast, and have that perfect balance of chewy, crunchy, and nutty goodness that sticks with you. The browned butter gives them a depth that makes them feel special without the fuss.
Feel free to customize with your favorite mix-ins or toppings. Personally, I love how just a pinch of sea salt makes the flavors pop. Whether you’re making these for a quick snack, a party, or a little personal indulgence, this recipe won’t disappoint.
If you try it, I’d love to hear how you make it your own—drop a comment or share your variations. There’s something so satisfying about turning a simple childhood treat into something a bit more grown-up and delicious. So go ahead, get your butter browning and enjoy every bite.
FAQs
Can I use regular butter instead of unsalted butter?
Yes, but I recommend unsalted so you can control the salt level. If using salted butter, skip adding extra salt on top.
What if I don’t have mini marshmallows?
Regular marshmallows work fine—just chop them into smaller pieces to help them melt evenly.
How do I know when the butter is perfectly browned?
Look for a golden brown color and a nutty aroma. The butter will foam and then clear, so watch carefully to avoid burning.
Can I make these treats ahead of time?
Absolutely! Store them in an airtight container at room temperature for up to 3 days or freeze for longer storage.
Is there a vegan version of this recipe?
Yes, use vegan butter or coconut oil to brown, and substitute with vegan marshmallows like Dandies brand.
Pin This Recipe!
Delicious Brown Butter Rice Krispie Treats
A simple twist on classic Rice Krispie treats using browned butter for a nutty, rich flavor and chewy texture. Perfect for a quick, nostalgic snack with a grown-up touch.
- Prep Time: 5 minutes
- Cook Time: 10 minutes
- Total Time: 35 minutes
- Yield: 12 servings 1x
- Category: Snack
- Cuisine: American
Ingredients
- 1/2 cup (115g) unsalted butter, browned slowly
- 4 cups (about 120g) mini marshmallows
- 6 cups (180g) Rice Krispies cereal
- 1 teaspoon pure vanilla extract
- Pinch of flaky sea salt (optional)
Instructions
- Brown the butter: Place 1/2 cup unsalted butter in a large saucepan over medium heat. Stir occasionally as it melts and foams. Remove from heat when it turns golden brown with nutty aroma, being careful not to burn.
- Add marshmallows and vanilla: Immediately add 4 cups mini marshmallows to the browned butter. Stir continuously until fully melted and smooth. Stir in 1 teaspoon vanilla extract.
- Mix in the cereal: Remove pan from heat and fold in 6 cups Rice Krispies cereal gently but thoroughly to coat all pieces.
- Press into pan: Line a 9×13-inch baking pan with parchment paper or grease lightly. Transfer mixture to pan and press evenly and firmly using parchment paper or wax paper on top.
- Sprinkle sea salt and cool: Optionally sprinkle flaky sea salt on top. Let treats cool at room temperature for about 30 minutes until set.
- Cut and serve: Lift treats from pan using parchment edges. Cut into squares or rectangles. Store leftovers in an airtight container at room temperature.
Notes
Use a light-colored pan to better watch the butter brown. Stir frequently but gently to avoid burning. Remove butter from heat immediately once browned. Press treats while warm for best texture. Mini marshmallows melt faster; if using regular marshmallows, chop into smaller pieces. Optionally sprinkle flaky sea salt on top for flavor contrast. Store in airtight container at room temperature for up to 3 days or freeze for up to 1 month.
Nutrition
- Serving Size: 1 square treat
- Calories: 160
- Sugar: 16.5
- Sodium: 50
- Fat: 6.5
- Saturated Fat: 4
- Carbohydrates: 25
- Protein: 1.5
Keywords: brown butter, Rice Krispie treats, easy snack, homemade, marshmallows, quick dessert, nostalgic, comfort food