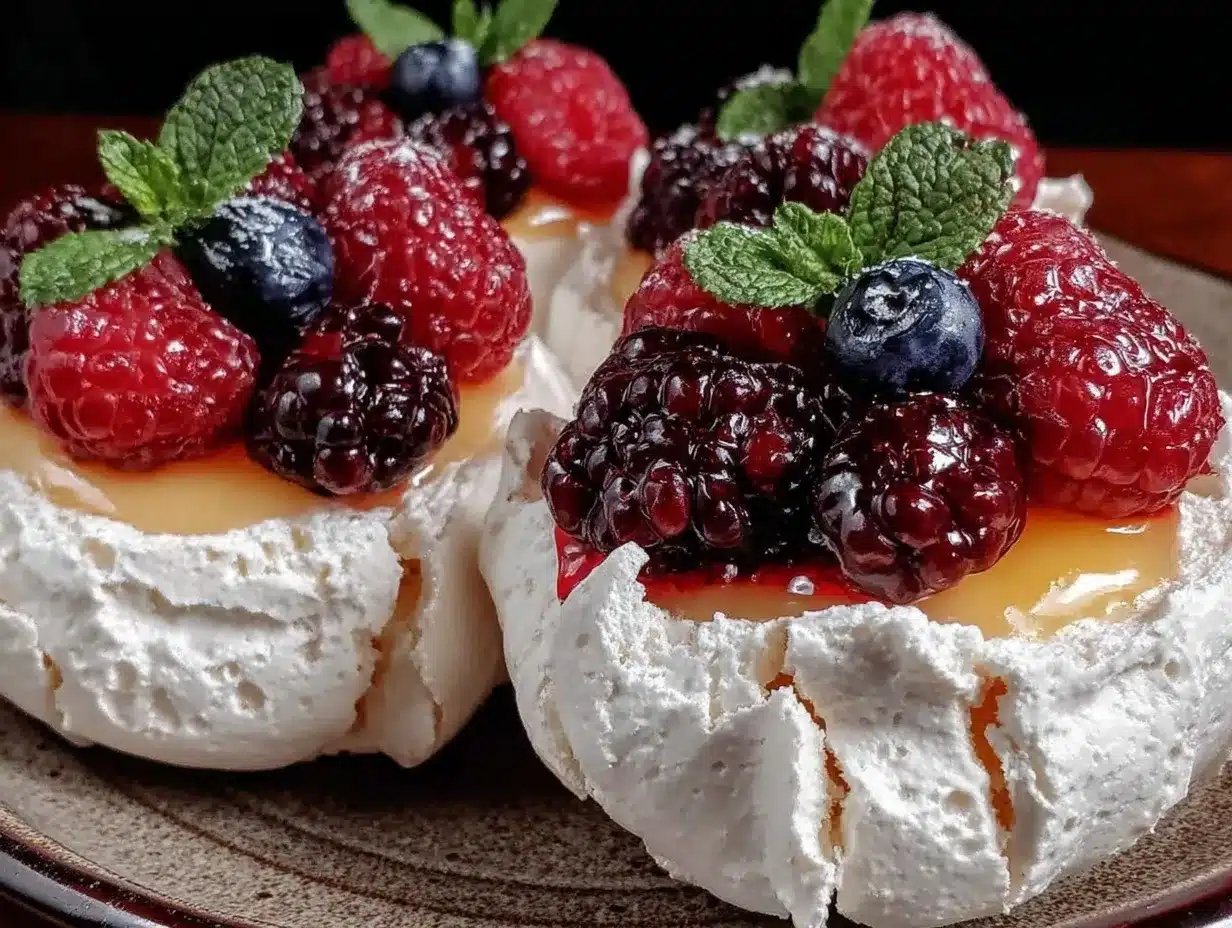
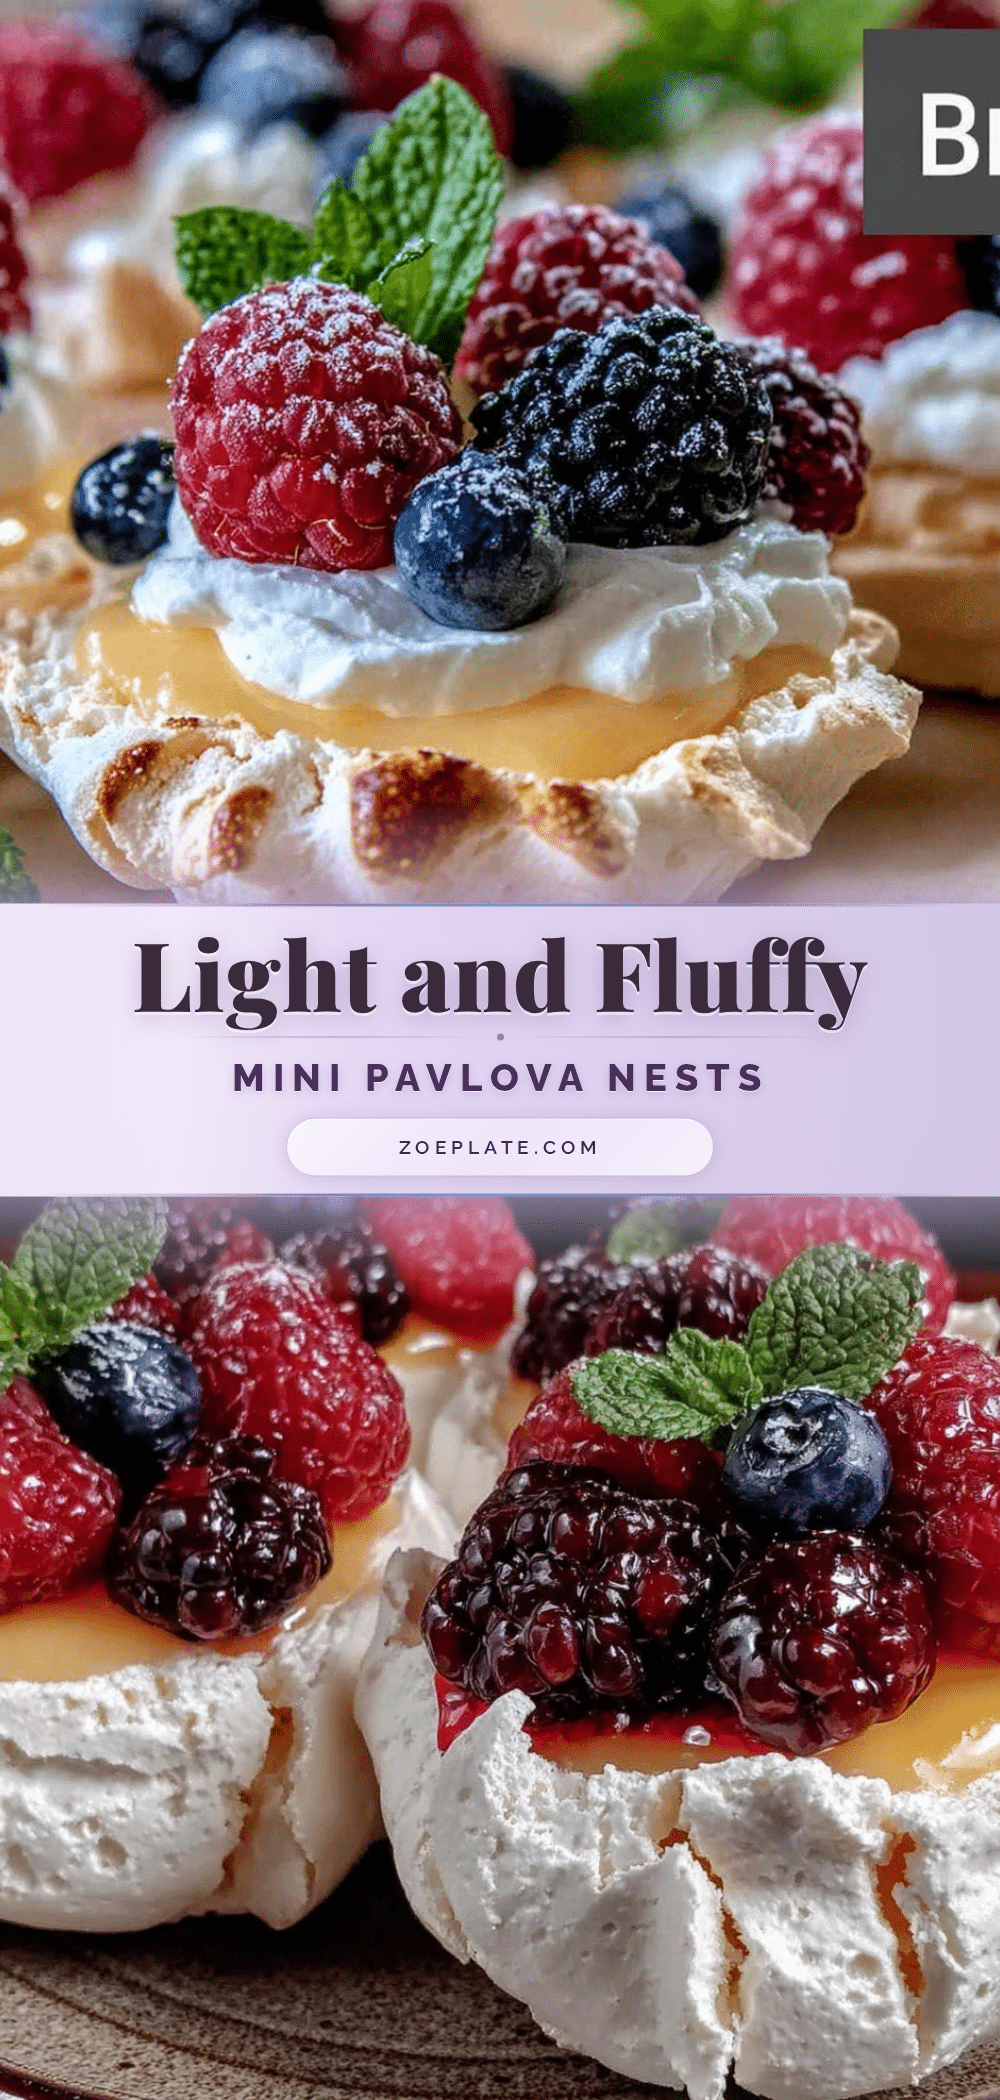
“Are you sure this will work?” my friend asked skeptically, peering over the rim of her coffee mug as I cracked the last egg white into the mixer bowl. I was attempting my third batch of mini pavlova nests that week, convinced that perfecting this recipe was a worthy obsession. Honestly, I wasn’t even a dessert person before these airy clouds of sweetness took over my kitchen — but there’s something about that crisp exterior giving way to a marshmallow-soft center, especially when paired with tangy lemon curd and juicy berries, that hooks you in.
It started as a late-night experiment after a long day, a craving for something light yet indulgent. I’d tried bigger pavlovas before, but they always felt too fragile or intimidating. These mini nests, smaller and more manageable, quickly became my go-to for impressing guests without stress. Watching the meringue whip into glossy peaks felt oddly calming, the kitchen filling with a sweet, vanilla-scented promise. And when I finally topped them with that zingy lemon curd and fresh berries, well… there was a quiet moment where everything else just fell away.
These mini pavlova nests have stayed on my favorites list not just because they taste incredible, but because they remind me that sometimes, the simplest things done well can make a day better. Plus, they’re surprisingly forgiving — even when my timing’s off, that crisp-crack and soft-center combo still shines through. If you’ve ever hesitated to make meringue or thought desserts had to be complicated, I hope this recipe gives you the same gentle nudge it gave me.
In fact, if you enjoy classic desserts with a fresh twist, you might like the cozy vibes from my blueberry muffins or the satisfying richness in the creamy cacio e pepe pasta I keep turning back to for special dinners.
Why You’ll Love This Recipe
Making these light and fluffy mini pavlova nests with lemon curd and berries isn’t just about dessert — it’s about creating a small moment of joy in your day. I’ve tested this recipe multiple times, adjusting the baking time and ingredient ratios to get that perfect texture you want from a pavlova: crisp on the outside, soft and tender inside.
- Quick & Easy: From start to finish, these nests come together in about 45 minutes, including baking and cooling. Perfect when you want a sweet treat without hours in the kitchen.
- Simple Ingredients: No need for fancy or hard-to-find items. Egg whites, sugar, lemon curd, and fresh berries — all staples or easy to grab.
- Perfect for Special Occasions: Whether it’s a light dessert for brunch, a fancy finish to a dinner party, or a festive holiday treat, these mini pavlovas fit the bill.
- Crowd-Pleaser: I’ve brought these to potlucks and family gatherings, and they always disappear fast — kids and adults alike love the texture contrast and fresh flavors.
- Unbelievably Delicious: The balance of the sweet meringue, tangy lemon curd, and juicy berries is just right — it’s the kind of dessert that makes you close your eyes after the first bite.
This recipe stands out because I take a little extra care to whip the egg whites just right (you’ll notice the difference!), and the lemon curd adds a bright pop that cuts through the sweetness. It’s not just a pavlova — it’s a light, flavorful celebration in every bite.
What Ingredients You Will Need
This recipe uses simple, wholesome ingredients to deliver bold flavor and satisfying texture without the fuss. Most of these are pantry staples, and you can easily swap or adjust some to suit your taste or dietary needs.
- Egg whites (4 large, room temperature): The base of the meringue, room temp helps whip to full volume.
- Granulated sugar (1 cup / 200 g): Adds sweetness and structure. I prefer a fine sugar like caster for smooth dissolving.
- Cornstarch (1 teaspoon): Helps create that classic soft center by stabilizing the meringue.
- White vinegar or lemon juice (1 teaspoon): Adds acidity which stabilizes the egg whites.
- Vanilla extract (1/2 teaspoon): For subtle flavor depth.
- Lemon curd (about 1 cup / 240 ml): Homemade or store-bought, adds the perfect tart contrast. I often use Mrs. Smith’s brand for convenience.
- Fresh berries (1 to 1 1/2 cups): A mix of blueberries, raspberries, and strawberries works beautifully — pick ripe, juicy berries for best flavor.
- Optional – powdered sugar for dusting: Adds an elegant finish.
If you want a gluten-free version, this recipe is naturally safe, but you can swap lemon curd for a dairy-free coconut lemon curd to make it vegan-friendly (though egg whites pose a challenge for vegan versions). For a dairy-free lemon curd, I’ve had good results with Trader Joe’s coconut lemon curd alternative.
Equipment Needed
- Electric mixer (stand or handheld): Essential for whipping egg whites to stiff peaks. I’ve tried whisking by hand — doable but tiring and less consistent.
- Baking sheet: A rimmed sheet works best to keep the nests in place.
- Parchment paper or silicone baking mat: Prevents sticking and helps with easy removal.
- Spatula or spoon: For shaping the mini nests.
- Measuring cups and spoons: For accuracy — meringues can be sensitive to sugar ratios.
If you don’t have a stand mixer, a good handheld mixer with beaters will do just fine. Keep your mixing bowl and beaters completely clean and dry for best results — even a drop of yolk or water can throw off the meringue.
Preparation Method
- Prep your oven and baking sheet (10 minutes): Preheat oven to 250°F (120°C). Line a baking sheet with parchment paper or a silicone mat.
- Beat the egg whites (5-7 minutes): In a clean, dry bowl, start whipping the 4 egg whites on medium speed until soft peaks form (the peaks flop over when you lift the beaters).
- Add sugar gradually (8-10 minutes): Slowly add the 1 cup (200 g) granulated sugar one tablespoon at a time while continuing to whip. This slow addition helps dissolve the sugar fully and creates glossy, stiff peaks. The meringue should hold stiff peaks that stand straight up without drooping.
- Fold in cornstarch, vinegar, and vanilla (1-2 minutes): Gently fold in 1 teaspoon cornstarch, 1 teaspoon white vinegar or lemon juice, and 1/2 teaspoon vanilla extract using a spatula. This adds stability and flavor without deflating the meringue.
- Shape the mini nests (5 minutes): Spoon or pipe small dollops of meringue onto the prepared baking sheet. Use the back of a spoon to create a slight well or nest in the center for the lemon curd and berries later.
- Bake low and slow (1 hour 15 minutes): Place the baking sheet in the oven and bake at 250°F (120°C) for about 75 minutes. The pavlovas should feel dry and crisp on the outside. Avoid opening the oven door during baking to prevent cracking.
- Cool completely (30 minutes to 1 hour): Turn off the oven and leave the meringues inside with the door slightly ajar to cool completely. This helps prevent cracks and keeps the interior soft.
- Add lemon curd and berries just before serving: Once cooled, spoon lemon curd into the nest centers and top with fresh berries. Dust lightly with powdered sugar if desired.
Pro tip: If you notice the meringue is sticky or weeping, your sugar might not have dissolved fully. Continue whipping for a bit longer and ensure slow sugar addition next time. The nests should peel off the parchment easily without sticking if baked and cooled correctly.
Cooking Tips & Techniques
Getting that perfect pavlova texture can feel tricky, but here are some tricks I’ve learned that make it easier:
- Use room temperature eggs: They whip better and reach full volume faster.
- Scrape your bowl often: While whipping, scrape down the sides to incorporate all whites evenly.
- Add sugar slowly: Rushing this step can cause grainy meringue that won’t hold stiff peaks.
- Don’t rush cooling: Sudden temperature changes crack the meringue. Let them cool gradually in the oven with the door ajar.
- Shape with care: Use a spoon or piping bag to create uniform nests so they bake evenly.
- Watch your oven temperature: Baking too hot causes browning or cracking; too low means the meringue won’t dry out properly.
I once tried skipping the vinegar thinking it was optional — major mistake. The nests collapsed a bit and felt dense. Acid helps stabilize those egg whites, so don’t skip it. Also, multitasking during baking is possible — check out my ultimate one-pot freezer meal for a no-fuss dinner idea to pair with your pavlova dessert.
Variations & Adaptations
These mini pavlova nests are a great canvas for creativity. Here are some ideas I’ve tried or recommend:
- Seasonal fruit swaps: In fall or winter, swap berries for poached pears or spiced apple slices for a cozy twist.
- Flavor the meringue: Try adding a teaspoon of finely grated lemon or orange zest to the egg whites for extra citrus aroma.
- Dairy-free lemon curd: Use coconut milk-based lemon curd for a vegan-friendly option (though eggs would need replacement with aquafaba for true vegan meringue).
- Chocolate drizzle: A touch of melted dark chocolate drizzled over the berries adds richness and pairs beautifully.
- Nutty crunch: Sprinkle toasted crushed pistachios or almonds for texture contrast.
For a fun twist, I once swapped lemon curd for passionfruit curd — the tropical tang made the nests feel extra special. If you enjoy simple, crunchy-sweet snacks, the ants on a log recipe might be a fun, wholesome follow-up to try after your pavlova treats.
Serving & Storage Suggestions
These mini pavlova nests are best served fresh at room temperature, right after topping with lemon curd and berries. The contrast of warm, crisp meringue and cool, tangy curd is delightful. Arrange them on a pretty platter, dust with powdered sugar, and watch them disappear.
If you need to store them, keep the baked nests in an airtight container at room temperature for up to 2 days. Avoid refrigerating baked meringue nests — moisture will make them lose their crispness. Store lemon curd separately in the fridge for up to a week.
For leftovers with toppings, gently cover and refrigerate for up to a day, but expect the meringue to soften as it absorbs moisture. To re-crisp plain nests, you can return them to a low oven (200°F / 95°C) for 5-10 minutes, but don’t add toppings before reheating.
Nutritional Information & Benefits
Each mini pavlova nest with lemon curd and berries is a light dessert option, roughly estimated at 150-200 calories depending on portion size. The main ingredients—egg whites and fresh fruit—make it lower in fat than many creamy desserts.
- Egg whites: High in protein and low in calories.
- Fresh berries: Packed with antioxidants, vitamins, and fiber for a healthful boost.
- Lemon curd: Adds vitamin C but does contain sugar and butter, so moderation helps keep it balanced.
This dessert fits well into gluten-free diets naturally. If you’re watching sugar intake, try a lightly sweetened lemon curd or reduce sugar in the meringue slightly, but be cautious — sugar stabilizes the egg whites.
Conclusion
Light and fluffy mini pavlova nests with lemon curd and berries are a bright, airy dessert that’s surprisingly easy to master. Whether you’re treating yourself after a long day or impressing friends at your next gathering, these nests bring a sweet, fresh finish without fuss. I love how adaptable they are — you can tailor the toppings and flavors to fit the season or your cravings.
Give the recipe your own spin with different fruits or zests, and don’t hesitate to lean into the process of whipping those egg whites — it’s oddly therapeutic. If you try this out, I’d love to hear how your pavlovas turned out or what variations you dreamed up. Sharing food stories is part of what makes cooking so rewarding.
Happy baking!
Frequently Asked Questions
Can I make the pavlova nests ahead of time?
You can bake the nests up to 2 days in advance and store them in an airtight container at room temperature. Add lemon curd and berries just before serving for best texture.
What if my egg whites won’t whip to stiff peaks?
Make sure your bowl and beaters are clean and dry. Use room temperature egg whites and add sugar slowly. Even a small amount of yolk or moisture can prevent whipping.
Can I freeze mini pavlova nests?
Yes! Freeze baked, cooled nests in an airtight container for up to 2 months. Thaw at room temperature before adding toppings.
Is there a vegan alternative for pavlova nests?
Traditional pavlova uses egg whites, but aquafaba (chickpea water) can be whipped into a meringue substitute. The texture may differ slightly.
What fruits work best for topping pavlova nests?
Berries like strawberries, blueberries, and raspberries are classic. You can also use kiwi, passionfruit, or stone fruits depending on the season.
Pin This Recipe!
Light and Fluffy Mini Pavlova Nests Recipe with Lemon Curd and Berries Made Easy

These mini pavlova nests feature a crisp exterior and marshmallow-soft center, topped with tangy lemon curd and fresh berries for a light, airy dessert perfect for any occasion.
- Prep Time: 20 minutes
- Cook Time: 1 hour 15 minutes
- Total Time: 1 hour 35 minutes to 2 hours
- Yield: 8-10 mini pavlova nests 1x
- Category: Dessert
- Cuisine: Australian
Ingredients
- 4 large egg whites, room temperature
- 1 cup (200 g) granulated sugar
- 1 teaspoon cornstarch
- 1 teaspoon white vinegar or lemon juice
- 1/2 teaspoon vanilla extract
- 1 cup (240 ml) lemon curd (homemade or store-bought)
- 1 to 1 1/2 cups fresh berries (blueberries, raspberries, strawberries)
- Optional: powdered sugar for dusting
Instructions
- Preheat oven to 250°F (120°C). Line a baking sheet with parchment paper or a silicone baking mat.
- In a clean, dry bowl, whip the 4 egg whites on medium speed until soft peaks form.
- Gradually add the 1 cup granulated sugar one tablespoon at a time while continuing to whip until glossy, stiff peaks form.
- Gently fold in 1 teaspoon cornstarch, 1 teaspoon white vinegar or lemon juice, and 1/2 teaspoon vanilla extract using a spatula.
- Spoon or pipe small dollops of meringue onto the prepared baking sheet, creating a slight well or nest in the center.
- Bake at 250°F (120°C) for about 75 minutes until dry and crisp on the outside. Avoid opening the oven door during baking.
- Turn off the oven and leave the meringues inside with the door slightly ajar to cool completely (30 minutes to 1 hour).
- Once cooled, spoon lemon curd into the nest centers and top with fresh berries. Dust lightly with powdered sugar if desired.
Notes
Use room temperature egg whites for best volume. Add sugar slowly to ensure smooth, glossy meringue. Cool meringues gradually in the oven with door ajar to prevent cracking. Store baked nests in an airtight container at room temperature for up to 2 days. Add lemon curd and berries just before serving to maintain crispness.
Nutrition
- Serving Size: 1 mini pavlova nest
- Calories: 150200
- Sugar: 25
- Sodium: 15
- Fat: 3
- Saturated Fat: 1.5
- Carbohydrates: 30
- Fiber: 2
- Protein: 2
Keywords: mini pavlova, lemon curd, berries, meringue, light dessert, gluten-free dessert, easy pavlova recipe, airy dessert